“Tester Teatime” is a blog post format, which addresses topics that testers deal with on a daily basis. As certain issues or topics tend to recur again and again, the aim here is to create a basis for explaining such phenomena and finding solutions for them. To that end, the blog focusses on stimulating discussions and new ways of thinking. In testing, we can learn a lot from each other by observing our behaviour in our daily lives!
Moderator: Welcome to Tester Teatime! In this interview with testers from ZEISS Digital Innovation (ZDI), we will once again discuss exciting topics.
Today, we are talking to Sandra Wolf (SW), a tester at ZDI, about “spelling”. Sandra, why are we discussing this topic and what’s the connection with software development?
SW: A tester’s normal workday is full of challenges. During the testing process in particular, full concentration is required as every detail has to be checked for quality. One of these details is spelling and grammar. The importance of correct spelling is often underestimated. In our daily work, it is not unusual to find spelling mistakes in the software. But the tester is often ridiculed when they report these to Development for correction. According to the prevailing view, these are only minor and insignificant errors. Today’s talk aims to dispel this opinion. Spelling and punctuation are not exactly the most popular topics and are often perceived as being very dry. Yet these very rules, which we have been learning since our school days, act as a guide for us and our brains. Spelled correctly, a word is easier to read, easier to combine in a sentence to form a statement and thus easier to process for the brain. Attentive readers – or in the case of software development – users will inevitably stumble across incorrect spelling in the software. It has even been demonstrated that certain personality types react differently to incorrect spelling in terms of their emotional response (cf. Weiß, 2016). Thus, contrary to their reputation as being dry, errors in this area can trigger emotions, which in turn affect use of the software.
Image: Stanislaw Traktovenko and Sandra Wolf during the interview at the Tester Teatime.
Moderator: What kind of influence are we talking about here?
SW: For instance, correct spelling radiates respectability. In job applications and official requests, error-free spelling is an absolute must. For example, studies have even shown that a loan application is less likely to be approved if there are linguistic errors in it (cf. Weiß, 2016). If we now apply this to the software we develop, only one possible conclusion can be drawn: Spelling is essential for the user experience and external appearance of the software. And so this topic should clearly be taken more seriously in the development process and receive more attention than it has previously. If we look at the common workday of testers and developers, we know that their focus is on the functionality of the software. Of course, it is understandable that a seemingly cosmetic issue like spelling takes a back seat to elaborately programmed application parts. However, this should not fool all those involved in the process as to its importance. For it is quite clear that the success of a product, and thus also of an application, can be affected by the linguistic quality. First impressions count: When reading a text or using a software, we automatically judge the level of education of the creators based on these (cf. Frost, 2020). Incorrect spelling can therefore cast a bad light on good software.
Moderator: Can you give me a detailed example of this?
SW: Poor spelling can lead to less confidence in the quality of the software and a resulting decline in acceptance of the application. The user might presume that little value is placed on quality in general if even the spelling is handled carelessly. After all, correct spelling expresses not only professionalism but also a certain respect for the reader/user. It has even been found that the quality of a text can affect whether a prospective buyer chooses to make the purchase. Placing this in the context of software development, it can definitely save money if attention is paid to spelling from the onset and reports of such errors are taken seriously (cf. Frost, 2020). Ultimately, we also present our company in our projects, which is why the issue of spelling can have more far-reaching effects than we may initially think. In the best case, good spelling can improve or maintain the reputation of our software development. This in turn can lead to more customers and higher sales because the consistent quality of our software products can be an argument in favour of working with ZDI.
Moderator: I would like to build on this and let Stanislaw Traktovenko (ST) from our usability team have his say. What is the importance of spelling from your point of view? Do you also see the impact to the extent described by Sandra?
ST: The way I see it, spelling has an impact on the readability and therefore on the perception of the information in the application. We assign this to the usability principles of consistency and language. Spelling errors therefore potentially have a direct impact on the usability of an application. For instance, incorrect spelling disturbs the flow of reading and thus the way the user perceives the software. It creates a negative sentiment and the user no longer engages in the task they were actually pursuing with the software. The user is distracted by the incorrect spelling and this affects the user’s effectiveness and efficiency. Even though spelling is only a small part of usability, it can have a bigger impact than we think, as Sandra explained earlier.
Moderator: Thank you Sandra and Stanislaw for these interesting insights. The impact is indeed more far-reaching than expected, which is quite amazing. We can thus summarise that the seemingly dry topic of spelling must be taken seriously in all software projects in order to deliver the highest possible quality and to adequately present both the products and our company. Though the topic of spelling may seem trivial at first, ultimately it has a major effect and is therefore important for all of us. The topic should therefore definitely receive the attention it deserves.
In the following articles, we will address other issues from the daily lives of testers and discuss possible solutions for these.
GraalVM has now been on the market for over two years. It promises two main benefits: better runtime properties and the integration of multiple programming languages.
This blog post will focus on performance; it will not look primarily at whether and to what extent a particular program is executed faster on the Graal JDK than on a conventional JDK. After all, the specific measured values and the relative comparisons are not solely dependent on the program being tested, and they have little general applicability. Moreover, they are merely snapshots: Both GraalVM and, to take one example, OpenJDK, are undergoing continuous development, meaning that the measured values will be continuously changing too. This blog post will instead look at mainly the following questions: Why should GraalVM have a much better performance? What makes it different from conventional JDKs? This will allow us to evaluate whether all programs are executed with a better performance or if no appreciable improvement can be expected, or whether the performance increase is only to be expected in certain application scenarios. And ultimately, whether this means “conventional” Java is too slow.
The development of compilers
The performance of a Java program is fundamentally determined by the compiler, and in this case too, our key focus is to establish what it is that makes GraalVM different. So first, let’s get an understanding of compilers.
In the early days of programming, there were no compilers at all – the machine code was programmed directly. This was confusing and difficult to understand, and it soon led to the development of an assembler code. However, in principle, this was a direct mapping of the machine code, the only difference being that alphabetic abbreviations were now used instead of binary or hexadecimal opcodes. We cannot speak of a programming language and compiler here, at least not within the scope of this blog post.
Over time, it became necessary to develop more and more complicated programs, and the assembly code became increasingly impracticable. For this reason, the first higher programming languages were developed in the 1950s. These needed a compiler to convert the source text into machine code.
The first of these was the classic AOT (ahead-of-time) compiler. The source text is analysed (syntax analysis) and transferred to an internal tree structure (syntax tree), which is used to generate machine code (code generation). This creates a binary file that can then be directly executed.
As an alternative to AOT compilation, a program can also be executed by an interpreter. In this case, the source text is read in and implemented by the interpreter line-by-line. The actual operations (e.g. addition, comparison, program output) are then executed by the interpreter.
Compared to the interpreter, the AOT compiler has the benefit that the programs are executed much faster. However, the generated binary files are system-dependent. What’s more, the interpreter has better error analysis capabilities, since it has access to runtime information, for example.
Java, interpreters and JIT compilers
When the Java programming language was being designed, one of the goals was to ensure that it was architecture-neutral and portable. For this reason, the Java source code was translated into platform-independent bytecode right from the outset. This could then be interpreted by a runtime environment or JRE (Java Runtime Environment). This meant the translated bytecode was platform-independent. For example, applets could be executed on a Windows PC, Mac or Unix workstation without any adaptations, as long as the JRE – regardless of the applet – was already installed on the workstations.
It is worth noting that this idea of a combined solution – AOT up to the bytecode, then interpretation at runtime – does not come from the world of Java. Pascal, for example, was using p-Code as long ago as the 1970s. [1]
When Java technology was released in 1995 [2], this platform independence initially went hand-in-hand with major drawbacks when it came to performance. Many of the programming languages that were relevant at the time, such as “C”, compile their source code directly in machine code (AOT). This can be run natively on the appropriate system, meaning performance is much better than with interpretation of the bytecode. At that time, many IT specialists had come to the conclusion that “Java is slow” – and they were right.
However, “high performance” became an additional goal in the process of designing the Java programming language, which is why the JIT (just-in-time) compiler was introduced in 1998 [2]. This significantly reduced the losses in performance due to pure interpretation.
In JIT compilation, the bytecode is initially interpreted at the program start, but the system continuously analyses the parts of the program to determine which are executed and how often. The frequently executed parts of the program are then translated into machine code at runtime. In future, these parts of the program will no longer be interpreted, and the native machine code will be executed instead. So in this case, execution time is initially “invested” for compilation purposes so that execution time can then be saved at each subsequent call.
JIT compilation therefore represents a middle ground between AOT compilation and interpretation. Platform independence is retained since the machine code is only generated at runtime. And as the frequently used parts of the program are executed as native machine code after a certain warm-up time, the performance is approximately as good as with AOT compilation. As a general rule, the more frequently individual parts of the program are executed, the more the other, interpreted parts of the program can be disregarded in the performance analysis. And this applies above all to frequently run loops or long-running server applications with methods that are called continuously.
Runtime optimisations
With the mechanisms we have looked at so far, the JIT compiler was platform-independent but could not achieve the execution time of the AOT compiler, let alone exceed it. At the time the JIT compiler was integrated into the JDK, it was by no means certain that this would be enough to see it triumph.
However, the JIT compiler does have one significant advantage over the AOT compiler: It is not solely reliant on the static source code analysis, and it can monitor the program directly at runtime. As the vast majority of programs behave differently depending on inputs and/or environment states, the JIT compiler can make optimisations with much greater precision at runtime.
One major benefit in this context is speculative optimisations, where assumptions are made that are true in most cases. To ensure that the program works correctly in all cases, the assumption is supported by a “guard”. For instance, the JVM assumes that the polymorphism is pretty much never used when a productive program is running. Polymorphism is obviously a good idea in general, but the practical application scenarios are usually limited to testing or to decoupling a codebase – and usually to enable use by various programs or for future expansion possibilities. Nonetheless, during the runtime of a specific productive program – and this is the scope of the JVM – the polymorphism is rarely used. The problem here is that, when calling an interface module, it takes a relatively long time for the existing object to find the appropriate method implementation, which is why the method calls are traced. If, for example, the method “java.util.List.add(…)” is called multiple times on an object of the type “java.util.ArrayList”, the JVM makes a note of this. For the subsequent method calls “List::add”, it is speculated that they are ArrayLists again. At first, the assumption is supported by a guard, and a check is made to determine whether the object is actually of the ArrayList type. This is usually the case, and the method that has already been determined multiple times is simply called directly using the “noted” reference.
Over two decades have passed since the JIT compiler was integrated into the JDK. During this time, a great many runtime optimisations have been integrated. The polymorphism speculation presented here is just one small example intended to illustrate the fact that a large number of optimisations have been devised – in addition to the compilation of machine code – that only work at runtime in a complex language like Java. If, for example, an instance is generated using reflection, it is difficult or even impossible for an AOT compiler to identify the specific type and implement speculative optimisation. The speed advantages of the current JIT compilers are therefore primarily based on the fact that they can monitor the program during execution, identify regular operations and ultimately integrate shortcuts.
GraalVM
GraalVM is a JDK from Oracle based on OpenJDK. It offers a virtual machine and a host of developer tools – but the same is also true of the other JDKs. So why is GraalVM generating much more attention that the other JDKs?
Firstly, GraalVM provides a GraalVM compiler, which was developed in Java. In addition, the entire JVM is to be rewritten in Java. In the last section, we showed that current JVMs offer high performance primarily because various optimisations have been included over the decades that are now adding up. These optimisations are mainly Java-specific and are mostly developed by people with a background in Java. If the execution environment is implemented in Java rather than C++, it is possible to make optimisations without any knowledge of C++. This puts the developer community on a broader footing over the medium and long term.
Another exciting aspect of GraalVM is that it supports more than just Java-based languages. The “Truffle language implementation framework” is a starting point for developing domain-specific languages (DSL). The GraalVM compiler supports languages developed with the Truffle framework, meaning these can also be executed in GraalVM and enjoy all the corresponding benefits. Certain languages, such as JavaScript, Python or Ruby, are already supported by GraalVM as standard. Since all Truffle languages can be executed jointly and simultaneously in GraalVM, it is referred to as a polyglot VM.
LLVM-based languages are also supported. LLVM is a framework project for optimising compilers [4][5]. In the LLVM project, compiler components and technologies for external compiler developments are provided, and compilers for many programming languages, like C/C++ or Fortran, are offered too. LLVM runtime is another component of GraalVM that can be used to execute LLVM-based languages on the basis of the Truffle framework in GraalVM. However, we will not go into the polyglot aspect any further as it deserves its own blog post.
GraalVM native image
The innovation that is most relevant to this blog post is native image technology. Native image is a GraalVM developer tool that uses bytecode to generate an executable file. It aims to achieve better performance and reduced main memory usage at runtime. However, we have said that Java is getting faster, with the JIT compiler translating all commonly executed (i.e. relevant) parts of the program into native machine code. The program is monitored during execution, and runtime optimisations are continuously made. So this might lead us to ask: What exactly could be improved here by orders of magnitude?
The answer is incredibly simple: the start time. Even with JIT compilers, the bytecode is initially interpreted. Firstly, the program start is not usually a frequently executed part of the program. Secondly, these parts of the program usually need to run a couple of times first for the JIT compiler to recognise that they are a worthwhile translation target. With runtime optimisations, the behaviour is the same: The program first needs to be monitored at runtime so that the appropriate optimisations can be recognised and integrated. Another complicating factor is that all required objects and their classes, including the complete inheritance hierarchy, need to be initialised at start-up.
Since we now have an idea of “what”, we are interested in knowing “how”: How can our program be made to start faster?
When generating the native image, the bytecode initially undergoes highly extensive static analysis. Amongst other things, this checks which parts of the code can actually be executed at runtime. This includes not only the classes provided by the user but the entire classpath, with the Java class libraries provided by the JVM. Only the identified source code fragments are included in the native image, so the scope is significantly reduced at this stage. However, a “closed-world assumption” is also proposed: As soon as anything is loaded dynamically at runtime, the native image tool has a problem. It does not recognise that these source code parts can also be executed and are thus required. For this reason, anything more than a simple HelloWorld program would not work this way, so when creating the native image you can – and must – give the tool more information about anything that can be called dynamically.
Following the static analysis, the first element that increases the start-up speed is implemented: Since the JIT compiler would start with interpretation, an AOT compiler is used to create machine code. The generated native image is, as the name suggests, machine code that can be executed natively. However, this means that platform independence is lost.
In addition to the natively compiled program, the Substrate VM is included in the native image. This is a stripped-down VM containing only the components required to execute the native image, like thread scheduling or garbage collection. The Substrate VM has its own limitations, with no support provided for a security manager, for example.
An additional increase in the start-up speed is achieved by initialising the native image in advance during creation. Following compilation, the program is started until the key initialisations have completed but no external input needs to be processed. On the basis of this started state, a disk image is created and included in the native image.
We have looked at the “what” and the “how”, and now we turn to a rather critical “why”: The AOT compiler has been known for half a century, and Java has now existed for a quarter of a century. Particularly in early days of Java, various AOT approaches were tried but none ever became established. Why should it be different this time? Why is a reduced start time now of interest, when it goes hand-in-hand with certain disadvantages? Why are high-performance response times in operation over consecutive days or weeks suddenly less important?
The answer can be found in cloud computing, where the services are provided in a different form. Previously, the services were primarily operated in an application container executed day and night and in which the program had already been fully optimised for days. It was usually the case that the application container was not eventually shut down, even when used sparingly (e.g. depending on the time of day). By contrast, the service infrastructure in the cloud can be shut down without problems when not used, enabling capacity to be preserved. At the next call, the infrastructure is started up again and the call is executed. This means that the programs in the cloud may execute a cold start for each call rather than running continuously. As a consequence, the “all at once” start time is extremely crucial. And as it can be expected that even more Java programs will be executed in the cloud rather than in an application container in future, there is likely to be an increased focus on the start time.
Hands on: HelloWorld
After all of that theory, let’s take a look at the JDK in operation. First, we will use the HelloWorld class shown in listing 1.
package de.zeiss.zdi.graal;

public class HelloWorld {

    public static void main(String[] args) {
        System.out.println("Moin!");
    }

}
Listing 1
Here is the classic variant: We are on a Linux VM and an OpenJDK is installed:
> java --version

openjdk 11.0.11 2021-04-20
OpenJDK Runtime Environment (build 11.0.11+9-Ubuntu-0ubuntu2.20.04)
OpenJDK 64-Bit Server VM (build 11.0.11+9-Ubuntu-0ubuntu2.20.04, mixed mode, sharing)

java 11.0.12 2021-07-20 LTS
Java(TM) SE Runtime Environment GraalVM EE 21.2.0.1 (build 11.0.12+8-LTS-jvmci-21.2-b08)
Java HotSpot(TM) 64-Bit Server VM GraalVM EE 21.2.0.1 (build 11.0.12+8-LTS-jvmci-21.2-b08, mixed mode, sharing)
With this setup, we compile the HelloWorld class (javac) and execute the generated bytecode on a JVM:
time java -cp target/classes de.zeiss.zdi.graal.HelloWorld
This gives us the following output:
Moin!

real    0m0.055s
user    0m0.059s
sys     0m0.010s
The total of the two lines “user” and “sys” is relevant to the evaluation here. This is the computing time required to execute the program – in this case, approx. 69 ms.
One note on the 55 ms: From the start to the end, the HelloWorld program required 55 ms of “real time” (the time perceived by the user), which is less than the 69 ms of computing time required. This is due to the Linux system having multiple processors. However, for the purposes of our measurements, we will analyse the computing time applied by the system. Firstly, the computing time is less dependent on the number of processors that have executed the program. And secondly, in the cloud, for example, this is the time that must be paid for by the application operator.
Now we are curious about GraalVM, which is available to download from its website [3]. The Enterprise version (“free for evaluation and development”) is suitable for our evaluation, as most of the performance optimisations are only found here.
The installation is very well documented for Linux and works with virtually no problems. GraalVM is then available for use as JDK.
> java --version

java version "11.0.12" 2021-07-20 LTS
Java(TM) SE Runtime Environment GraalVM EE 21.2.0.1 (build 11.0.12+8-LTS-jvmci-21.2-b08)
Java HotSpot(TM) 64-Bit Server VM GraalVM EE 21.2.0.1 (build 11.0.12+8-LTS-jvmci-21.2-b08, mixed mode, sharing)
We can now compile and execute our HelloWorld program in the same manner with the GraalJDK (javac). This gives us the following output:
Moin!

real    0m0.084s
user    0m0.099s
sys     0m0.017s
Interestingly, the JVM of the GraalJDK needs almost 70% more computing time to execute our HelloWorld example as bytecode. However, the significant performance benefits promised by GraalVM primarily relate to the use of native image technology, rather than to the execution of bytecode.
The native image (the developer tool) is not contained in the downloaded GraalVM, but the command-line tool “gu” (GraalVM Updater) exists for this purpose. This enables us to load, manage and update additional components. In this case too, we find very good support in the GraalVM documentation. Once the developer tool is loaded, we can now generate the native image from the bytecode. With such a trivial program as our HelloWorld example, a single command with the fully qualified class name as the argument is sufficient:
cd ~/dev/prj/graal-eval/target/classes
native-image de.zeiss.zdi.graal.HelloWorld
Creating the HelloWorld native image requires a good three minutes of computing time, and the executable program is approx. 12 MB in size. At first glance, we might compare the size with the bytecode: HelloWorld.class is only 565 bytes. However, the native image contains not only the compiled class but also all relevant parts of the Java class library and the Substrate VM. As a rough estimate, the native image is only 10% of the size of a JRE.
But let’s return to our native image, which we have now managed to create. We can then execute it and obtain the following output.
time ./de.zeiss.zdi.graal.helloworld
Moin!

real    0m0.004s
user    0m0.003s
sys     0m0.001s
For now, we can consider this result to be a relevant speed gain.
Hands on: HelloScript
One of the features of GraalVM that is highlighted again and again is that it is a polyglot VM, rather than just a Java VM. For this reason, we will expand our HelloWorld program to include a short digression into the world of JavaScript. The relevant source code is shown in listing 2. The key difference here is the transition required from the world of Java to the world of JavaScript.
package de.zeiss.zdi.graal;

import javax.script.ScriptEngine;
import javax.script.ScriptEngineManager;
import javax.script.ScriptException;

public class HelloScriptEngine {

    public static void main(String[] args) throws ScriptException {

        ScriptEngine jsEngine = new ScriptEngineManager().getEngineByName("javascript");

        System.out.print("Hello ");
        jsEngine.eval("print('JavaScript!')");
    }

}
Listing 2
Alongside this universal JavaScript connection via javax.script.ScriptEngine, we also want to try out the Graal-specific JavaScript connection using org.graalvm.polyglot.Context. The source text is shown in listing 3.
package de.zeiss.zdi.graal;

import org.graalvm.polyglot.Context;

public class HelloScriptPolyglot {

    public static void main(String[] args) {

        System.out.print("Hello ");
        try (Context context = Context.create()) {
            context.eval("js", "print('JavaScript!')");
        }
    }

}
Listing 3
The two HelloScript programs are translated into bytecode in the same way as the HelloWorld program. When the native images are created, the developer tool must be informed that the world of JavaScript will be used. This is done with the following call:
cd ~/dev/prj/graal-eval/target/classes
native-image --language:js de.zeiss.zdi.graal.HelloScriptEngine
native-image --language:js de.zeiss.zdi.graal.HelloScriptPolyglot
The bytecode can then be executed natively on the VMs or the native images. Since the HelloScriptPolyglot is Graal-specific, we cannot simply execute it on the OpenJDK.
A look at the measured values
Each of the three scenarios was executed as bytecode on the OpenJDK, bytecode on the GraalJDK and as a native image. The average program execution times are listed in Table 1.
Hello World
HelloScriptEngine
HelloScriptPolyglot
Bytecode OpenJDK
69 ms
1321 ms
X
Bytecode GraalJDK
116 ms
2889 ms
2775 ms
Native Image
4 ms
13 ms
11 ms
Table 1: Example of average program execution times
At first glance, we can see that the execution as a native image is much faster in all three scenarios than the conventional bytecode execution.
However, at second glance, we notice that the bytecode execution with GraalJDK requires much more computing time than with OpenJDK: In the HelloWorld example it needs nearly 70% more time, and in the HelloScriptEngine example it needs over 100% more. This was not communicated by Oracle, but in general it is not such a big problem since the faster bytecode execution is probably not the motivation for using GraalVM . Nevertheless, we should keep this fact in the back of our minds when we want to determine the relevant speed-up from the native image, since GraalVM must be installed in order to create the native image. If we measure the bytecode execution for comparison purposes and execute “java -jar …”, the bytecode is executed via GraalVM. However, since it is most likely that OpenJDK has tended to be used until now in productive operations, we should use this for comparison – and this means the speed-up would be “only” just over half as high.
Things to consider
If we want to achieve the promised performance gains, it is not enough to simply install GraalVM instead of a conventional JDK. During bytecode execution, it was not possible to achieve any performance gains – at least with our examples and setup. This is only possible if we use a native image, but we must keep in mind that this has several disadvantages when compared with bytecode execution.
In the native image, Substrate VM is used as JVM. This comes with certain restrictions. Aside from the fact that not all features are currently implemented, there are some things that are not even on the agenda, like a security manager.
We should also keep in mind the duration of the build process: For the native image, the start time does not simply disappear. With different approaches, the computing time is “simply” shifted, from the execution time to the build time. In our environment, it took more than three minutes to create our HelloWorld example, and the process of creating the HelloScript program took more than 20 minutes (HelloScriptEngine: 1291 s, HelloScriptPolyglot: 1251 s).
However, the biggest challenge is the “closed world assumption”. When the native image is created, a static code analysis is run and only the parts of the code that are run through are compiled in the native image. Although this works for our HelloWorld program, command line parameters had to be input for the JavaScript examples. Classes loaded via “reflection” are only recognised if the fully qualified class name is hard-wired in the source code. This results in problems with any technology that uses dynamic class loading in any form, including JNDI and JMX.
The parts of the program that are loaded dynamically can (and must) be explicitly specified when the native image is created. This includes all parts of the program, from the actual project code to all the libraries used, right up to those of the JRE. Since this configuration is a real challenge for “genuine” programs, tools are provided that are likely to be needed for it to work in practice. For example, the tracing agent monitors a program executed as bytecode. It detects all reflective access operations and uses them to generate a JSON configuration. This can now be used to create the native image.
In practice, the build pipeline would therefore initially create the bytecode variant. All automated tests can then be run with this bytecode variant, and the tracing agent detects the reflective access operations. Assuming that every program path is really executed in this process, the native image can then be generated in a further build step. This takes us directly to the next point: When working with native image technology, the build process becomes longer and more complex overall.
In summary, this means that some things are impossible or close to impossible when using native image technology (e.g. security manager). Although many other things generally work, they require extensive configuration. Tool support is available for this and is undergoing extremely dynamic development. The hope here is that the tools will be able to compensate for the additional work (aside from the build duration). However, this will also make the build process more complex and thus more susceptible to errors.
Pitfalls in Windows
Finally, we will take a look at the Windows platform, which is now also supported. In preparation for this blog post, the “GraalVM Enterprise 20.3.0” and “GraalVM Enterprise 21.0.0.2” versions were tested on a Windows system. Unfortunately, the relevant documentation was still a little lacking here and the tooling does not mesh quite as well as in the Linux environment, so there were some obstacles that were not noticeable in Linux. For instance, there was a problem creating a native image when the underlying bytecode was generated by a different JDK (in this case, by OpenJDK). The error message that appeared was not very helpful either, as it gave no indication of the actual cause.
native-image de.zeiss.zdi.graal.HelloWorld

[de.zeiss.zdi.graal.helloworld:20764]    classlist:     947.02 ms,  0.96 GB
[de.zeiss.zdi.graal.helloworld:20764]        (cap):   3,629.54 ms,  0.96 GB
[de.zeiss.zdi.graal.helloworld:20764]        setup:   5,005.98 ms,  0.96 GB

Error: Error compiling query code (in C:UsersxyzAppDataLocalTempSVM-13344835136940746442JNIHeaderDirectives.c). Compiler command ''C:Program Files (x86)Microsoft Visual Studio2019BuildToolsVCToolsMSVC14.28.29333binHostX64x64cl.exe' /WX /W4 /wd4244 /wd4245 /wd4800 /wd4804 /wd4214 '-IC:Program FilesJavagraalvm-ee-java11-21.0.0.2includewin32' '/FeC:UsersxyzAppDataLocalTempSVM-13344835136940746442JNIHeaderDirectives.exe' 'C:UsersxyzAppDataLocalTempSVM-13344835136940746442JNIHeaderDirectives.c' ' output included error: [JNIHeaderDirectives.c, Microsoft (R) Incremental Linker Version 14.28.29337.0, Copyright (C) Microsoft Corporation.  All rights reserved., , /out:C:UsersxyzAppDataLocalTempSVM-13344835136940746442JNIHeaderDirectives.exe , JNIHeaderDirectives.obj , LINK : fatal error LNK1104: Datei "C:UsersxyzAppDataLocalTempSVM-13344835136940746442JNIHeaderDirectives.exe" kann nicht ge?ffnet werden.]

Error: Use -H:+ReportExceptionStackTraces to print stacktrace of underlying exception
Error: Image build request failed with exit status 1
There was another pitfall when it came to operating across drives, as it is unfortunately not possible in Windows to install GraalVM on one drive (in this case, C:\Program Files) and execute it on another drive (in this case, D:\dev\prj\…):
native-image de.zeiss.zdi.graal.HelloWorld

[de.zeiss.zdi.graal.helloworld:10660]    classlist:   3,074.80 ms,  0.96 GB
[de.zeiss.zdi.graal.helloworld:10660]        setup:     314.93 ms,  0.96 GB

Fatal error:java.lang.IllegalArgumentException: java.lang.IllegalArgumentException: 'other' has different root
        at java.base/jdk.internal.reflect.NativeConstructorAccessorImpl.newInstance0(Native Method)
[…]
In addition, it was not possible to identify any performance benefits with the native image in the Windows environment. At present, Windows support (both the GraalVM toolchain itself and the generated native images) is thus rather experimental.
Summary
This blog post has looked primarily at how the start time for Java programs can be massively improved with GraalVM native image technology. It has shown what approaches and technologies GraalVM uses to do this. The results are backed up by measurements from example programs. However, certain challenges were mentioned that arise when native image technology is used.
Virtually no performance improvements can be expected for longer-running programs since the optimisations in conventional JVMs would also apply in such cases. For now, this is just an assumption. An investigation of this aspect would be beyond our scope here and has enough potential to merit its own blog post.
Let’s now turn to the questions from the introduction. In principle, “conventional” Java has not been slow for a very long time; in fact, it is extremely fast. Its use in the (computationally intensive) big data environment is enough of an indication that this is the case. The main prerequisite for a high level of performance is a certain warm-up time. The reverse conclusion is that starting a conventional Java program leaves a lot to be desired, and this is exactly where native image technology comes in. On the other hand, this technology comes with a number of drawbacks, particularly for large, technology-heavy applications.
In summary, GraalVM has the potential to establish itself in various fields of application. Applications in multiple languages could make use of the polyglot properties, and the use of the native image technology that we covered is definitely a viable option for cloud services in particular. However, the use of GraalVM is probably not worthwhile for applications that are computationally intensive (usually those that are longer-running) and non-trivial.
Finally, we should mention the fact that the compiler and optimiser are implemented in Java as a benefit of GraalVM. Although this is initially not better or worse than the previous implementations, it increases the chances of making better use of the potential of the Java community in the medium and long term.
Overall, it remains exciting. At the moment, it is not possible to foresee OpenJDK being replaced entirely. And we should remember that developments in that area are also continuing apace. Nevertheless, GraalVM certainly has the potential to establish itself (at least initially) in specific fields of application.
This blog post addresses the high standards of security and compliance that we have to meet in every software project. Trained security engineers are responsible for ensuring that we achieve this within any given project. An especially persistent challenge they face is dealing with the countless dependencies present in software projects, and getting them – and their variety of versions – under control.
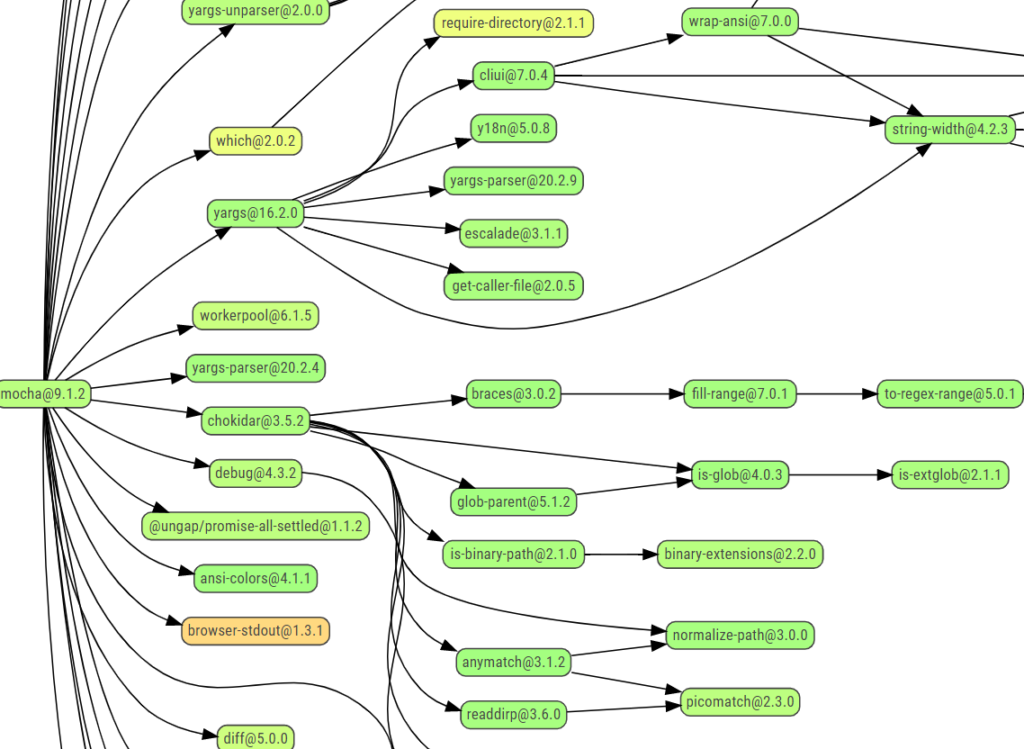
Figure 1: An excerpt from the dependency graph of an npm package, taken from npmgraph.js.org/?q=mocha
Challenges in software projects
For some time now, large-scale software projects have consisted of smaller components that can each be reused to serve their particular purpose. Components with features that are not intended to be kept clandestine are increasingly being published in the form of free and open-source software – or FOSS for short – which is freely licensed for reuse.
To assess and prevent security vulnerabilities, it is vital that we have a complete overview of all the third-party libraries we are integrating, as any of our imported modules may be associated with multiple dependencies. This can result in the overall number of dependencies that we are aware of stretching into the thousands – making it difficult to maintain a clear picture of licences and security vulnerabilities among the various versions.
Based on reports of incidents in recent years, such as supply chain attacks and dependency hijacking, there is no mistaking the significant impact that issues like these can have. For an interesting meta-analysis of breaches of this kind, we would recommend Ax Sharma’s article “What Constitutes a Software Supply Chain Attack” (https://blog.sonatype.com/what-constitutes-a-software-supply-chain-attack). Here, we’re going to delve deeper into how to handle components in both large-scale and small-scale software projects, working from the perspective of a security engineer.
FOSS scanning tool solutions
Over time, some projects have managed to overcome the issues associated with identifying FOSS components. Today, there are programs available for creating bills of materials (BOMs) and overviews of security risks, and we have tried these out ourselves.
There are also large catalogues such as Node Package Manager (npm), containing detailed information about the components available in any given case.
Open-source components of this kind might be free to use, but they still involve a certain amount of work, particularly in cases where they are being used in major and long-term software projects.
To perform our own evaluations, we have combined the OWASP Dependency-Check (DC) tool and the OSS Review Toolkit in order to create a solution for identifying security problems through DCs and checking that licensing conditions are being adhered to. Compared with commercial solutions such as Black Duck, these tools provide a free, open option for gaining an overview of FOSS components in projects and evaluating the risks associated with them.
That said, our experience has shown that these tools also involve additional work in the form of configuration and ongoing reviews (in other words, re-running scans in order to identify new security issues).
What software engineers are responsible for
Our guidelines for ensuring secure development and using open-source tools outline the processes we require and the goals that our security engineers have to keep in mind when they are approaching a project. Below is probably the most important part of those guidelines:
It is our responsibility that the following so called Essential FOSS Requirements are fulfilled:
All included FOSS components have been identified and the fitness for purpose has been confirmed.
All licenses of the included FOSS have been identified, reviewed and compatibility to the final product/service offering has been verified. Any FOSS without a (valid) license has been removed.
All license obligations have been fulfilled.
All FOSS are continuously – before and after release – monitored for security vulnerabilities. Any relevant vulnerability is mitigated during the whole lifecycle.
The FOSS Disclosure Statement is available to the user.
The Bill of Material is available internally.
For that it must be ensured that
the relevant FOSS roles are determined and nominated.
the executing development and procurement staff is properly trained and staffed.
These guidelines form the basis for developing mandatory training, equipping subject matter experts with the right knowledge and putting quality control measures in place.
The processes involved
Investigation prior to integration (licences and operational risks such as update frequency)
Update monitoring (operational risks)
Let’s say that a new function needs to be built into a software project. In many cases, developers will already be aware of FOSS tools that could help introduce the function.
Where feasible, it is important that whichever developer is involved in the project knows how to handle package managers and the potential implications of using them so that they know how to account for the results produced by tools or analyses. As an example, developers need to be able to visualise how many parts are involved in a top-level dependency, or evaluate various dependencies associated with the same function in order to maintain security in any future development work. In other words, they must be able to assess operational risks. More and more nowadays, we are seeing projects that aim to keep the number of dependencies low. This needs to be taken into account when selecting components so that, wherever possible, additional dependencies only provide the functions that are really needed.
Before integration, the security engineer also has to check potential imports for any security vulnerabilities and verify that they have a compatible licence. An equally important job is reviewing the operational risks, involving aspects such as the following:
How up-to-date the import is
Whether it is actively maintained or has a keenly involved community
Whether the update cycle is agile enough to deal with any security vulnerabilities that crop up
How important secure handling of dependencies is considered to be
Whether the number of additional dependencies is reasonable and whether it is reduced where possible
During the development process and while operation is taking place further down the line, the project team also has to be notified whenever new security vulnerabilities are identified or closed. This may involve periodic scans or a database with security vulnerability alerts. Periodic scans have the advantage of running more independently than a database, which requires hardware and alerts to be provided. However, alerts are among the benefits offered by software composition analysis solutions such as Black Duck.
As the number of well-marked FOSS tools rises, the amount of time that needs to be invested in curating them manually is becoming comparatively low. The work that does need to be done may involve declaring a licence – and adding easy-to-find, well-formatted copyright details to components, as these have often been given highly unusual formats or left out altogether in older components. Cases in which no licence details are provided should never be misconstrued as carte blanche invitations to proceed – without a licence, a component must not be used without the author’s consent.
Example of a security vulnerability
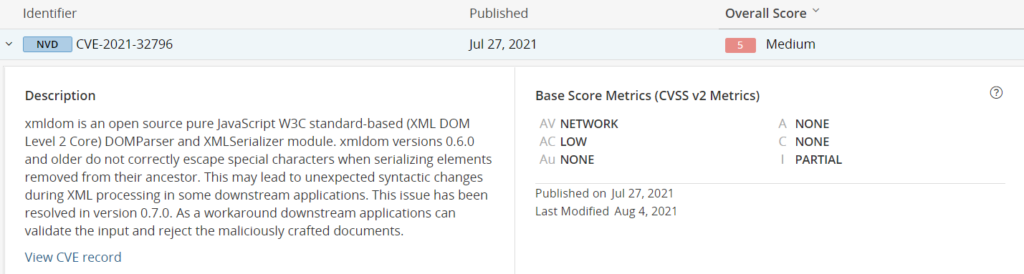
An example of a complex security vulnerability was published in CVE-2021-32796. The module creating the issue, xmldom, is indirectly integrated via two additional dependencies in our example project here.
Black Duck shows the following security warning related to the module:
Figure 2: Black Duck example summarising a vulnerability
This gives a security engineer enough information to make a broad assessment of the implications that this vulnerability has. Information is also provided with the patch in version 0.7.0.
The importance of having enough time in advance when it comes to running updates/replacing components
Before issuing new publications under @xmldom/xmldom, we have had the time to check how much work would be involved if we were to do without this dependency.
To benefit from this kind of time in a project, it is useful to gain an overview of potential issues right at the development stage, and ensure that there is enough of a time buffer leading up to the point at which the product is published.
This makes it easier for developers to evaluate workarounds for problematic software libraries, whether they are affected by security vulnerabilities, incompatible licences or other operational risks.
Summary
This post has provided an overview of the project work we do involving the large variety of open-source software out there, and has outlined what security engineers need to do when handling open-source software. By using the very latest tools, we are able to maintain control over a whole range of dependencies and establish the transparency and security we need. Dependencies need to be evaluated by a trained team before they are integrated and then monitored throughout the software lifecycle, with the team responding to any issues that may arise.
Software systems are becoming increasingly complex due to the constantly growing number of applications on different platforms. A decisive factor for the success of a software product is its quality. For this reason, more and more companies are carrying out systematic checks and tests, if possible, on the various platforms, in order to be able to ensure a given quality standard. In order to be able to keep short release cycles despite the higher testing effort, it becomes necessary to automate the tests. This in turn leads to the need to define a test automation strategy. One of the first steps in introducing a test automation strategy is to evaluate suitable test automation tools. Since each project is unique, both the requirements and the choice of tools vary. This blog series is intended to provide guidance in selecting the appropriate solution.
Figure 1: Evaluating suitable test automation tools is an important part of introducing a test automation strategy.
Introduction
As part of my final thesis, I took on the task of providing the Scrum teams at ZEISS Digital Innovation (ZDI) with an aid to help them find the right test automation tool quickly and flexibly. The challenge here was that the projects have specific scenarios and the requirements may have to be weighted separately. I would like to present the status of the work and the results to you in this and the next blog articles.
Software development has long been an area of rapid change. But while in the past these developments have mainly taken place at the technological level, we are currently observing major changes in the area of processes, organisation and tools in software development. However, these new trends come with challenges such as changes in requirements management, shortened timelines and especially the increased demands on quality. Today, the development of needs-based solutions and the optimisation of quality increase both efficiency and effectiveness within software development.
In addition, software systems are becoming more and more complex due to the constantly growing number of applications on different platforms. Since quality is a decisive factor for the success of a software product, more and more companies are carrying out systematic checks and tests, if possible, on the various platforms, in order to ensure a given quality standard. A SmartBear survey conducted in early 2021 found that many companies, regardless of the sector, already perform different types of testing, with web application testing leading the way at 69% and API/web services testing second at 61%. Desktop testing is done by 42% of the respondents. A total of 62 % of the respondents state that they perform mobile testing, 29 % of which for native applications (apps) (SmartBear, 2021, p. 12). In order to be able to maintain short release cycles despite the higher testing effort, it is becoming necessary to automate the tests.
As ZDI, we support our customers inside and outside the ZEISS Group in their digitisation projects. We also offer individual test services. That is why we have a large number of projects with different technologies and different solutions. As a small selection, keywords such as Java, .Net, JavaFX, WPF, Qt, Cloud, Angular, Embedded etc. should be mentioned here. In such complex projects, quality assurance is always in the foreground and the projects are dependent on the use of modern test tools that support the project participants in the manual, but especially in the automated tests. It would be desirable to have a tool that supports this automation effectively and efficiently. However, testers face a variety of challenges when selecting a test automation tool.
Challenges
In the research and interviews conducted as part of my work, the greatest challenges in test automation were named as the variety of test tools available. Due to this fragmentation a variety of tools is available for the same purpose.
The choice becomes even more difficult because the tools differ not only in the technology they can test, but also in their work approach. When automation is mentioned, it is always associated with scripting. In recent years, however, a new approach to GUI testing has been developed called NoCode/LowCode. This approach basically requires no programming knowledge and is therefore popular with automation beginners. Nevertheless, scripting remains the dominant method, although sometimes both approaches are used to involve as many of the quality assurance team as possible (SmartBear, 2021, p. 33).
The type of test automation approach, and therefore the use of a test automation tool, depends on the requirements in the project. This means that the requirements must always be re-examined for each new project.
Inventory
In the course of the interviews, the analysis of the current approach and the evaluation of an internal survey, I was able to identify the following procedures for the selection of tools in the projects, which have become established as a “quasi-standard”:
Das The tool is Open Source and costs nothing.
The tool has been used before and is considered trustworthy.
One aim of the survey was to find out to what extent the project situation has an influence on the tool selection. Therefore, the next step was to examine the project situations and the process models used in the projects and their influence. It turned out that it is not the process models that have a direct influence on the tool selection, but the people or groups who use the tool as future users or who approve its use.
When examining the influence of these operationally-involved participants, it became apparent that there are other interest groups that have a direct or indirect influence on the selection of a tool. These are, for example:
Software architects, who define the technology or tool chains within the project,
The management, which sets guidelines for the purchase or use of tools (OpenSource, GreenIT, strategic partnerships, etc.) or
The company’s IT, which prevents the use of certain tools through the infrastructure used (firewall, cloud, etc.).
Furthermore, the first approaches of checklists for the selection of test tools were already found during the research. They were mostly based on a few functional criteria and were determined in workshops by the project members. The evaluation showed that there was no uniform method and that the tools selected in this way were very often later replaced by other tools. This became necessary because essential requirements for the tool were overlooked during the selection.
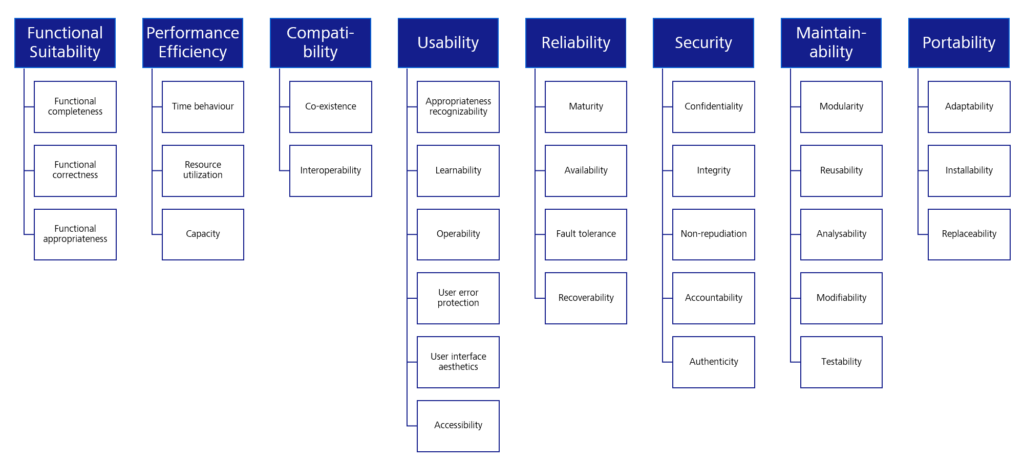
In the majority of cases, the forgotten requirements were of a non-functional nature, such as usability criteria or performance requirements. Therefore, a next step in checking relevant criteria was to refer to ISO/IEC 25000 Software Engineering (Quality criteria and evaluation of software products.
Figure 2: Criteria for software according to ISO/IEC 25010
The next blog article in this series will show how the criteria catalogue is structured and how the final list of criteria is composed.
Literature
SmartBear (2021): State of Software Quality | Testing.
This article was technically supported by:
Kay Grebenstein
After graduating in computer sciences, Kay Grebenstein was drifting over to “The Dark Side” of software development and he is now working as a software tester and agile QA coach at ZEISS Digital Innovation, Dresden. Over the last few years, he was responsible for quality assurance and software testing in many projects in different business domains (telecommunications, industry, commerce, energy sector, …). He has experience with both the classical as well as the agile process models.
A large part of the apps we use regularly provide individual data and services for different users and therefore need to be able to clearly identify their users.
The classic approach here would be to build a login form and manage it with its own user database, but this can have some disadvantages. This article presents the alternative approach with the protocols “OAuth” and “OpenID Connect”, which were developed for the purpose of secure authentication and authorisation.
Disadvantages of the classic login forms
The classic variant of user authentication described at the beginning has some disadvantages:
Security
Building security-critical functions yourself is always associated with a certain risk. With passwords, for example, it is not enough to simply store hash values. Because the passwords must be secure even if the worst-case scenario occurs and the database falls into the hands of hackers. Special procedures are available for this, but they must also be implemented correctly. In case of doubt, it is therefore generally better to rely on established and expert-reviewed free products than to copy them yourself.
Effort
A simple login mask is not enough. Other processes such as registration, changing a password, forgetting a password, etc. must also be considered and implemented. And, of course, there are also best practices here, for example with regard to usability, which should be taken into account. The effort required to implement all these aspects in a high quality should not be underestimated.
Two-factor authentication
To further increase security, users should be given the option to use a second factor for login. This can be, for example, a one-time code sent by SMS or generated by an Authenticator App. But hardware tokens are also popular. This increases security enormously, as it is no longer sufficient to guess the password. Instead, attackers must additionally be in possession of the smartphone or hardware token. However, implementing these additional security features oneself is not only error-prone, but, see previous point, also labour-intensive.
Central account management
Especially in a corporate context, it is often an important requirement that account information can be used from a central administration (e.g. LDAP, Active Directory). If employees have a company account anyway, why should they create an additional account with (hopefully) an individual password for each company-internal application? The possibility for Single-Sign-On additionally increases user comfort. And even outside the corporate context, many people do not want to create a separate account and remember the access data for every app and every website, but prefer to use a central identity provider.
“OAuth” and “OpenID Connect” as a solution approach
With the “OAuth” and “OpenIDConnect” protocols, two protocols are available that were developed precisely for this purpose.
In practice, however, the actual implementation of these standards usually presents a certain hurdle, especially when one comes into contact with these procedures for the first time. On the one hand, this is due to the fact that the processes are somewhat more complex than a simple adjustment with a stored password hash. Another reason might be that the standards provide for several variants (so-called flows) that are used in different situations. As a newcomer, one is quickly confronted with the question of which variant is best for one’s own application and how it should then be implemented in concrete terms. The answer to this question depends in particular on the type of application, i.e. whether it is a native mobile app, a classic server-side rendered web application or a Single-Page App, for example.
In this article, we do not want to go into too much depth about the two protocols (if you want to learn more about OAuth and OpenID Connect, we recommend this very good lecture on Youtube: https://www.youtube.com/watch?v=996OiexHze0).
Instead, we want to pick out a concrete use case that occurs relatively often in our projects: we build a Single-Page-App (SPA) that is delivered statically. This means that there is no frontend logic on the server, only JavaScript and HTML files are provided. Instead, the server simply provides an API for use by the SPA (and other clients) to fetch data and perform operations. This API could be implemented using REST or GraphQL.
As usual with OAuth, a separate authentication service is used here, so we do not want to implement the user management ourselves. This could be a cloud provider or self-hosted software, for example the free open-source authentication server “Keycloak”. The only important thing is that the authentication service “speaks” OAuth2/OpenID Connect.
The exciting thing about this constellation is that, unlike with a server-side processed web frontend, authentication initially takes place outside the sphere of influence of the server (i.e. purely client-side in the SPA or in the user’s browser). However, the SPA must then send requests against the server API, whereby the server must first mistrust the credibility of the requests and check the authentication again independently.
Working with OAuth: Implicit Flow and Authorisation Code Flow
The OAuth specification specifies several flows, but for our purpose we will only take a closer look at two: The so-called “Implicit Flow” and the “Authorisation Code Flow”. Ultimately, both variants involve the Auth Provider issuing a so-called “Access Token” to the application, which the application then sends to the API server with all requests. The API server, in turn, can use the Access Token to determine the authenticity of the request. The only difference between the flows is how exactly the Access Token is issued.
For years, the ImplicitFlow was the recommendation for use in JavaScript applications in the browser. First, the application forwards the user to a login page of the Auth Provider. Once the user has logged in, the Auth Provider redirects the browser back to the original page and passes the Access Token to the application as part of the response. However, this is exactly where the problems lie with this variant. It is possible for an attacker to obtain the Access Token in various ways, for example by manipulating the redirects so that the Access Token is no longer sent to the actual app but to the attacker.
Figure 1: Implicit Flow
From the beginning, the Implicit Flow was an emergency solution for JavaScript applications in the browser. At the time of standardisation, there was no possibility for browser scripts to execute requests on servers other than their own (so-called Same-Origin Policy). This meant that the execution of the actually better Authorisation Code Flow was not possible. In the meantime, a system has been introduced with the so-called CORS mechanism (for Cross-Origin Resource Sharing), which closes precisely this gap and allows requests to be made to other servers, as long as they allow access.
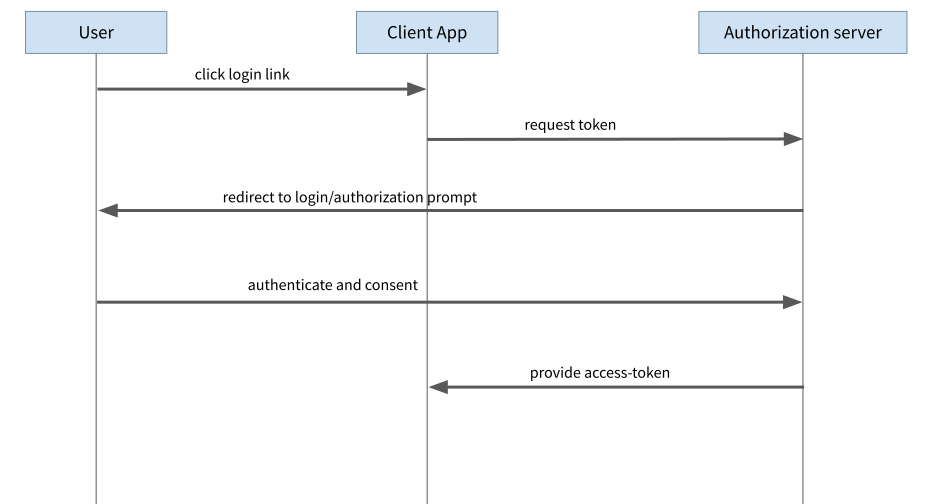
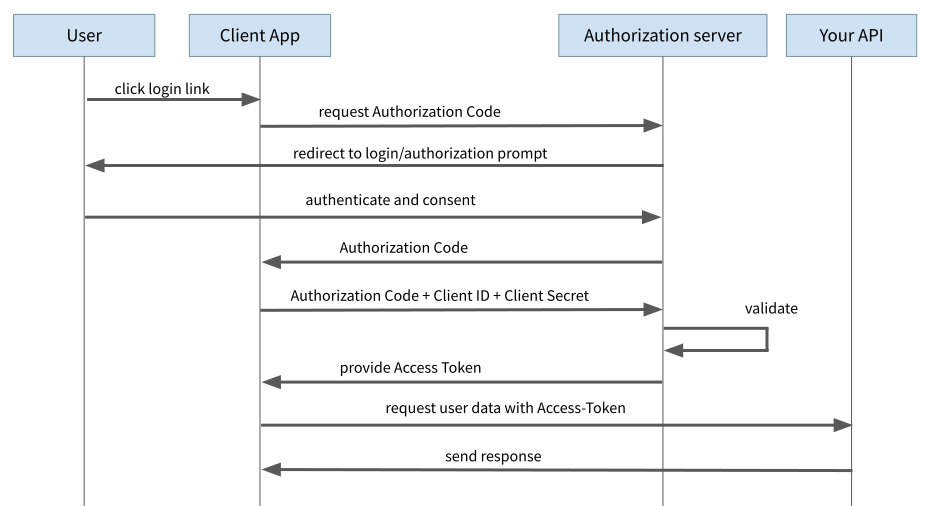
With the AuthorisationCodeFlow, there is also a redirect to the login page of the Auth Provider. Instead of an Access Token, however, the Auth Provider only sends a so-called “Authorisation Code” to the client. In a separate request, this Authorisation Code must be sent to the Auth Provider together with the “Client ID” and the “Client Secret” and exchanged for the Access Token. The Client ID identifies the client (in our case the Single-Page App) and enables the Auth Server to apply different rules for different clients. The Client ID is in principle publicly known and appears in some apps/services as part of the URL.
The Client Secret, on the other hand, is a secret code that only this one client is allowed to use to identify itself to the Auth Server (we will come back to this in a moment). The crucial point here is that this second request is not implemented as a GET request but as a POST request. This means that the transmitted information is not part of the URL and is protected from the eyes of hackers by means of HTTPS (which of course must be used).
Figure 2: Authorization Code Flow
The Problem with the Browser-based Single-Page-App
Actually, this flow is primarily intended for server-side rendered web applications, so that the exchange of the authorisation code for the access token takes place on the server. In that case, the client secret in particular can remain on the server side and does not have to be transmitted to the browser.
With single-page apps, however, the entire process has to take place in the browser and therefore the app also needs the client secret. The difficulty is therefore to keep the client secret “secret”. In practice, this turns out to be practically impossible, because ultimately the client secret must be bundled as part of the application code and delivered to the browser.
Bundling in modern SPA frameworks produces unreadable JavaScript code, but it remains JavaScript and an attacker could look at this code, extract the client secret and thus compromise the application. The solution to this is “PKCE”.
Authorization Code Flow with PKCE
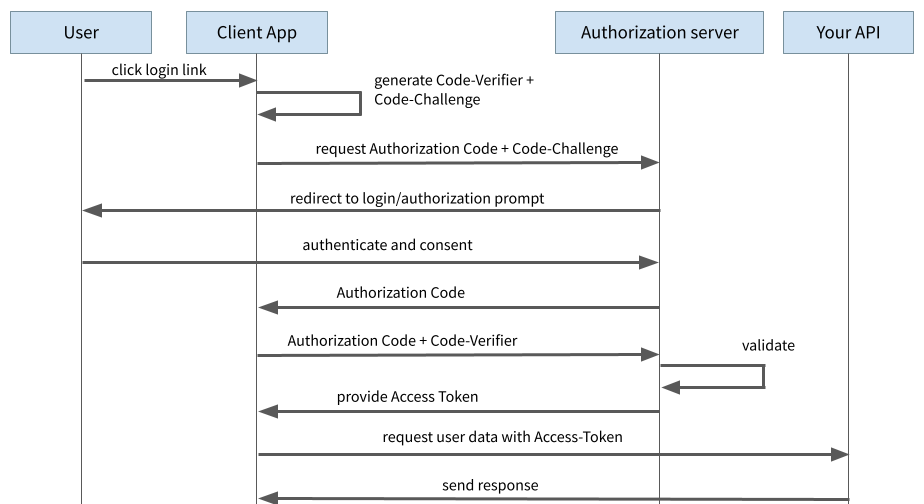
PKCE stands for “Proof Key for Code Exchange” and is an extension of the authorisation code flow. Here, no static client secret is used and instead, in principle, a new secret is generated dynamically for each authentication process.
For this purpose, a so-called “code verifier” is generated at the very beginning. This is a string of random numbers. The code verifier is used to calculate the “code challenge” by hashing the code verifier with the SHA256 hash method.
During the initial login process to request the authorisation code, the application sends the code challenge to the auth provider. The auth provider remembers the code challenge and responds with the authorisation code as before.
Figure 3: Authorization Code Flow with PKCE
With the subsequent request for the exchange of the Authorisation Code against the Access Token, the client now sends the Code Verifier along. The Auth Provider can now check whether the Code Verifier and the Code Challenge match by hashing with SHA256.
With this procedure, an attacker can no longer extract the Client Secret, since no such Client Secret exists anymore. The most an attacker could do from the outside would be to pick up the Code Challenge, as this is transmitted to the Auth Provider via a browser redirect during the initial request. However, the attacker has no knowledge of the Code Verifier and cannot derive it from the Code Challenge. Without the Code Verifier, the Auth Provider does not issue an Access Token, which successfully blocks an attacker.
Originally, the PKCE procedure was developed primarily for native mobile apps, but it can also be used to securely implement Single-Page Apps that are publicly visible in the source code. And not only that: the procedure is now even recommended for other types of applications, such as server-side applications, for which the normal Authorisation Code Flow with Client Secret was previously intended.
PKCE in detail
Since Authorisation Code Flow with PKCE is the method of choice for Single-Page Apps, let’s take a closer look at the individual steps.
Code Verifier and Code Challenge
First, the Code Verifier and Code Challenge are calculated:
In this and the following examples, I use truncated random values to better represent the individual steps and parameters. In a real application, of course, real random values must be generated here.
However, random values in a security context are a topic of their own and therefore we do not want to go into detail here about how exactly the Code Verifier is generated. As a keyword, however, the relatively new Web Crypto API should be mentioned, which among other things provides functions for generating secure random numbers. The Web Crypto API also provides the right tools for hashing using SHA256.
Request Token
Now a redirect or GET request is executed to obtain the Authorisation Code:
The Code Challenge and the method used to calculate the Code Challenge (in our case SHA256) are included in the request.
In addition, a so-called “state” parameter is given, which also consists of a random value. We will discuss this in more detail in a moment.
Login and Redirect
The browser is redirected to the login page at the Auth Provider, where the user can log in and authorise the app. The Auth Provider then redirects back to the app using the “request_uri” parameter passed in the first request. As a rule, one or more valid redirect URIs are configured in the Auth Provider to prevent an attacker from manipulating the request and trying to impose a forged redirect URI.
The redirect URI must of course be configured in the router of the Single-Page App and accept the parameters that the Auth Provider wants to communicate to the client. The request for this looks something like this:
The Authorisation Code is a token that we want to exchange for the actual Access Token in the next step (again, I would like to point out that I am using made-up and abbreviated random values here for the sake of simplicity. A real Authorisation Code looks different).
In addition, the state parameter appears again. We generated this as a random value in the previous step and sent it to the Auth Provider. The Auth Provider sends the state back unchanged. In this way, our Client App can find out whether the Response Request actually follows its own Token Request or not. Should an attacker have initiated a Token Request, the corresponding state parameter would be unknown to the app and the request would be directly exposed as insecure. This procedure protects especially against so-called CSRF attacks (Cross Site Request Forgery, further explanation here: https://security.stackexchange.com/questions/20187/oauth2-cross-site-request-forgery-and-stateparameter).
Exchange Code for Access Token
Now we can exchange our Authorisation Code for the actual Access Token. To do this, we start a POST request:
We pass the Authorisation Code and the Code Verifier as parameters. As a response, we finally receive the Access Token, which we can then use for requests against the API server. The answer looks something like this:
We receive the Access Token and some further information about the token.
What exactly does an Access Token look like? The “JSON Web Token” standard, or JWT for short, has established itself as the format. This not only enables the standardised exchange of authentication/authorisation data, but also the verification of the tokens. Both symmetrical and asymmetrical verification is available for confirmation. This allows our API server to check the validity of the Access Tokens without having to contact the Auth Provider for each request.
Increase user-friendliness with the Refresh Token
Another aspect of OAuth are so-called “Refresh Tokens”. In the previous example, we received such a token together with the Access Token. The idea is to keep the validity of Access Tokens as short as possible (in the range of a few minutes to a few hours). When the Access Token expires, it must be renewed. This has the advantage that any compromised access tokens can only cause limited damage. In addition, with OAuth, users have the possibility to cancel their authorisation, i.e. for example to revoke the authorisation of an app to access their own data at the Auth Provider. Since the API server does not communicate with the Auth Provider to verify Access Tokens, the API server is not aware of this revocation of rights.
However, as soon as the old Access Token has expired and a new one has to be obtained, the new authorisations take effect. However, for reasons of convenience, you do not want to ask your users to log in again every few minutes. For this reason, the Auth Provider transmits a longer valid Refresh Token. This is stored in the Client App and used when the Access Token expires to get a new Access Token from the Auth Provider. In this case, the Auth Provider does not request a new login from the user. However, if the user has previously revoked the authorisation for the app, the Auth Provider will no longer issue new Access Tokens. It is important to note that the Refresh Token is even more valuable than the Access Token and must therefore be protected from access by unauthorised third parties at all costs!
Conclusion
OAuth is an exciting protocol that can securely solve most questions around authentication and authorisation. However, the topic is not exactly beginner-friendly and at the beginning the many terms and processes can quickly overwhelm you.
Once you have finally got to grips with the subject, the question of implementation arises. Especially for Single-Page Applications, there are still many instructions on the web that refer to the Implicit Flow, which is no longer recommended. With PKCE, however, an extension is available that also enables the better Authorisation Code Flow for JavaScript applications.
Numerous libraries exist to simplify the implementation. On the one hand, cloud providers who use OAuth often offer their own help libraries. However, it is also recommended to take a look at the library “OIDC-Client” (https://github.com/IdentityModel/oidc-client-js), which offers a provider-independent solution. In addition to pure OAuth, this library also supports the extension “OpenID Connect”, which supplements OAuth with functions for user profiles and authentication. The library does abstract the individual steps of the OAuth flows, so that one no longer has to “struggle” with the individual requests and their parameters. However, a certain basic understanding of the processes is still useful and helps in the sensible use of the library.
Since the beginning of the Covid pandemic the healthcare sector has been under enormous pressure. The demographic development, the change in the spectrum of diseases, legal regulations, cost pressure and a shortage of specialists combined with the increasing demands of patients, present healthcare organisations with a number of challenges. Here, digitalisation and the use of modern technologies such as artificial intelligence or machine learning offer numerous opportunities and potentials for increasing efficiency, reducing errors and thus improving patient treatment.
Figure 1: Digital Health Solutions with Azure Health Data Services for optimal and future-proof patient care
Use of medical data as the basis for optimised patient care
The basis for the use of these technologies and for future-oriented predictive and preventive care is medical data. This can already be found everywhere today. However, most healthcare professionals and the medical devices in use still store this on-premise, resulting in millions of isolated medical data sets. In order to get a fully comprehensive overview of a patient’s medical history and, based on this, to create treatment plans in terms of patient-centred therapy and to be able to derive overarching insights from these data sets, organisations need to integrate and synchronise health data from different sources.
To support the development of healthcare ecosystems, the major global public cloud providers (Microsoft Azure, Amazon Web Service and Google Cloud Platform) are increasingly offering special SaaS and PaaS services for the healthcare sector that can provide companies with a basis for their own solutions. Through our experience at ZEISS Digital Innovation as an implementation partner of Carl Zeiss Meditec AG and of customers outside the ZEISS Group, we recognised early on that Microsoft offers a particularly powerful healthcare portfolio and is continuing to expand it strongly. This became clear again at this year’s Ignite.
ZEISS Digital Innovation (right) at Ignite 2021 talking about how to get long-term value from healthcare data with Microsoft Cloud for Healthcare. (Click here for the full video)
Medical data platforms based on Azure Health Data Services
One possibility for building such a medical data platform as the basis of an ecosystem is the use oAzure Health Data Services. With the help of these services, the storage, access and processing of medical data can be made interoperable and secure. Thousands of medical devices can be connected to each other and the data generated in this way can be used by numerous applications in a scalable and robust manner. As Azure Health Data Services are PaaS solutions, they can be used out of the box and are fully developed, managed and operated by Microsoft. They are highly available with little effort, designed for security and are in compliance with regulatory requirements. This significantly reduces the implementation effort and thus also the costs.
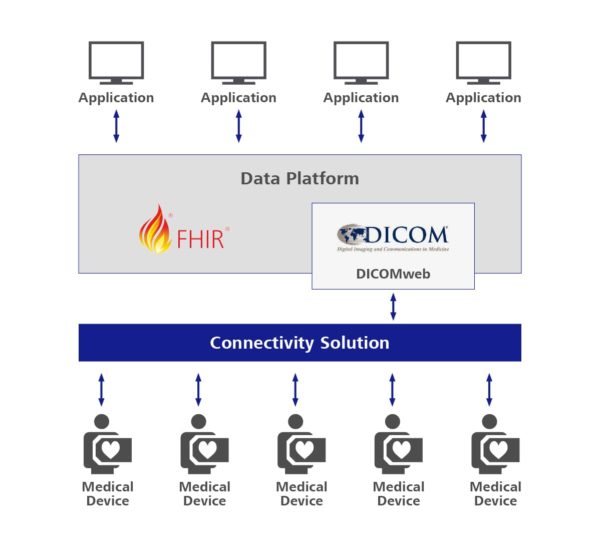
Carl Zeiss Meditec AG also relies on Azure Health Data Services to develop its digital, data-driven ecosystem. The ZEISS Medical Ecosystem, developed together with ZEISS Digital Innovation, connects devices and clinical systems with applications via a central data platform, creating added value at various levels to optimise clinical patient management.
The DICOM service within Azure Health Data Services is used here as the central interface for device connection. As DICOM is an open standard for storing and exchanging information in medical image data management, the majority of medical devices that generate image data communicate using the DICOM protocol. Through an extensible connectivity solution based on Azure IoT Edge, these devices can connect directly to the data platform in Azure using the DICOM standard. This allows a wide range of devices that have been in use with customers for years to be integrated into the ecosystem. This increases acceptance and ensures that more data can flow into the cloud and be further processed to enable clinical use cases and develop new procedures.
Azure API for FHIR® serves as the central data hub of the platform. All data of the ecosystem are stored there in a structured way and linked with each other in order to make them centrally findable and available to the applications. HL7® FHIR® (Fast Healthcare Interoperability Resources) offers a standardised and comprehensive data model for healthcare data. Not only can it be used to implement simple and robust interfaces to one’s own applications, but it also ensures interoperability with third-party systems such as EMR systems (Electronic Medical Record), hospital information systems or the electronic patient record. The data from the medical devices, historical measurement data from local PACS solutions and information from other clinical systems are automatically processed, structured and aggregated centrally in Azure API for FHIR® after upload. This is a key factor in collecting more valuable data for clinical use cases and providing customers with a seamlessly integrated ecosystem.
Figure 2: Building a medical data platform with Azure Health Data Services
Successful collaboration between ZEISS Digital Innovation and Microsoft
As early adopters of Azure Health Data Services, our development teams at ZEISS Digital Innovation work closely with the Azure Health Data Services product group at Microsoft headquarters in Redmond, USA, helping to shape the services for the benefit of our customers. In regular co-creation sessions between the ZEISS Digital Innovation and Microsoft teams, the solution design for currently implemented features of the Azure Health Data Services is discussed. In this way, we can ensure that even the most complex use cases currently known are taken into account.
We are working very closely with ZEISS Digital Innovation to shape Azure’s next generation health services alongside their customer needs. Their strong background in the development of digital medical products for their customers is a core asset in our collaboration and enables the development of innovative solutions for the healthcare sector.
Steven Borg (Director, Medical Imaging at Microsoft)
Elisa Kunze has been working at ZEISS Digital Innovation since 2013. During her various sales and marketing activities she supported lots of different projects, teams and companies in various sectors. Today she supports her clients in the health sector as a key account manager and supports them in implementing their project vision.
A not inconsiderable part of the work of a software architect consists of comparing different solution alternatives with each other. Decision tables or evaluation matrices are often used for this purpose, whereby both terms are usually used synonymously. This article aims to provide an insight into two basic approaches and to evaluate them according to their suitability.
Figure 1: Software architects often have to compare different solution alternatives with each other. To do this, they often use certain evaluation matrices.
Types of evaluation matrices
Evaluation methods for comparing several options range from simple rankings based on voting to complicated evaluation methods based on matrices calculations. The challenge is to find the most appropriate methodology for an objectified evaluation of the comparison of two options available. Criteria for this are:
Fast comparison
Simple, uncomplicated procedure
Little to no training time
Any number of people
After a brief comparison of the evaluation methods based on the criteria mentioned, the very widespread and well-known utility value analysis turns out to be the method of choice here. Why? Because it is an uncomplicated and simple way of comparing options on the basis of various criteria without the need for a great deal of mathematical effort. In the utility value analysis, the variants are evaluated with a score using weighted criteria, the weighting and score are multiplied together and all the evaluations for an option are added up (see example).
Figure 2: Evaluation of the individual variants in a utility value analysis
This procedure should be familiar to almost everyone and is also used in practice in many areas. In addition to the evaluation by the person giving the score, there is a potential source of subjective error: the weighting of the criteria. Since score allocation cannot be made more objective, a way of calculating the weighting objectively must be found. This is absolutely essential if a meaningful utility value analysis is required. Objective weighting ensures that no “mindless” decisions are made, e.g. due to time pressure, and that the weighting is as independent of the observer as possible.
Procedure for calculating weighting
As with the utility value analysis, the procedure should be uncomplicated, quick and require no training. Under these premises, two procedures in particular emerge, which are briefly explained in the following below.
Graduated weighting
In the graduated weighting calculation, all criteria are compared with each other in terms of their importance. Thereby, the scale comprises five gradations from -2: “significantly lower importance” to 2: “significantly higher importance”. This granular assessment must therefore be made for each pairing of criteria. The weighting is then calculated using a method similar to matrices calculation.
Figure 3: Example of a scale with graduated weighting
Priority weighting
Here, the granular evaluation is dispensed with and a distinction is only made between “more important” and “less important”. Thus, each criterion is compared with each other and the more important one is noted in the table. The relative proportion of the number of a criterion is then used to determine the weighting. This procedure can be integrated well in a team, because after the ranking by the individuals, all results can be combined and thus a representative weighting is obtained.
Figure 4: Example of priority weighting of individual criteria
When is which procedure suitable?
In principle, any weighting procedure can be used in any situation. However, the following table gives indications for which calculation method can be advantageous in which circumstances.
Graduated weighting
Priority weighting
Low number of criteria
High number of criteria
Low number of evaluating persons
High number of evaluating persons
Sufficient time available
Little time available
Especially important decision
In summary, it can be said that the procedure of graduated weighting is often too labour-intensive if one assumes in practice that decisions are sometimes not even accompanied by a representative evaluation procedure. Priority weighting, on the other hand, is an uncomplicated option that can be quickly understood and also implemented in a team and is therefore particularly recommended.
In addition to the utility value analysis, other methods and indicators can be used to compare variants, such as standard deviation, number of gains/losses, etc., which should make the final decision easier, but which are not part of this article.
Many projects work with databases, and of course the performance of the system has to be tested. Usually, smaller amounts of data are entered by means of manual tests, but how do you get bulk data?
The usual answer is, of course: “Buy one of the tools” – and usually rightly so. These tools have an (often) fairly easy-to-use UI, are quick and above all they can generate semantically meaningful data.
Figure: To perform a meaningful performance test for databases, testers need to simulate the processing of both small and large amounts of data.
Generating data with SQL
However, with a little SQL you can also generate such data yourself. It gets interesting when linking multiple tables, which plays an important role in the following example.
Scenario: Our project manages companies and their plants and for them invoice data is to be generated. There are different views and queries for this data in the project. We want to have some areas with little data (to test the functioning of the system), but also bulk data.
First, we create the companies (here only three of them) with a single instruction. This is the first important point to achieve good performance in the generation of the data. Of course, you could write three INSERT statements one after the other or use a loop 1-3 with PL/SQL. But after a certain amount of data, that you want to generate, it will become massively slower.
Sub-select„company_seq“: Creates a sequence of 1-3
Insert Statement: The company will get a meaningful name (high number = more data).
insert into company (name)
  select
    'company '||company_seq.company_number as name
  from (
    select rownum as company_number
    from dual
    connect by level<=3
  ) company_seq
;
Next, we would like to assign the plants to the companies. Remember: We want some areas with little data, others with a lot of data. Therefore, three plants are to be assigned to the first company, six plants to the second company, etc.
Sub-select “Company“: The ranking gives you a running number 1-N, so you can easily set the desired number of plants per company. This query produces exactly one line per company.
Sub-select “plant_seq“: We need a sequence to generate a row by joining the “company” subquery and desired number of attachments. To do this, we use a generously estimated sequence. The join is limited by the previously determined number of plants per company.
Insert Statement: The plant name should indicate which company the plant belongs to.
insert into plant (firma_id, name)
  select
    company.company_id,
    'plant '||company.company_number||'.'||plant_seq.plant_number
  from (
    select
      company_id,
      dense_rank() over (order by company_id) as company_number,
      dense_rank() over (order by company_id) * 3 as amount_plants
    from company
  ) company
  join (
    select rownum as plant_number from dual connect by level<=1000
  ) plant_seq on (plant_seq.plant_number <= company.amount_plants)
;
Finally, a billing per calendar month is to be generated for each company and plant.
The core element for random data in Oracle is the dbms_random package. It offers several functions for generating numbers, with the default range 0-1 or with self-defined ranges. However, the decimal places of the generated numbers have to be checked by rounding up or down. There is also a generator for characters available, with some modes like Large, Small, Alphanumeric, …
Column “Invoice number“: Three capital letters followed by six digits
Column “Amount“: A random value in the range € 100.900.
Column “Surcharges”: For approx. 10% of invoices a surcharge of € 50 is to be charged, this is achieved by comparing a random number in the range 0-1 to < 0.10.
insert into billing (company_id,plant_id,billing_month,invoice_number,amount,surcharges)
  select
    company.company_id,
    plant.plant_id,
    to_date('01.'||month||'.2021', 'dd.mm.yyyy') as billing_month,
    dbms_random.string('U',3) || round(dbms_random.value(10000,99999), 0) as invoice_number,
    round(100 + dbms_random.value(100,900),2) as amount,
    case when dbms_random.value<0.10 then 50 else null end as surcharges
  from company
  join plant
    on plant.company_id = company.company_id
  join (
    select rownum as month from dual connect by level<=12
  ) month_seq on (1=1)
  order by 1,2,3
;
Conclusion
These data do not win a beauty prize, so it may be better to resort to the mentioned products. But in our project, this approach has helped to provide data of sufficient quality and, above all, quantity from day one. This enabled us to ensure the performance of the system right from the start. In addition, the end result is that the system can process more data with better performance than similar systems.
Source Code
--------------------------------------------------------------------------------------------------------------
-- Create data model
--------------------------------------------------------------------------------------------------------------
drop table billing;
drop table plant;
drop table company;

create table company (
  company_id number(9) generated as identity,
  name varchar2(100) not null,
  constraint pk_company primary key (company_id)
);

create table plant (
  plant_id number(9) generated as identity,
  company_id number(9) not null,
  name varchar2(100) not null,
  constraint pk_plant primary key (anlage_id),
  constraint fk_plant_01 foreign key (company_id) references company (company_id)
);

create table billing (
  billing_id number(9) generated as identity,
  company_id number(9) not null,
  plant_id number(9) not null,
  billing_month date not null,
  invoice_number varchar(30) not null,
  amount number(18,2) not null,
  surcharges number(18,2),
  constraint pk_billing primary key (billing_id),
  constraint fk_billing_01 foreign key (company_id) references company (company_id),
  constraint fk_billing_02 foreign key (plant_id) references plant (plant_id)
);

--------------------------------------------------------------------------------------------------------------
-- Generate data
--------------------------------------------------------------------------------------------------------------

-- Delete all data

truncate table billing;
truncate table plant;
truncate table company;

whenever sqlerror exit rollback;

-- Generate Companies  (here 3)
insert into company (name)
  select
    'company '||company_seq.company_number as name
  from (select rownum as company_number from dual connect by level<=3) company_seq
;

commit;

-- Insert attachments per company. The first company will receive three plants, the next six plants, ...
insert into plant (company_id, name)
  select
    company.company_id,
    'plant '||company.company_number||'.'||plant_seq.plant_number
  from (
    -- Determine the serial number for each company and the desired number of plants
    select
      company_id,
      dense_rank() over (order by company_id) as company_number,
      dense_rank() over (order by company_id) * 3 as amount_plants
    from company
  ) company
  join (
    -- A sequence of attachments by which to join the required rows per company with N attachments
    select rownum as plant_number from dual connect by level<=1000
  ) plant_seq on (plant_seq.plant_number <= company.amount_plants)
  -- order by 1,2
;

commit;

-- Generate an invoice per calendar month for each company and plant.
-- The invoice number is a random string with three letters and six digits.
-- The amount is a random value in the range 100-900 euros.
-- The surcharge of 50 euros is applied to approx. 10% of the invoices.
insert into billing (company_id,plant_id,billing_month,invoice_number,amount,surcharges)
  select
    company.company_id,
    plant.plant_id,
    to_date('01.'||month||'.2021', 'dd.mm.yyyy') as billing_month,
    dbms_random.string('U',3) || round(dbms_random.value(10000,99999), 0) as invoice_number,
    round(dbms_random.value(100,1000),2) as amount,
    case when dbms_random.value<0.10 then 50 else null end as surcharges
  from company
  join plant on plant.company_id = company.company_id
  join (select rownum as month from dual connect by level<=12) month_seq on (1=1)
  -- order by 1,2,3
;

commit;
Within ZEISS Digital Innovation (ZDI) there is an internal training event at regular intervals – the so-called ZDI Campus Event. As employees, we present software development topics by means of lectures, workshops or discussion rounds.
Katharina had already reported on collaborative testing methods at the last ZDI Campus, and also published blog articles about Remote Pair Testing and Remote Mob Testing. Therefore, we wanted to continue the topic at the next ZDI Campus and offer a workshop on the topic of collaborative testing methods. However, due to the Covid-19 pandemic, the next campus had to be held online. Nevertheless, we wanted to offer several participants the opportunity to apply a test method using a practical example, and therefore decided to hold a remote Mob-Testing Workshop.
But there was a challenge: We had never worked with so many people in the mob remotely!
Structure of the workshop
As described in the blog post about Remote Mob Testing, it makes more sense to supervise small groups of four to six people. Distributed work may otherwise lead to more frequent delays due to technical problems (e. g. poor connection, poor sound quality), which could reduce the time required for the current navigator. As a facilitator, you can also keep an overview of smaller groups and the participants can take on the role of navigator or driver more often. (Zur Erläuterung der verschiedenen Rollen siehe ebenfalls Blogbeitrag Remote Mob Testing)
Our setting looked like this:
Microsoft Teams as a communication platform
Easy to understand test object (website)
3 Facilitators
39 participants from the fields of QA, Development and Business Analysis
Timeframe: 1.5 hours
Because we wanted to give everyone the opportunity to get to know the Mob-Testing themselves by means of a practical example, we did not set a limit on participants in the run-up to the workshop. In the end, all three facilitators had more than 12 participants.
In remote mob testing, all participants take on the active role of the navigator once.
As a test object, we chose a simple website so that everyone could concentrate on communicating or getting to know the test method and not have to acquire additional knowledge about the application.
Feedback
Already during the course of the workshop, we noticed that waiting times for an active role (Driver or Navigator) could be perceived as unpleasant.
This was also mentioned in the feedback round. Therefore, we recommend that the mob assists with test ideas, because it doesn’t mean that you can sit back and wander with your thoughts as a mob member. This also avoids double testing or having to admit that you were not paying attention.
In some cases, it was difficult for some participants to focus purely on the role of the driver – executing the instructions of the navigator, and holding back on their own test ideas. However, the participants got used to it after some remarks by the facilitator. This aspect of Mob-Testing was considered to be very positive, because everyone in the role of the navigator can speak and contribute their own test ideas.
However, the question arose as to why the roles Navigator and Driver could not be combined. The following can be said: It promotes the learning process when a member articulates step-by-step what he or she intends to do. In this way, more participants are involved in this active role. Communicating the destination makes it easier for the participants to follow the ideas of the navigator. Otherwise, some steps may be carried out too quickly, and with too little explanation. This would lose traceability and make it difficult for the mob to get actively involved.
There was other positive feedback on the division of roles and the whole process. According to the respondents, the test approaches are partly obtained by the path taken by the previous navigator, and therefore viewed the test object from a variety of angles. For this reason, it is always useful to invite participants with different skills, depending on the purpose of the Mob-Testing session. This increases the learning process, and the number of test cases. The simple sample test object also helped to focus on the method and to internalize it.
The collaborative work in Mob-Testing was highlighted very positively. This is how the agile thought is experienced.
Solution approach for a large number of participants
The problem of too many participants could be solved by limiting the size of the group in advance or by introducing a new role: the role of spectator. A separation would then be made between active participants on the one hand and spectators on the other. Participants would follow the procedure described above, and follow the roles distribution (navigator, driver, mob) and the role change. The spectators would only observe and not participate. Comments by them would not be allowed either, because this could disturb the active participants with a large number of spectators.
Conclusion
All in all, the workshop was very well received at the Campus event, and showed that it is very possible to use Mob-Testing remotely, and therefore for distributed work. This means that cooperation can be maintained, even if it is not always possible to meet on site.
Maria Petzold has been working at ZEISS Digital Innovation since 2010. As a test manager, her focus is on software quality assurance. She was able to gain her test experience especially in medical software projects.
The first post of this blog article series describes a lightweight method to eliminate discrepancy between the default user interface design and the implemented application. Developers as well as specialists for User Interface (UI) / User Experience (UX) work in this area by means of Pair Programming, in order to optimize the usability and appearance of an application in an uncomplicated way.
In our project we regularly conduct such “UI-Dev Sessions.” In this blog post I want to report on our experiences – away from theory to practice.
Why are the UI-Dev Sessions important to us?
Within the scope of the project a standalone software is being developed, which serves ophthalmic specialists as a support tool for collecting patient data and analyzing the results of surgical laser vision corrections. Also in the medical environment, user experience is becoming an important purchasing criterion. In addition to safety, which is probably the most important criterion for medical devices, soft criteria such as “Joy of Use” and appearance are gaining in importance. The UI-Dev Sessions are a way for us to give the finishing touch to our application.
„The details are not the details. They make the design.”
Charles Eames, Designer
Figure 1: Screenshot of Software
How do the UI-Dev Sessions work with us?
Our project team works agilely and uses Scrum as a framework for its approach. Like most of the teams at ZEISS Digital Innovation (ZDI), the team members work in a distributed way, i. e. they are not in the same location and therefore not in the same office. Our project team is spread over four locations in two countries. The roles of Scrum Master, Developer, Tester, Business Analyst and UI/UX Specialist are represented.
Usually, people from the fields of UI/UX and development take part in a UI-Dev Session. The UI/UX specialists focus on two different aspects, which makes them ideally complementary: on the one hand, on the visual design of the UI and on the other hand, on the behavior of the UI components. The participating developers have a high affinity for front-end development. One of these people participates in each UI-Dev Session and has an overview of the items to be completed. A few days before, the UI/UX specialists in the Daily remind us that there will be a UI-Dev Session and that one more person from the development team is needed to assist. Depending on availability, we then decide who can support. The four-eyes principle applies on both sides (design and development), thus avoiding errors and extensive review rounds.
The list of UI errors to be solved is maintained, structured and prioritized by the UI/UX experts in project Wiki and is accessible to all team members. Confluence from Atlassian is used as a tool for this purpose. A selection of the themes is shown in Figure 2.
Figure 2: Excerpt from the list of UI errors
Since our list of possible topics is currently quite extensive, regular sessions are necessary. A UI-Dev Session takes place once per sprint – i. e. once every three weeks – for two hours. If other topics are priorities in the sprint, the date can also be postponed at short notice, but ideally within the same sprint. The event will be held remotely with the help of Microsoft Teams, as the participants are distributed over the locations Dresden, Leipzig and Miskolc.
One or two days before the UI-Dev Session, the developers pick out a few points from the list in project Wiki and start preparing them. This includes, for example, marking the appropriate places in the code with to-dos in order to efficiently use the time in the UI-Dev Session for the actual adjustments.
At the beginning of the UI-Dev Session, all participants briefly go through the selected UI errors, which are to be corrected in the session. The topics are then dealt with from top to bottom. A person from the development department transmits the screen, opens the development environment, and the style guide in Figma. The other participants also open the style guide. One of the advantages of Figma is that the attendees can see where the other participants currently are in the style guide. In this way, the relevant positions can be quickly found by everyone. The specialists for UI/UX help the developers to find their way through the style guide faster and to find the relevant information. It is important that the people in the development team are able to look at the relevant places themselves and, for example, color values are not just “predicted”. This also trains the handling of the style guide.
The selected points will be dealt with gradually. If the selected UI errors are fixed faster than expected, new topics are added within the event. If selected topics remain open, they will be dealt with at the beginning of the next appointment.
During the preparation, or during the UI-Dev Session, it turns out that topics are more complex than initially thought, the developers communicate this to the specialists for UI/UX. These then move the theme from project Wiki to a separate backlog item in Jira, for example as an improvement or new-user story.
The results are presented to the testers in a follow-up appointment, which usually takes place one to two days after the UI-Dev Session and lasts a maximum of 30 minutes. This is important to determine if test cases are affected by the changes. Afterwards, the list of topics in project Wiki is updated by the specialists for UI/UX. The completed items are documented in tabular form in order to make it possible to track the changes made.
Figure 3: Excerpt from the list of fixed UI errors
There doesn’t have to be a catch everywhere
In our project, the use of UI-Dev Sessions has proven itself to optimize the appearance of the application quickly and easily. For us, the sessions primarily bring the following advantages:
It fixes UI errors which have been known for a long time, but have been given only a low priority compared to the development of new features.
The lightweight method with little documentation effort can be easily integrated into our sprints.
We achieve a high level of compliance with the ZEISS style guide for user interfaces
In addition, the sessions strengthen collaboration and knowledge sharing within the team:
The collaboration between the development and UI/UX departments enables UI errors to be efficiently corrected, as developers can focus on the implementation and the UI/UX specialists can directly pass on design-specific specifications (e. g. font color, spacing) orally.
The experts for UI/UX get to know the implementation problems of the developers, which, for example, result from the technologies used.
With the experience gained from the UI-Dev Sessions, the UI/UX specialists will be able to make future design decisions even better based on the development effort.
The development team gets to know the Figma design tool, including the style guide, better.
The team of UI/UX specialists have the opportunity to explain design decisions and give developers an insight into what is important in the design.
The development team is working out a better awareness of subtleties in design and will thus be able to avoid UI defects in the future.
The list of benefits that the method brings to us is therefore long. But what’s the catch? For us there is currently none, and we are convinced of the method. We therefore recommend it to any team that has accumulated a large number of smaller UI errors in the project over time. The procedure is flexible and can be adapted according to the needs of the team. For example, the number of participants can be minimised or the timeframe expanded.
The outlook
Our goal is to continuously reduce the list of existing UI errors with the help of the UI-Dev Sessions. In order to keep the number of new UI errors as low as possible, we plan to integrate the UI-Dev Sessions into the Sprint during the implementation of a user story. In this way, new deviations from the design can be avoided from the outset.