Storybook is a component-driven tool for creating visual style guides and demonstrating UI components from React, Angular and Vue, as well as web components.
In particular, snapshot testing provides an opportunity to detect and correct unexpected changes to style at an early stage.
Snapshot testing in Storybook
Snapshot tests are a very useful tool if you want to ensure that there are no unexpected changes to your user interface.
A typical snapshot test case renders a UI component and creates a snapshot before comparing this to a reference snapshot file that has been saved alongside the test. If the two snapshots do not match, the test has failed: There has either been an unexpected change or the reference snapshot needs updating to match the new version of the UI component.
Storybook offers several ways to test an application, starting with Chromatic. However, this tool chain assumes that the source code has been versioned in GitHub and is subject to a monthly fee for professional use.
Another option is Storyshots, a streamlined addon that uses the Jest testing framework. It launches in the command line, where it lists instances where components have deviated from their previous state. The programmer must then check whether such changes were intentional or erroneous.
Installation for Angular
This guide assumes that Storybook has already been installed for the Angular application. A setup guide can be found at the following link. Angular comes with the Karma testing framework by default. To migrate the application to Jest, the following steps are required:
Installation of Jest dependencies
To install Jest, simply run the command “npm install jest jest-preset-angular –save-dev” in the command line.
Create Jest setup file
In the root directory of your Angular project, create the new typescript file setupJest.ts with the contents: import ‘jest-preset-angular’.
Adjust package.json
A script for the Jest testing framework must be added to the package.json of your Angular project:
Außerdem muss die Script-Ausführung für Test angepasst werden. Anstatt “test“: “ngtest“, muss “test“: “jest” In addition, the test script execution must be adapted. Instead of “test”: “ngtest”, “test”: “jest” must be used.
Next, the Karma.config.js and test.ts files in the <root>/src directory should be deleted and the section for testing must be removed from the angular.json.
Migrating from Jasmine (optional)
To migrate to Jest, certain adjustments must be made:
• spyOn with returnValue() must be changed to jest.spyOn(…).mockReturnValue(…)
• spyOn with callFacke() must be changed to jest.spyOn(…).mockImplementation(…)
• Asymmetric matchers: jasmine.any, jasmine.objectContaining, etc. become expect.any, expect.objectContaining
Installing Storyshots dependencies
Storyshots is now being installed. To install Storyshots, the following two command lines should be run::
npm i -D @storybook/addon-storyshots
npm i -D @storybook/addon-storyshots-puppeteer puppeteer
After installation, the following dependencies should be available in the package.json (as at 12/11/2021; important for the installation workaround under Angular):
After installing Storyshots, the addon still needs to be configured. To do this, the Storyshots.test.js file must be created in the <root>/src directory with the contents:
import initStoryshots from '@storybook/addon-storyshots';
import { imageSnapshot } from '@storybook/addon-storyshots-puppeteer';
import path from 'path';

// Function to customize the snapshot location
const getMatchOptions = ({ context: { fileName } }) => {
 // Generates a custom path based on the file name and the custom directory.
 const snapshotPath = path.join(path.dirname(fileName), 'snapshot-images');
 return { customSnapshotsDir: snapshotPath };
};

initStoryshots({
 // your own configuration
 test: imageSnapshot({
 // invoke the function above here
 getMatchOptions,
 }),
});
Expanding tsconfig.json for Storyshots
Moreover, the tsconfig.json must also be adapted. To do so, the compilerOptions section in tsconfig.json must be expanded as follows:
"compilerOptions": {
 "esModuleInterop": true,
Expanding package.json for Storyshots
Lastly, the section contained in the package.json must be reconfigured for Jest:
These adjustments are specific to the selected version because the folder structure must be remapped in Jest. This may change again in later versions of Storyshots.
Testing components
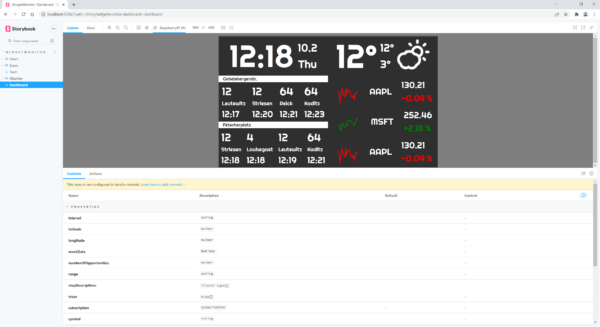
There is a sample application for the test, which is composed of four individual components. The first component displays the time, including the date and day of the week. The second component shows a chart of the current weather in degrees, as well as the highest and lowest daily temperatures. Another component displays tram departures, using Dresden Striesen as an example. There is one final component, which shows three share prices along with graphs and indicators.
Figure 1: Storybook for an application composed of four components
For example, the source code for the clock component appears as follows:
This includes three states, the first two of which are static points in time. The third state, “Running”, shows the current time, i.e. not static.
Prerequisite for snapshot tests in Storybook
It is important for us to have a static state under Storybook in order to test the application. The “Running” state is not static in the clock component example. This can be omitted by adding the parameter storyshots: { disable: true } (see source code above).
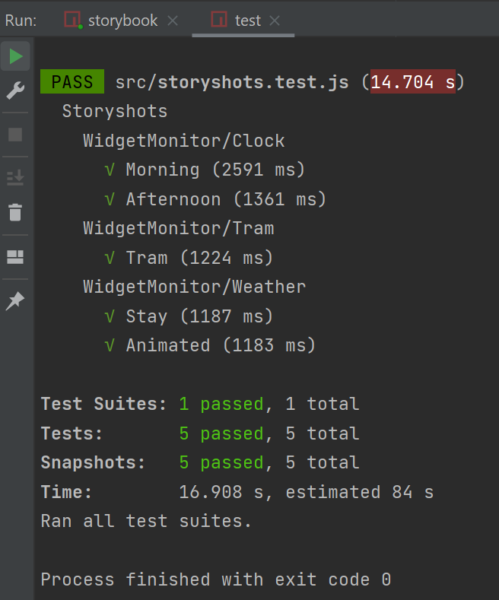
Start testing
Using the npm test command line, the test is launched in the command line of the Angular project directory. The initial snapshot test will now produce a snapshot image of each component state.
Figure 2: Start test in Storybook
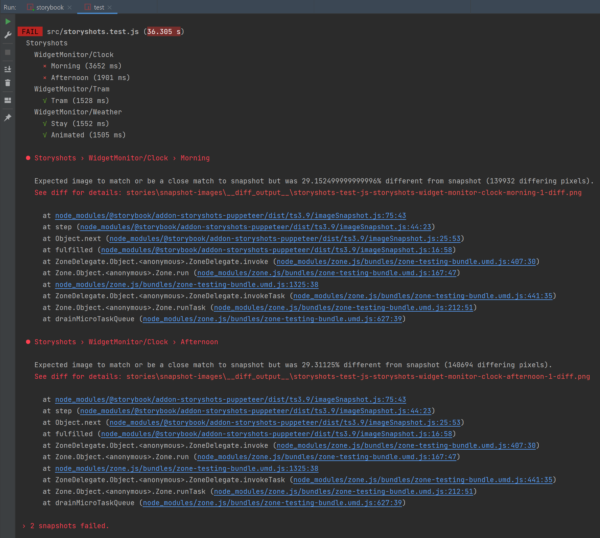
To demonstrate an example of an error, the font used on the clock in the clock component has now been changed so that it is smaller and red in the SCSS, and the test has been restarted.
Figure 3: Show errors in Storybook
The result of the snapshot test shows that the two active states of the clock component have failed and a diff image is referenced. This appears as follows:
Figure 4: Result of the snapshot tests
The original state is visible on the left, and the state following the change can be seen on the right. In the middle, you can see how both states overlap. It is now possible to either apply this state or to re-run the test after the application has been adapted.
The npm test — -u command line is used to force-apply the state. This deletes the differential images and creates a new snapshot of the state of the component. The npm test command line should now run again with no errors.
Summary
For Storybook, maintaining a state invariably means that more effort is required in the project. Anyone who is not afraid of tackling this can use Jest and the Storyshots addon to check a specific state in a closed environment. This is particularly helpful for detecting styling bugs at an early stage, as these can be difficult to detect in unit and end-to-end tests and usually only become apparent during manual testing.
In the first part of this series we looked at how to build your own web components. Now, let’s take a look at the integration in React applications.
According to their idea, web components can be used independently of JavaScript frameworks. While this works with Angular, for example, with just a few steps without problems, the situation with React is unfortunately a bit different. Why this is so and how to solve the problem is explained in more detail below.
In principle, web components can also be fully used in React. However, in certain cases additional effort is required and deviate from the usual React conventions. Usage is no longer necessarily what React developers would expect.
Essentially, there are two problem areas: On the one hand, it is the problem “Attribute vs. Properties”, which we will address in this article. On the other hand, there is the problem of “custom events” – this is discussed in the next part of this series.
Description of the problem „Attribute vs. Properties“
As we saw in the first part of the series, there are two ways to pass data to a Web component – as an HTML attribute or as a JavaScript property.
In this code example, the value is defined as an attribute in HTML:
<my-component value="something"></my-component>
Here, on the other hand, the property of the same name is set using JavaSript:
In JavaScript, however, it is also possible to explicitly set the attribute:
myComponent.setAttribute("value", "something")
JavaScript is more flexible in this respect, because in HTML only attributes are possible – properties cannot be set in HTML.
It is important to understand: Whether and how attributes and properties are processed or taken into account by the component is entirely up to the implementation of the component. While there is a best practice, to offer both attributes and properties and keep them in sync, technically, no one is bound to do so. It would therefore be possible to accept either only attributes or properties, or to give them completely different names (which would certainly cause the resentment of the users of the component).
On the other hand, however, there are also solid reasons for deliberately deviating from this best practice in some cases.
An important factor is that attributes and properties have different power: Attributes only allow values that can be represented as a string, i. e. strings and numbers. In addition, Boolean values can be represented by the presence or absence of an attribute. More complex data such as JavaScript objects or functions cannot be passed as an attribute, or would have to be serialized.
JavaScript properties naturally do not have this limitation. However, properties have the disadvantage that they are always imperative and not declarative when used. Instead of simply declaring, as with HTML, which state you want to have, you have to use commands to set properties in sequence. From a developer’s point of view, this is rather unattractive, because frameworks such as React and (with slight derogations) Angular have made you accustomed to the benefits of declarative work.
Another difference between attributes and properties concerns performance: Both attributes and properties are used not only to input data into the component from outside, but also to access component information. A nice example of this is the standard HTML tag <video>, which offers the current playback position of the video being played using the JavaScript property “currentTime”. When querying these properties, you get the position in seconds as a decimal number. A matching HTML attribute does not exist. Otherwise, such an attribute would have to be constantly updated with the current playback time, which would be a relatively expensive operation in the DOM. The query via a JavaScript property, on the other hand, can be solved quite efficiently, since a Lazy-Getter method can be implemented for this purpose, which is only triggered when the position is actually queried.
In web components, we have two different mechanisms for a very similar purpose, but they are quite different in some respects.
Attribute
Properties
declarative
imperative
String, Number, Boolean
String, Number, Boolean, Date, Object, Function
React Props
With React, things look a little more straightforward: React only knows so-called “props”. Since React places a strong focus on declarative programming, the use of HTML attributes is similar:
<MyComponent value="something" />
However, React props are not limited to certain data types, but allow transfer of arbitrary data and functions. For this purpose, a syntax with curved brackets is used instead of quotation marks:
As a React developer I have to say that I personally like the React variant with props much better than the distinction between attributes and properties with their respective characteristics in web components – but this is a matter of taste.
Web Components in React
Now the API of web components is just as it is. So the question is: What happens when I use a web component in React? Are “props” passed to the web component as attributes or properties?
Initially, React decides whether the tag is case-sensitive or not, and whether it is a React component (starting with uppercase letters) or an HTML tag, which includes web components. With the exception of some special cases for some standard HTML tags, React Props always uses “setAttributes” for HTML tags and web components. This means that using attributes in web components in React does not cause any problems. It is different when JavaScript properties have to be explicitly used, e. g. because complex data or functions are to be added to the Web Component. React is currently unable to do this in a declarative way. In about 90% of cases, this is not a problem because, as already mentioned above, it is considered best practice to keep attributes and properties synchronous, and to support both variants if possible. Only in the remaining 10% of cases where properties are necessary (because either the authors of the Web Component did not follow the best practice, or some other reason prevents the use of attributes) do we have to come up with something.
However, this does not mean that such web components cannot be used in React at all! We simply cannot go down the usual, purely declaratory path, but must resort to the mandatory API, which is also supported by React. We will look at how this works in the following.
React abstracts from concrete instances of DOM nodes. Even independently of web components, you have to access DOM nodes directly in some cases, for example if you want to call a method like “.focus()”. For this purpose, React uses so-called “refs” and we can use this mechanism to set JavaScript properties on our web components. In the code, for example, it looks like this:
With “const elementRef = useRef(null)” we create a kind of container into which React will put the reference to the DOM node after it has been made. “useEffect” can be used to execute a function once certain variables have been changed. To do this, we give the “elementRef” variable (wrapped into an array) as a second parameter to the “useEffect“-Hook-function. As soon as React has rendered the component for the first time, the specified function is executed, so our property is set accordingly. As you can see, the code is a lot more complicated than just setting an attribute directly on the tag. The example shows, however, that it is possible to use web components in React. In the fourth part of this series of articles, we will look at another variant, which scales better especially for larger applications where certain web components are to be used again and again. In the next article in the series, however, we will then take a closer look at the second problem of web components with React: The processing of custom events.
Conclusion
As an interim conclusion, the situation of web components with React is complicated. On the one hand, React is ideally suited for the development of comprehensive web applications and is therefore widely used. On the other hand, it is extremely annoying that React has such problems with a modern web technology like web components.
There are at least two reasons for this: On the one hand, React was created at a time when web components or “custom elements” were still a mere idea and far from being implemented in practice. At the same time, the React team places great emphasis on backward compatibility and understandably shies away from incompatible changes in the way React components are written. The discussion about which options are available to make React compatible with web components can be followed if you are interested in the issue tracker of the project.
The second factor I want to highlight is: The concepts of web components and React are quite different when it comes to how components are used. React is designed entirely for declarative programming, while web components and standard HTML tags provide a mixed form that is partly declarative, but in some places imperative. And since React developers like this declarative character of React, it is not the solution to simply blindly adopt the imperative API of web components. Instead, ways need to be found to enable these two “worlds” to work together. Unfortunately, the process of finding a solution has been going on for quite some time now, and in the meantime the discussion within the React-developer community seems to have fallen asleep a bit.
It is therefore only to be hoped that this process will pick up speed again, so that web components can be used in React projects easily and without any hassle.
That there is something going on not only in Saxony, but especially around our headquarter in Munich was shown at the end of last year by the “International JavaScript Conference“ and the “W-JAX“. Both conferences took place shortly after each other and attracted numerous visitors to the Bavarian capital.
Just like the S&S Media Group as event organizer of the iJS (international JavaScript Conference) noticed, JavaScript is everywhere by this time: hardly any digital business can do without JavaScript and high level frameworks like Angular, React or NodeJS these days. It is hardly surprising that there was a whole conference with numerous keynotes, sessions and power workshops dedicated to this topic on iJS during 23. – 27.10.2017 in the Holiday Inn Munich City Centre. The W-JAX, too, partly deals with these topics but offers many additional impulses in the areas of enterprise technology, software architecture, agility and Java.
Figure 1: iJS and W-JAX conferences
We took the opportunity on both of the conferences to exchange intensively with the community. That is why we brought some questions to put them to the participants of the conferences. We were able to conduct close to 100 surveys total, that split to share equally among the two events. We would like to take this opportunity to once again thank all those who took the time to participate in our survey. Only through an intensive exchange with partners, customers and community can we succeed in constantly improving. This approach of continuous improvement, which is also anchored in the agile manifesto, is not only taken within our projects, but is also lived across the company.
While our experts Manuel Mauky and Alexander Casall spoke about topics like “Angular applications with Redux“ and “Offline-capable desktop application with Angular and Electron“, we first of all wanted to know the frameworks and languages that were used by our interview partners in their main projects at that time. Angular and JQuery were used most often, followed closely by JavaEE and Spring. React for example was still used quite rarely. Additionally, 72 of 88 interviewees used JavaScript, 69 HTML and 51 used Java as programming language. Ruby, Groovy and CoffeeScript on the other hand were used quite little and got a maximum of 5 votes each.
Figure 2: Which frameworks do you use in your main project?
Of course, we were not only interested in the technologies currently used, but even more important is the direction in which the trends of software development are moving. More and more users of business computer programmes expect modern web applications instead of existing desktop software. The usability of those often does not meet the expectations of the users in times of modern B2C-applications and so more and more web-based solutions, that are actively supporting the user with their work, are established. It is therefore not surprising that 70% of the respondents were planning to work with Angular, React or another interactive technology (e.g. ReactiveX, RxJS). Vue.JS (14 votes) and JavaFX (3 votes) on the other hand only play a tangential role.
Figure 3: Do you plan to work with one of the following technologies in the nearest future?
Half of the polled participants could position themselves quite precisely and settled either for Angular, React, or at least a reactive technology. But about 20% were still indifferent and not able to decide between Angular and a reactive technology. The decision matrix that we evaluated could be of assistance here, which provides a personal technology recommendation with the help of a list of questions. It is based on the experiences of our web experts.
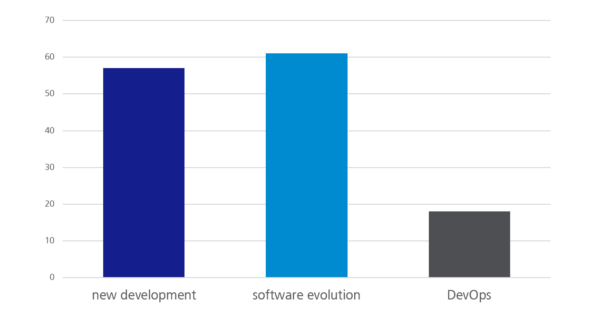
Furthermore, the content of a project is important when choosing a suitable programming language or a framework, of course. This is why we asked the survey participants what they were doing in their main project. The majority was dealing with software evolution projects (61 votes), closely followed by new developments (56 votes). About one fifth was dealing with DevOps in everyday working live. Depending on whether maintaining an existing software or having a green-field project on the table, the tolerances when choosing programming languages and tools can be very different.
Figure 4: What are you doing in your main project?
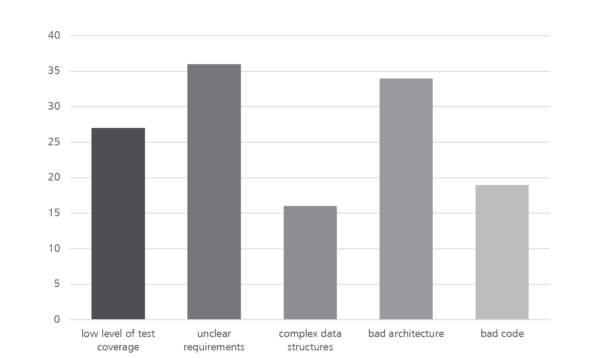
Now that we had found out a little more about what the respondents were doing, most of whom were software developers of different nationalities and from a wide range of industries and company sizes, we wanted to know what was holding them back most in the current project. At this point, we gave quite open answer possibilities like “bad code” or “bad architecture” on purpose to leave the interviewees some room for interpretation and challenge them to address problems and where possible initiate a first dialogue to solve the problems.
The most frequently mentioned problems are shown in the following graphic. Additional to the answers shown here, where “unclear requirements” is still one of the major problems, there were a few free answers. “Legacy code”, “waiting for the client / customer” or “rapidly growing and confusing software architecture” were mentioned quite often.
Figure 5: What frustrates you most in your main project?
Finally we turned to some questions of the area of “modern web development” to verify, which trends are actually confirmed by the community and which ones are “hyped” in the web but are not yet arrived in everyday developer life. One of these trends in information technology is for example GraphQL. We first asked the basic question on how the conference visitor’s position on this technology is. Only one forth of the respondents were planning to use this REST alternative for the future or were already using GraphQL, while almost half of them have never heard of this technology before.
Figure 6: What do you think about “GraphQL”?
Additionally we wanted to know, whether the interviewees were utilising cloud technologies in their projects. Here, the ratio of the responses was nearly balanced. 45% affirmed the statement, while the other 55% are not, or at least not in their main project, working with cloud technology. The second question of this thematic block was about the technology currently used by the surveyed for state management. The options were React/Angular (without extra framework for the state management), Redux or MobX. While the latter only got one vote, the majority (around 50%) did not use an extra framework and approximately 25% work with Redux, while about again 20% did not give an answer, which unfortunately distorts the survey results somewhat.
The rapid development in the world of web technologies, especially in SPA frameworks like Angular and React, empowers developers to build enterprise scale, platform independent applications with a flexible and vivid technology stack. Although these applications can fulfill numerous use cases they may fall short in others because of the limitations web applications have. Especially the limited environment integration and system access capabilities make some kinds of applications impossible (e.g. missing file system access) or hurt the user experience (e.g. no offline usage, no integration into application menu or task bar in most cases).
The Electron Framework by GitHub attempts to tackle those problems while preserving the advantages of web technologies by wrapping conventional web apps as native applications and giving them powerful access to the underlying system and their environment.
In this article we will go over the process of building a hybrid Desktop App with Angular using the Angular-CLI and Electron.
About Electron
Electron is an open source framework developed by GitHub for the Atom project. It integrates web technology based applications into the system, to make them work like native applications. To do so, it uses the rendering component of the Chromium browser to render the web views, while executing the JavaScript elements of the app in the Node.js runtime environment to provide access to the underlying system. In addition Electron brings additional APIs to integrate the application into the environment (e.g. with keyboard listeners, notifications, tray integration, etc.) it runs in.
Creating an Electron application
To run a web app in Electron, you need to provide an entry point script to the electron binary (which is available as binary package or as NPM module). You can find an example of an entry point script at the Electron quick start repo. The entry point (which is run in the Main Process) can register global handlers for the app (e.g. keyboard shortcuts, behavior on closing, etc.) and creates one or multiple windows for the app via
    const {app, BrowserWindow} = require('electron')
    const path = require('path')
    const url = require('url')
    // Create the browser window.
    win = new BrowserWindow({width: 800, height: 600})
    // and load the index.html of the app.
    win.loadURL(url.format({
      pathname: path.join(__dirname, 'index.html'),
      protocol: 'file:',
      slashes: true
    }))
Each of the windows runs the specified web page (index.html in this example) and the associated JavaScript in a Render Process. All the JavaScript in this Render Process has access to the full Node.js API and all available NPM packages, to the DOM, which is visually represented by the Chromium renderer of this process, as well as to parts of the Electron API.
You can pass an entry point script to Electron either via the command line arguments of the Electron binary (e.g. electron ./index.js) or you pass a directory containing an package.jsonto the Electron command (e.g. electron ./project/). In the latter case electron executes the file referenced by the mainfield of the package.json.
Building desktop apps with Angular
Because Electron doesn’t constrain the used web technology stack, it’s possible to use Angular to create an Electron Desktop App. To spin up your project, you can use this project seed and all configuration changes, which we will perform during this article are available in this Gist.
For the purpose of this article we will build a Hello World app with Angular and Electron to demonstrate the setup of such a project. You can find the resulting application in this GitHub repository. The commit which corresponds to the upcomming changes will be linked on top of every section.
We will use the Angular-CLI which is a tool for generating Angular Projects without having to bother with the configuration and selection of all necessary and fast evolving tools and best practices in the Web ecosystem. In addition to the setup off linting, building, bundling and testing tools it brings some neat little features like code scaffolding or a development server.
In this project we will use Yarn as an alternative to npm for installing and managing our dependencies. If you have not made the transition to Yarn yet you can use this guide for the migration. If you do not want to switch that’s no problem either, you just have to use the equivalent npm commands.
Let’s start by setting up a new mostly configured project with the new command of the Angular-CLI. So install the Angular-CLI on your system with
yarn global add @angular/cli
Although the Angular-CLI already switched to Yarn internally, it still sets up your projects via npm. If you do not want this you can configure the CLI to use Yarn by running
ng set --global packageManager=yarn
Then you can run
ng new hello-electron
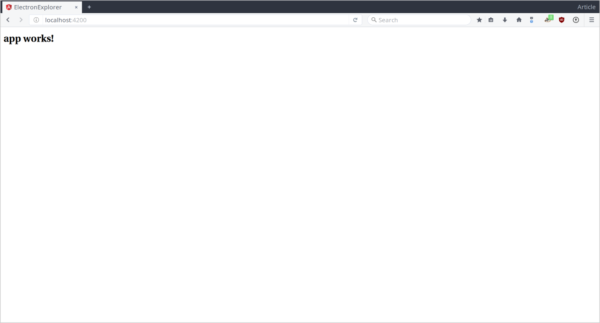
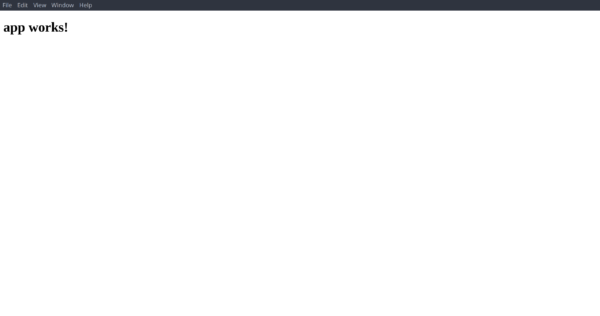
This creates a new Angular Project named hello-electron, which is already preconfigured as a web project. The installation of the project dependencies causes the yarn.lock file, which pins your projects dependencies. Commit this file to keep track of your dependencies correctly. To test if there were any issues while setting up the base project, you can run the default application. To do so, run ng serve and head your browser to the location which is printed in the terminal (normally this is http://localhost:4200). You should see the Text “App works!“
Figure 1: Angular-CLI default app
Because the Angular-CLI isn’t aware of the possibility of building Electron Desktop Apps (yet) neither the build will work out of the box nor the build results will run in Electron. To achieve this, we need to reconfigure some parts of the setup.
Angular-CLI brings a lot of tools for managing, building and supporting our project. The configuration and invocation of these tools is managed internally and automatically by the CLI and is accessed via the corresponding CLI commands. While this is very convenient it limits our influence on the build and tooling, especially if we want to achieve more exotic effects, which are out of the scope of the Angular-CLI. Because we want to make a lot of changes to the projects configuration during this article, we have to “eject” the project from the Angular-CLI. This means that all build and tool configuration files get generated and added to our project. After this some of the CLI commands (like build or serve) no longer work and get substituted by mostly equivalent Yarn / NPM scripts.
To eject the Project run
ng eject
and install some new and some missing dependencies via
To use electron (and the corresponding TypeScript typings), we install it locally into our project for development purposes to set a working version and list it in our dev-dependencies:
because Electron doesn’t resolve included files relatively to the current domain (like web browsers do), but relatively to the current file tree, so the base/ would resolve relatively to the file system root. We want the dependencies to get resolved relatively to the location of index.html, so we use ./.
The file src/polyfills.ts includes some polyfills into the project. The Polyfill zone.js, which is necessary to detect asynchronous code execution to trigger the Angular change detection correctly by implementing a concept named “Zones” doesn’t work by default with Node.js, which is used for some parts of the Code execution in Electron. To make the change detection work with Node.js, a different version of the zone.js polyfill called zone-node exists. To enable the correct change detection for Node.js as well for ordinary Angular Code we have to include the zone-mix polyfill. To do so, we have to change the line
The Angular-CLI uses Webpack to handle the project build, the development server and particularly the module bundling. (Theoretically we don’t need module bundling when using Electron, because Node.js has native support for modules, but because Webpack handles so much different things of our projects infrastructure, it is easier to configure Webpack for Electron and bundle our project, than it is to rebuild all the infrastructure ourselves.)
To set up Webpack for our build open the webpack.config.js file and modify the returned Object in the following way:
This configures Webpack not to build for a Web environment but for an Electron rendering Process and to leave all references to Node core modules untouched. Basically this allows you to include Node.js core modules as well as using browser and Electron specific APIs (like the DOM) in your application (read more about different targets in the Webpack documentation).
We also want our Electron entry point script (which we will add to the project shortly) to be automatically copied from our project sources to our build result. We can achieve this with Webpack by installing the copy-webpack-plugin into our project viayarn add --dev copy-webpack-plugin
Now we can use it by including it in our webpack.config.js:
Because of a bug in the TypeScript loader used by the build the type root isn’t resolved correctly by default. To fix this set the type roots explicitly in the TypeScript configuration files src/tsconfig.app.json, src/tsconfig.app.json and e2e/tsconfig.e2e.json and add the entry "node" to the types array:
Easy and integrated unit testing is another major feature of the Angular-CLI, which does not run out of the box, when using Electron as environment. All tests, which involve features of the Node.js environment fail, because they are not available in the normal Browser, which the preconfigured test runner uses to run the tests in. To run our unit test, we have to configure the test runner, to run our tests in Electron, too. To do so, install the Electron launcher for the Karma test runner via
yarn add --dev karma-electron
Then open the file karma.conf.js and perform the following modifications:
This configures Karma to use Electron and execute every test in a new Browser (Electron) window, instead of in an iFrame in the same window. This is necessary, because iFrames in Electron have no access to the Node.js environment, while windows have.
With these changes we have set up the provided unit testing for our Angular-Electron app and can run the test via yarn run test.
The Angular-CLI also brings a setup for End-To-End (aka. e2e, aka. UI-Testing) which can easily be configured to use Electron as execution environment instead of Google Chrome because it can provide the same webdriver interface as Chrome. To configure the e2e testing framework (called Protractor) open the file protractor.conf.js and adapt it the following way:
Now Protractor uses Electron instead of Chrome and all your tests will work, even when they use Node.js features. Be aware, that the End-To-End testing setup of the Angular-CLI requires a running dev server, which we will configure in the next section.
To optimize our workflow I highly recommend setting some properties and scripts in our projects package.json.
To make Electron behave correctly, when initialized in the projects root directory, set the main field of the package.json:
    {
      [...]
      "main": "dist/entry.js",
      [...]
    }
dist/entry.js will be the location of our Electron entrypoint in the build result.
To run our app, we add the run script, which invokes Electron in our package directory:
"run": "electron .",
So running yarn run run will launch our Electron app.
Now we have a project setup, which will allow us to build, test and run our app, but the Angular-CLI provides another very neat feature called LiveReload. LiveReload spins up a webserver via the Webpack dev server, which serves our app wrapped in some more JavaScript, that reloads our app automatically from the server when it changes, while our sources get recompiled every time they are modified. This makes it possible to develop our app while constantly seeing the current state and without having to compile and run it by hand every time we make a change. Because we use Electron instead of a browser and we want to build desktop apps, we load our app directly from the build result and have no connection to the LiveReload server by default. To use this feature, we have to crate a second, slightly modified Electron entry point for development purposes and load this one to use LiveReload. We now create an additional NPM script, which concurrently starts the dev server and our Electron binary with our “live” entry point (which we will create later). To do so, we use the tool concurrently, which we install with
yarn add --dev concurrently
Then we modify the following script in our package.json:
To load our App into Electron, we need to create an entry point at src/entry.js, whose main purpose is to load the entry point HTML document (which is generated in the build process). We use this slightly modified version of the example entry point from the Electron documentation. Basically the entry point loads the file index.html in the same directory as the entry point itself into a new window by calling
It also handles general application lifecycle events like application start or exit and registers environment integration like keyboard bindings or tray icons. A small modification opens the developer tools, when the app is started with the environment variable NODE_ENV=development set.
To make use of LiveReloading, we also need the alternative entry point src/entry.live.js which you can find here. This entry point is mostly the same as src/entry.js. The only difference is, that the application entry point page gets loaded from the dev server instead of the file system. By default the dev server serves at http://localhost:4200, so we change the lines
We also want to set a short timeout, so we reduce the chance of loading the file from the server, before the server has finished building (you may adapt the time according to your project size and the resulting build time). To do so, we change the createWindow function:
    [...]
    function createWindow () {
      // content
      [...]
    }
    [...]
Because the dev server only serves the static files and handles the changes, it is not relevant, if the code inside the application bundle is written for the browser or for Electron and Electron executes any provided code in the bundle, whether it is generated by your sources or by the dev server. So the page gets loaded and reloads itself, when the dev server recognizes changes.
Devtron is an extension for the Electron DevTools, which helps you developing your app by giving you more information about Electron internals, like the Inter-Process-Communication (IPC) mechanism or the established event listeners. Just install it to the project via
yarn add --dev devtron
and install it to the DevTools right after opening them, when the app is started in development mode, by modifying the following section in entry.js and entry.live.js:
    [...]
    function createWindow () {
      [...]
      // Open the DevTools when in dev mode.
      if(process.env.NODE_ENV=='development') {
        win.webContents.openDevTools()
        require('devtron').install()
      }
      [...]
    }
    [...]
When launching your app with NODE_ENV=development set, you will now find a Devtron tab in the DevTools, which shows you the intended information.
After building our application inside our development environment, we want to distribute our app as platform specific packages. Package distribution in the Electron world usually works by packing all the necessary application resources together with the Electron binary for the specific target platform. The binary is renamed to the name of your application, so when running the resulting executable, Electron is started, locates your entry point (because it is noted in the package.json) and loads your application. Conveniently there is a tool called electron-packager, which automates the process of packaging your application for different platforms and architectures and carries the responsibility for creating all the platform specific packaging formats, configuration files, icon formats, etc. So let us install the tool
yarn add --dev electron-packager
and include it into our workflow by adding the following scripts to our package.json:
These scripts create the application packages for the specified platforms in the directory packages and the --ignore flags prevents the inclusion of files, which are unnecessary for the package (some directories like your devDependencies or .git are ignored by default). Because Webpack already bundles our dependencies into the JavaScript bundles inside the dist folder, we don’t even need to include the dependencies in node_modules. You can also build your packages on your CI system to automate your application distribution, but it has to be said, that packaging for Windows on non-Windows systems requires Wine, which on the other hand may not deal very well with headless systems out of the box. You may also add the packages folder to your .gitignore file.
Now we have a completely configured project environment, for building an Angular-Electron App, with all the features, which are available through the Angular-CLI. We can now go on with creating our little app itself.
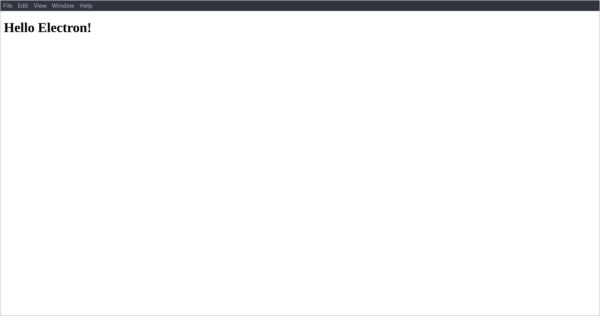
To make our app say hello we need to set the value of the title property in the AppComponent class in src/app/app.component.ts to our desired value, let’s say ‘Hello Electron!’
    [...]
    export class AppComponent {
      title = 'Hello Electron!';
    }
To make our tests pass, we need to set this text in the components test src/app/app.component.spec.ts as well es in the e2e test specification e2e/app.e2e-spec.ts.
After this we can build and run our app with
yarn run build && yarn run run
Figure 2: Hello Electron app
With this setup you can build powerful desktop applications, while being supported by the rapidly evolving ecosystem of Node.js, Angular and the Angular-CLI.
In the next article we will build a simple file explorer with these technologies to gain a deeper insight into the power of Node.js and the Electron API.
Recently, I created an Angular App with current Angular CLI 1.0.0-rc.0 using Yarn instead of NPM. When I pushed some code to the GitHub repo and opened a pull request for my teammates to review, an information box popped up on GitHub suggesting to connect to a GitHub Integrations tool. Then with every push or pull request the app is built and tested by the integration tool, allowing for a quick feedback about whether it is safe to integrate the code. Let’s give it a try, I thought and decided to go with Travis CI. An hour later I had everything up and running. Here is what you need to do:
First of all, authorize Travis CI to access your GitHub repos and hook into push events. Thanks to GitHub Integrations this is done by the push of two buttons. Second, for Travis CI to build your app it looks for a .travis.yml configuration file in your application’s root folder. This is what it looks like:
# .travis.yml
dist: trusty
sudo: required
language: node_js
node_js:
  - "7"
os:
  - linux
env:
  global:
    - DBUS_SESSION_BUS_ADDRESS=/dev/null
    - DISPLAY=:99.0
    - CHROME_BIN=chromium-browser
before_script:
  - sh -e /etc/init.d/xvfb start
install:
  - yarn
script:
  - yarn run lint
  - yarn run test -- --watch=false
  - yarn run pree2e
  - yarn run e2e
cache: yarn
Travis CI starts up a virtualization environment that will execute your build scripts. Stick with the defaults and select an Ubuntu Trusty on Linux with sudo permissions. Configure the environment to use Node.js and set the required version to at least version 6. I required version 7 because I remembered we had problems with Node.js 6 in a different Angular project. But for a newly created Angular CLI project version 6 should be fine as well.
Now, before running the build scripts a couple of environment variables have to be set. This is to allow running tests that require a graphical user interface, in our case for Karma and Protractor to run their tests in Google Chrome. The xvfb command will launch an X-Server with a virtual display.
As I said earlier, this Travis CI configuration is for Angular CLI projects using the Yarn package manager in favor of NPM. As you might know, Yarn enables us to lock down the project dependencies in a lock file named yarn.lock which mitigates the risk of indeterminate dependency versions on different systems. Travis CI comes with Yarn support and will install Yarn automatically if the project contains both a package.json and a yarn.lock file. To fetch all dependencies add a yarn install command to the Travis CI configuration. You can even omit install as this is the default command in Yarn. To speed up builds, the Yarn cache can be saved across builds. See the cache: yarn property at the bottom of the config file.
Then add build scripts for linting, Karma tests and Protractor e2e tests. Make sure to disable the watch mode in Karma by adding -- --watch=false, otherwise the tests won’t finish and the build will be stuck forever.
The Protractor e2e tests are likely to fail because Protractor tries to update the webdriver before execution. While this works with NPM it is different with Yarn as it can’t load the webdriver from a deep link. This is a known issue in Angular CLI that is supposed to be fixed soon. For the time being, disable the webdriver update adding --no-webdriver-update to the e2e script. Then add a preceding script to update the webdriver before test execution. As this is not a Travis CI related problem, I put these modifications in package.json instead of .travis.yml.
That’s all, you’re done! Push your code to GitHub and watch Travis CI build your app. As a bonus you can display the build status as a badge on your GitHub page or README file. See this basic project on GitHub and the CI build for reference. Feel free to contact me for any questions.
Modern APIs are often realized in a RESTful way. Besides being stateless and using the correct HTTP verbs for specific actions, REST does not specify the response of a request. Hypermedia Formats are trying to overcome this issue by providing a discoverable API. Hypermedia Application Language is one format and abbreviates as HAL.
HAL is a set of conventions expressing hyperlinks in either JSON or XML. Resources returned by a HAL API contain a _links element hosting a self link and a link to resources. This makes HAL APIs discoverable as it is possible to navigate from one resource to another via the links provided within the resources knowing only a single entry point. This article describes how to use HAL hypermedia APIs in Angular.
Consuming a HAL API in an Angular app is pretty straight forward. Just use the Angular http API as you would for a http request.
private restQuery(): Observable<HypermediaResult> {
  return this.http.get('api-endpoint') // URI to the API
    .map(response => response.json() || new HypermediaResult())
    .share();
 }
As abstraction for all API responses we introduced the HypermediaResult class containing a _links element which acts as host for the self link and an array of links to resources.
We implemented a HAL API with JSON. As explained previous the response contains a self link and a link to a resource. In this particular case the leads resource.
To specify query parameters HAL makes use of templated URIs. The leads resource provides a query parameter named query. This makes query parameters transparent in the API. Leads could be retrieved by following request:
searchLeads(searchstring: string): Observable<HypermediaResult> {
  return this.restQuery().flatMap((hypermediaResult: HypermediaResult) => {
    let link = uriTemplates(hypermediaResult._links['leads'].href).fill({'query': searchString});
    return this.http.get(link);
    })
    .catch(this.handleError)
    .map(res => res.json() || new HypermediaResult());
}
As you might have noticed we are using the URI-Templates project instead of UrlSearchParams from the Angular http API. UrlSearchParams is not capable of handling templated URIs.
A pretty young project is ng-hal combining the Angular http API, URI-Templates and halfred providing a Navigator concept similar to Angular http and a shortcut for the observables. At the time of writing this project was not ready to use.
The http library from Angular does not have a support of templated URLs out of the box, but they are required to make query parameters transparent in API definitions. For future releases of Angular it would be great to have native support of templated URLs. So far they are not on the roadmap. Maybe future releases of ng-hal close this gap. For now using Angular and the URI-Templates lib is an easy solution to consume HAL APIs.
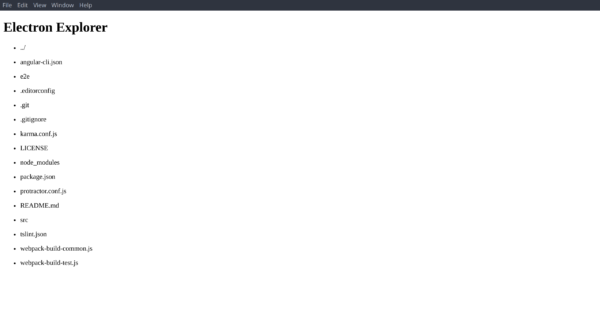
After having a deeper look into the project environment and the basic anatomy of an Angular-CLI-Electron project in the last article we now want to build a simple application using the Node.js as well as the Electron API to get a deeper insight into the possibilities of such an app and to gain more familiarity with the environment. Our example will be a basic file explorer which can browse through the directories of our file system and open files in their associated default program. It should also provide a keyboard shortcut to move up in the file tree.
To set up the project you can either follow the steps in the last article or you use the angular-2-electron-seed project. For the purpose of this article I will do the latter. So after cloning the seed with
we change into the project directory (electron-explorer) and open the package.json where we adapt the name field to match our project name electron-explorer. After this we have to run
npm install
to install the required dependencies.
Building the application
After setting up the project we can run npm run start to have a look at the current state.
Figure 1: Angular 2 – Electron seed default app
We can see the default app of the Angular-CLI inside of Electron.
To build a simple file list view we just need a component which displays a list of all files in the current directory. All directory entries are displayed as links, which change the currently displayed directory or open the selected file. For the purpose of simplicity we store the currently active directory in the component itself. We fetch all available files in the active directory via the Node.js core module fs and display the entries via NgFor.
So let’s start with creating the component. To do so, change into the directory src/app and create a new component via the scaffolding command of the Angular-CLI by running
ng generate component files
This creates a new component called FilesComponent which is bound to the HTML tag <app-files></app-files>. The generated component already contains a basic component class in the file src/app/files/files.component.ts, decorated with the correctly configured @Component decorator. To implement our component we have to include the necessary file system functions from the Node.js core module fs and some other functions from the Node core via
    import { readdir, stat } from 'fs';
    import { resolve } from 'path';
    [...]
After this we implement our properties for storing the current directory, as well as all file system elements in this directory. These properties are always updated in sync via the changeDir method when the user clicks on a directory entry. When a regular file is clicked we want to open it in the systems default application, rather than changing the directory. This can be implemented the following way:
To represent these information in our view we list all the file system entries via NgFor and handle the user interaction via a click binding by inserting the following into src/app/files/files.component.html:
    <ul *ngFor="let entry of entries">
      <li><a (click)="changeDir(entry)">{{entry}}</a></li>
    </ul>
During development you can live-test and debug your app by running npm run start and you can create unit tests by adding test cases in the <component>.spec.ts file of your component and run them via npm run test.
After adding the directive to the main view (it is added to the module automatically by the CLI), by inserting
<app-files></app-files>
at the end of src/app.component.html and setting the correct application title in src/app.component.ts we can have a first look at our file list.
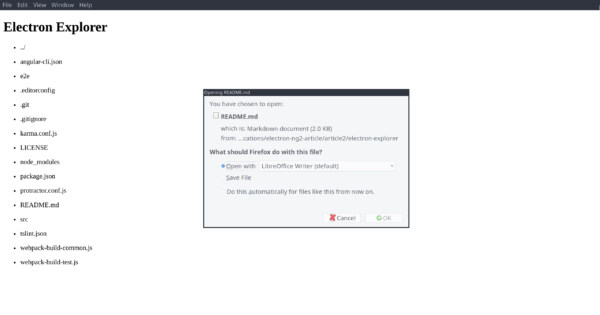
If the user clicks on a file, we want to open the file in the default program associated with the file type on the users system. Fortunately Electron provides this feature out of the box with the function shell.openItem. Lets include the shell object by adding
import { shell } from 'electron';
to the top of src/app/files/files.component.ts and implement our openFile method by using the provided helper function:
Implementing keyboard shortcuts is a bit harder because of Electrons architecture. Electron allows the registration of keyboard shortcuts in the MainProcess only, while our application gets executed in a RendererProcess. Because we want to handle the keyboard shortcuts in our application we have to use Inter-process communication (IPC) to communicate between the MainProcess and a RendererProcess. Fortunately Electron provides an easy event-based IPC mechanism to achieve this. In the Electron IPC mechanism the MainProcess doesn’t know how to send information to a RendererProcess until it gets a reference to corresponding IPC endpoint through an incoming message. Therefor our application has to request the keyboard shortcut in the RendererProcess using ipcRenderer.send:
Our files component now sends a message to our MainProcess containing the desired keyboard shortcut. Our MainProcess now listens for the request-keyboard-shortcut message, subscribes to the provided shortcut via globalShortcut.register and notifies our component via event.sender.send. To implement this behavior, we edit src/entry.js:
Make sure to make the corresponding changes in src/entry.live.js to enable the feature when running your app with npm run start, too. Now we can listen for the corresponding keyboard-shortcut-Backspace event in our component and move upwards in the file tree:
Now our app reacts to key presses on Backspace and moves to the parent directory. Great!
With only little code we created our own small file explorer which already integrates itself into the surrounding system and there are a lot more APIs we could use to achieve more system integration and features!
As we have seen Electron can be a great tool to develop full-featured desktop applications especially when combined with a modern GUI application framework like Angular 2.