Storybook is a component-driven tool for creating visual style guides and demonstrating UI components from React, Angular and Vue, as well as web components.
In particular, snapshot testing provides an opportunity to detect and correct unexpected changes to style at an early stage.

Snapshot testing in Storybook
Snapshot tests are a very useful tool if you want to ensure that there are no unexpected changes to your user interface.
A typical snapshot test case renders a UI component and creates a snapshot before comparing this to a reference snapshot file that has been saved alongside the test. If the two snapshots do not match, the test has failed: There has either been an unexpected change or the reference snapshot needs updating to match the new version of the UI component.
Storybook offers several ways to test an application, starting with Chromatic. However, this tool chain assumes that the source code has been versioned in GitHub and is subject to a monthly fee for professional use.
Another option is Storyshots, a streamlined addon that uses the Jest testing framework. It launches in the command line, where it lists instances where components have deviated from their previous state. The programmer must then check whether such changes were intentional or erroneous.
Installation for Angular
This guide assumes that Storybook has already been installed for the Angular application. A setup guide can be found at the following link. Angular comes with the Karma testing framework by default. To migrate the application to Jest, the following steps are required:
Installation of Jest dependencies
To install Jest, simply run the command “npm install jest jest-preset-angular –save-dev” in the command line.
Create Jest setup file
In the root directory of your Angular project, create the new typescript file setupJest.ts with the contents: import ‘jest-preset-angular’.
Adjust package.json
A script for the Jest testing framework must be added to the package.json of your Angular project:
{
 "jest": {
 "preset": "jest-preset-angular",
 "setupFilesAfterEnv": [
 "<rootDir>/setupJest.ts"
 },
}
Außerdem muss die Script-Ausführung für Test angepasst werden. Anstatt “test“: “ngtest“, muss “test“: “jest” In addition, the test script execution must be adapted. Instead of “test”: “ngtest”, “test”: “jest” must be used.
Removing Karma (optional)
Run the following command line to remove Karma:
npm uninstall karma karma-chrome-launcher karma-coverage-istanbul-reporter karma-jasmine
karma-jasmine-html-reporter
Next, the Karma.config.js and test.ts files in the <root>/src directory should be deleted and the section for testing must be removed from the angular.json.
Migrating from Jasmine (optional)
To migrate to Jest, certain adjustments must be made:
• Command line: npm uninstall @types/jasmine
• jasmine.createSpyObj(‘name’, [‘key’]) becomes jest.fn({key: jest.fn()})
• jasmine.createSpy(‘name’) becomes jest.fn()
• spyOn with returnValue() must be changed to jest.spyOn(…).mockReturnValue(…)
• spyOn with callFacke() must be changed to jest.spyOn(…).mockImplementation(…)
• Asymmetric matchers: jasmine.any, jasmine.objectContaining, etc. become expect.any, expect.objectContaining
Installing Storyshots dependencies
Storyshots is now being installed. To install Storyshots, the following two command lines should be run::
npm i -D @storybook/addon-storyshots
npm i -D @storybook/addon-storyshots-puppeteer puppeteer
After installation, the following dependencies should be available in the package.json (as at 12/11/2021; important for the installation workaround under Angular):
"jest": "^27.3.1",
"jest-preset-angular": "^10.0.1",
"@storybook/addon-storyshots": "^6.3.12"
"@storybook/addon-storyshots-puppeteer": "^6.3.12"
Creating Storyshots installation file
After installing Storyshots, the addon still needs to be configured. To do this, the Storyshots.test.js file must be created in the <root>/src directory with the contents:
import initStoryshots from '@storybook/addon-storyshots';
import { imageSnapshot } from '@storybook/addon-storyshots-puppeteer';
import path from 'path';

// Function to customize the snapshot location
const getMatchOptions = ({ context: { fileName } }) => {
 // Generates a custom path based on the file name and the custom directory.
 const snapshotPath = path.join(path.dirname(fileName), 'snapshot-images');
 return { customSnapshotsDir: snapshotPath };
};

initStoryshots({
 // your own configuration
 test: imageSnapshot({
 // invoke the function above here
 getMatchOptions,
 }),
});
Expanding tsconfig.json for Storyshots
Moreover, the tsconfig.json must also be adapted. To do so, the compilerOptions section in tsconfig.json must be expanded as follows:
"compilerOptions": {
 "esModuleInterop": true,
Expanding package.json for Storyshots
Lastly, the section contained in the package.json must be reconfigured for Jest:
"jest": {
 "preset": "jest-preset-angular",
 "setupFilesAfterEnv": [
 "<rootDir>/setupJest.ts"
 ],
 "transformIgnorePatterns": [
 "<rootDir>/node_modules/(?!(@storybook/addon-docs))"
 ],
 "moduleNameMapper": {
 "jest-preset-angular/build/setup-jest": "jest-preset-angular/setup-jest",
 "jest-preset-angular/build/AngularNoNgAttributesSnapshotSerializer": "jest-presetangular/build/serializers/no-ng-attributes",
 "jest-preset-angular/build/AngularSnapshotSerializer": "jest-presetangular/build/serializers/ng-snapshot",
 "jest-preset-angular/build/HTMLCommentSerializer": "jest-presetangular/build/serializers/html-comment"
 }
},
These adjustments are specific to the selected version because the folder structure must be remapped in Jest. This may change again in later versions of Storyshots.
Testing components
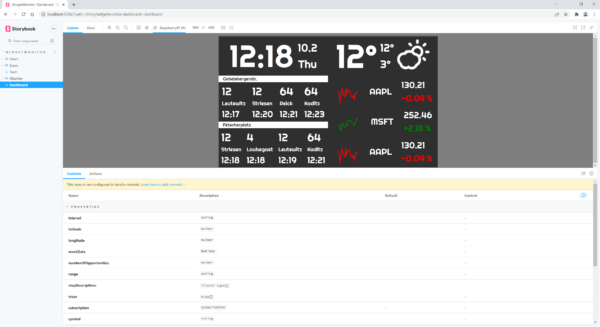
There is a sample application for the test, which is composed of four individual components. The first component displays the time, including the date and day of the week. The second component shows a chart of the current weather in degrees, as well as the highest and lowest daily temperatures. Another component displays tram departures, using Dresden Striesen as an example. There is one final component, which shows three share prices along with graphs and indicators.
For example, the source code for the clock component appears as follows:
export default {
 title: 'WidgetMonitor/Clock',
 component: ClockComponent,
 timeIsRunning: false,
} as Meta;

export const Morning = () => {
 return({
 props: {
 timeIsRunning: false,
 time: new Date(2021, 10, 9, 9, 9, 9, 9)
 },
 parameter: {
 time: new Date(2021, 10, 9, 9, 9, 9, 9)
 }
 })
}

export const Afternoon = () => {
 return({
 props: {
 timeIsRunning: false,
 time: new Date(2021, 10, 9, 15, 15, 15, 15)
 }
 })
}

const Template: Story<ClockComponent> = (args: ClockComponent) => ({
 props: args
});

export const Running = Template.bind({});

Running.args = {
 timeIsRunning: true,
};

Running.parameters = {
 storyshots: { disable: true }
};
This includes three states, the first two of which are static points in time. The third state, “Running”, shows the current time, i.e. not static.
Prerequisite for snapshot tests in Storybook
It is important for us to have a static state under Storybook in order to test the application. The “Running” state is not static in the clock component example. This can be omitted by adding the parameter storyshots: { disable: true } (see source code above).
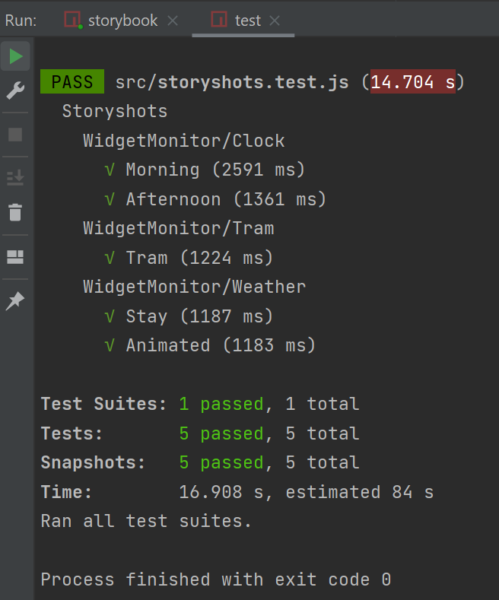
Start testing
Using the npm test command line, the test is launched in the command line of the Angular project directory. The initial snapshot test will now produce a snapshot image of each component state.
To demonstrate an example of an error, the font used on the clock in the clock component has now been changed so that it is smaller and red in the SCSS, and the test has been restarted.
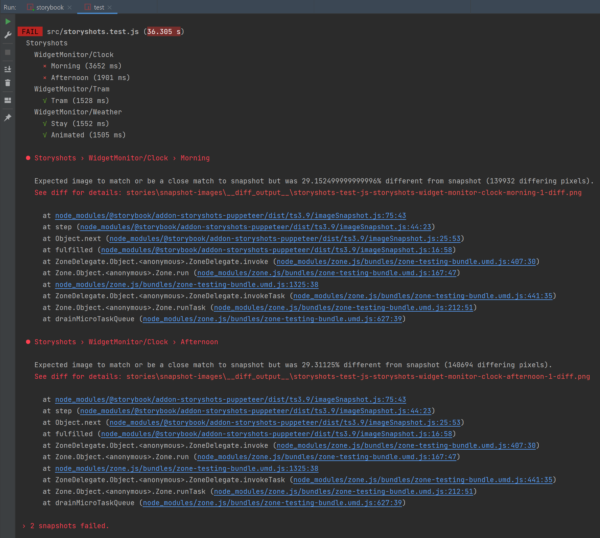
The result of the snapshot test shows that the two active states of the clock component have failed and a diff image is referenced. This appears as follows:

The original state is visible on the left, and the state following the change can be seen on the right. In the middle, you can see how both states overlap. It is now possible to either apply this state or to re-run the test after the application has been adapted.
The npm test — -u command line is used to force-apply the state. This deletes the differential images and creates a new snapshot of the state of the component. The npm test command line should now run again with no errors.
Summary
For Storybook, maintaining a state invariably means that more effort is required in the project. Anyone who is not afraid of tackling this can use Jest and the Storyshots addon to check a specific state in a closed environment. This is particularly helpful for detecting styling bugs at an early stage, as these can be difficult to detect in unit and end-to-end tests and usually only become apparent during manual testing.