The central objective of each style guide is to ensure a consistent appearance and a consistent user experience (UX) across multiple applications. For this reason, there are detailed specifications for applications of the ZEISS Group as to how a user interface (UI) should look and behave. Any application that is to be published and used commercially must comply with these requirements.
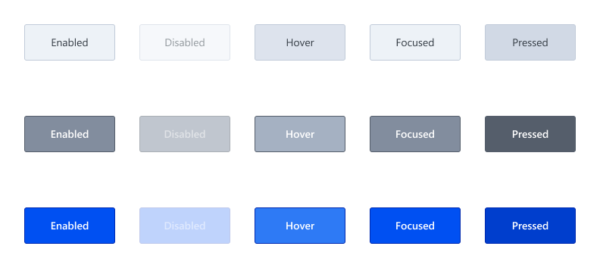
Figure 1 illustrates the complexity and the manifold states that hide behind even very simple UI elements. The efforts for the correct implementation of such states are usually hidden and are often overlooked during application development or given lower priority compared to the implementation of functions.
Figure 1: Different states of a button in the ZEISS style guide
With an advanced project duration, small deviations from the style guide accumulate, which quickly deceive the overall picture. Other classic examples of such UI errors are:
Missing states of UI elements (Hover, Focused, …)
Incorrect use of font sizes, fonts and font colors
Incorrect use of greyscales for surfaces, borders or dividing lines
Incorrect spacing and positioning of UI elements
Although such deviations can usually be corrected quickly, extensive creation and acceptance processes often result in disproportionate effort for such comparatively small adjustments. If there are also misunderstandings or misinterpretations of the design specifications and several feedback loops are required, this is a negative experience for all involved.
In order to correct such small UI errors more effectively and efficiently and thus improve the product piece by piece and adapt it to the style guide, we have created and established an uncomplicated form of collaboration.
Pair Programming with Specialists for UI/UX
Pair programming has been successfully used within the development team of our project for a long time. It promotes collaboration and the quality of the code through the four-eyes principle. Two people from the development team work simultaneously and directly on the program code. Through discussion, criticism and the introduction of new ideas, high-quality code should be generated and development time saved.
We made use of this principle in the project and expanded the circle of participants to include specialists for UI/UX in order to be able to give developers direct feedback on their adaptations to the user interface. The requirements and requests for changes to the user interface are communicated by the experts for UI/UX directly in the appointment and the changes are checked instead of documenting them in the backlog and waiting for them to be implemented correctly at some point. The people who specialize in UI/UX include those responsible for the user interface specifications, who are significantly involved in the development of the Figma UI design.
The regular exchange in this circle is called UI Dev session or simply Dev session. The whole thing works very well in a decentralized way in mobile work, because thanks to Microsoft Teams and its screen-sharing function, all participants can see the changes to the code and the user interface at the same time.
To create a framework for pair programming, we have created the following “rules of the game”:
People from the field of development as well as from the field of UI/UX participate. The group consists of two to a maximum of four people. Together, we search for the solution for specific UI errors and program live on the code.
A UI Dev session does not have a predefined scope. On the contrary, the objectives achieved are limited by the time available.
Depending on the requirements of the project, a UI Dev session should take place at regular intervals and should have a clear time frame. For example, 2-3 hours per sprint, week or month can be reserved for a UI Dev session. This means that the time required to solve UI errors should be proportionate and consistent.
Possible topics are maintained in a list by the specialists for UI/UX and processed iteratively in several UI Dev sessions. The basis for this is, for example, deviations between implementation and style guide or feedback from usability tests.
The development team is free to select topics from the list and prepare them in advance if need be. This should help to solve as many issues as possible in a short time. However, where necessary, priority may be given to issues for maximum benefit, in order to solve the most important issues first, especially in tight time frames.
The activities on unexpectedly complex topics whose live implementation is beyond the time frame of a UI Dev session will be stopped after the participants agree and outsourced to other backlog items (e. g. user stories or spikes) and edited later.
The edited and solved UI errors should be documented after the UI Dev session and made available to the project team. This allows each project member to see what changes have been made in which UI Dev session. In addition, it is a good idea to present the topics covered in the Sprint Review briefly to the entire project team.
Abbildung 2: Beispiel für Abweichungen von der Implementierung (links) und für Styleguide-konformes Figma-Design (rechts)
Conclusion
Whether clear deviations from the style guide, optimizations after usability tests or other minor adjustments to the user interface: The procedure described in this article for conducting a joint UI Dev session with developers and UI/UX specialists promotes team collaboration and can solve UI errors quickly and efficiently. The documentation effort should be reduced to a minimum and the time required for implementation should be clearly defined. Through iterative implementation of the UI dev sessions, the list of UI errors is processed piecemeal, whereby the project team raises a mutual awareness of such issues.
The UI-Dev Session is now a proven tool in our project and an integral part of every sprint. My colleague Franziska Kubitz will describe a detailed experience of our project in the second part of this blog article series.
In May 2020, Microsoft released a new, unified UI platform for all systems under the resounding name MAUI or in full “. NET Multi-Platform App UI”, which is expected to be launched in November 2021. But what exactly is behind this name? This question is to be answered in this article. The platform will be presented, the technical background explained and, above all, the potential of the technology will be highlighted.
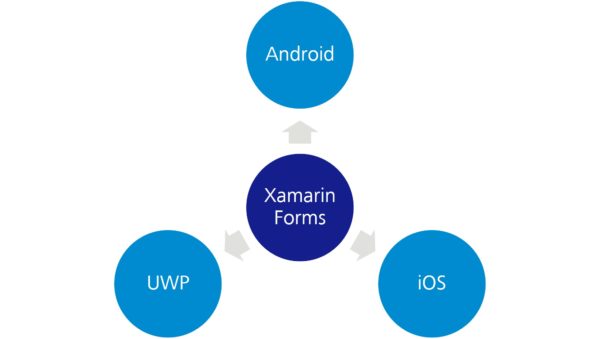
To understand MAUI as a platform, you need to know Xamarin. Xamarine (and in particular Xamarine.Forms is a platform for developing native apps for iOS, Android, and UWP with C#, XAML, and .NET. You can create an app from a code base for all supported operating systems. Thus, the development effort for different operating systems is significantly lower compared to the native coding of the applications. Currently, the various SPA frameworks for the browser are actually the only technology that offers comparable portability at a similar overall effort.
Figure 1: Xamarin.Forms allows you to create native apps for all supported operating systems from a single code base. MAUI is the direct successor of Xamarin.Forms.
But what is this mysterious MAUI and what does it have to do with Xamarin? The answer to this question is quite simple: MAUI is the new Xamarin or, more precisely, its direct successor, which is shipped with .NET 6 for the first time.
Just like Xamarin.Forms, MAUI can create apps for all supported operating systems from a single project and with the same code base. Installation packages are generated from the code, which can then be installed on the different platforms. Officially, Microsoft supports Android from version 10, iOS, macOS and of course Windows, both natively and as UWP app. In addition, there will be a community implementation for Linux operating systems and an implementation for their Tizen platform provided by Samsung. The project and build system will be standardized for all platforms and the creation of the apps will be possible via both Visual Studio and the .NET CLI
Another feature will be the sharing of resources such as images or translations. These should be automatically converted by MAUI into the corresponding native formats and integrated into the created packages. You will also be able to access the APIs of the respective operating system at any time. For this purpose, there should be a special folder in the project, under which the native code hooks are stored and which are then automatically integrated into the package when compiling.
All functionalities available in the .NET standard, such as Dependency Injection, should also be able to be used for a MAUI app. By using C# and XAML it will also be possible to use corresponding design patterns such as the widely used MVVM pattern. Also new is the support for the Model View Update Pattern, a pattern borrowed from Elm, which is intended to be able to display a unidirectional data flow analogous to Redux. Also, Microsoft’s web-based client technology Blazor is to be supported.
Unfortunately, MAUI will not be officially available until the launch of .NET 6 in November 2021. In addition, parts of the framework have been moved to .NET 7 and thus to 2022. The official support for Blazor and the MVU pattern should be mentioned here. Since MAUI is the official successor of Xamarin, it will be supported with the release of .NET 6 for another year and then discontinued.
Microsoft’s strategy for the future of UI development with the .Net Framework seems clear: MAUI is the new “First Class Citizen” when it comes to creating native user interfaces.
At first it all sounds like Microsoft wants to integrate native cross-platform support into the .NET framework. However, this plan will only work if MAUI is accepted by the developers. Due to the very late release and a lot of excellent open-source alternatives such as Uno might not be able to establish MAUI in the end. At the moment, therefore, one can only wait and see what the future holds.
However, MAUI would actually have the potential to become the only UI technology in the .NET framework and eventually even replace WPF. It offers a variety of functionalities to increase productivity in development – “Write once, run everywhere” is the motto of the hour. This could significantly reduce costs and development time for apps on all supported platforms. Just imagine the joy of the customer if you could create not only a Windows application, but also the corresponding mobile apps for only a small amount of development effort. Of course, this is an idealized idea, the devil is in the detail as you know. Migration of existing WPF applications is difficult, for example, because the long-awaited XAML standard, which was supposed to define a standardization of elements and tags for all XAML dialects, has apparently been dropped and MAUI and WPF will not be able to be exchanged seamlessly due to different elements.
But if the technology actually delivers on its promises, developers deploy it widely, and MAUI becomes as high-class as Microsoft promises, a cross-platform revolution under .NET could be in the offing.
In the first part of this series we looked at how to build your own web components. Now, let’s take a look at the integration in React applications.
According to their idea, web components can be used independently of JavaScript frameworks. While this works with Angular, for example, with just a few steps without problems, the situation with React is unfortunately a bit different. Why this is so and how to solve the problem is explained in more detail below.
In principle, web components can also be fully used in React. However, in certain cases additional effort is required and deviate from the usual React conventions. Usage is no longer necessarily what React developers would expect.
Essentially, there are two problem areas: On the one hand, it is the problem “Attribute vs. Properties”, which we will address in this article. On the other hand, there is the problem of “custom events” – this is discussed in the next part of this series.
Description of the problem „Attribute vs. Properties“
As we saw in the first part of the series, there are two ways to pass data to a Web component – as an HTML attribute or as a JavaScript property.
In this code example, the value is defined as an attribute in HTML:
<my-component value="something"></my-component>
Here, on the other hand, the property of the same name is set using JavaSript:
In JavaScript, however, it is also possible to explicitly set the attribute:
myComponent.setAttribute("value", "something")
JavaScript is more flexible in this respect, because in HTML only attributes are possible – properties cannot be set in HTML.
It is important to understand: Whether and how attributes and properties are processed or taken into account by the component is entirely up to the implementation of the component. While there is a best practice, to offer both attributes and properties and keep them in sync, technically, no one is bound to do so. It would therefore be possible to accept either only attributes or properties, or to give them completely different names (which would certainly cause the resentment of the users of the component).
On the other hand, however, there are also solid reasons for deliberately deviating from this best practice in some cases.
An important factor is that attributes and properties have different power: Attributes only allow values that can be represented as a string, i. e. strings and numbers. In addition, Boolean values can be represented by the presence or absence of an attribute. More complex data such as JavaScript objects or functions cannot be passed as an attribute, or would have to be serialized.
JavaScript properties naturally do not have this limitation. However, properties have the disadvantage that they are always imperative and not declarative when used. Instead of simply declaring, as with HTML, which state you want to have, you have to use commands to set properties in sequence. From a developer’s point of view, this is rather unattractive, because frameworks such as React and (with slight derogations) Angular have made you accustomed to the benefits of declarative work.
Another difference between attributes and properties concerns performance: Both attributes and properties are used not only to input data into the component from outside, but also to access component information. A nice example of this is the standard HTML tag <video>, which offers the current playback position of the video being played using the JavaScript property “currentTime”. When querying these properties, you get the position in seconds as a decimal number. A matching HTML attribute does not exist. Otherwise, such an attribute would have to be constantly updated with the current playback time, which would be a relatively expensive operation in the DOM. The query via a JavaScript property, on the other hand, can be solved quite efficiently, since a Lazy-Getter method can be implemented for this purpose, which is only triggered when the position is actually queried.
In web components, we have two different mechanisms for a very similar purpose, but they are quite different in some respects.
Attribute
Properties
declarative
imperative
String, Number, Boolean
String, Number, Boolean, Date, Object, Function
React Props
With React, things look a little more straightforward: React only knows so-called “props”. Since React places a strong focus on declarative programming, the use of HTML attributes is similar:
<MyComponent value="something" />
However, React props are not limited to certain data types, but allow transfer of arbitrary data and functions. For this purpose, a syntax with curved brackets is used instead of quotation marks:
As a React developer I have to say that I personally like the React variant with props much better than the distinction between attributes and properties with their respective characteristics in web components – but this is a matter of taste.
Web Components in React
Now the API of web components is just as it is. So the question is: What happens when I use a web component in React? Are “props” passed to the web component as attributes or properties?
Initially, React decides whether the tag is case-sensitive or not, and whether it is a React component (starting with uppercase letters) or an HTML tag, which includes web components. With the exception of some special cases for some standard HTML tags, React Props always uses “setAttributes” for HTML tags and web components. This means that using attributes in web components in React does not cause any problems. It is different when JavaScript properties have to be explicitly used, e. g. because complex data or functions are to be added to the Web Component. React is currently unable to do this in a declarative way. In about 90% of cases, this is not a problem because, as already mentioned above, it is considered best practice to keep attributes and properties synchronous, and to support both variants if possible. Only in the remaining 10% of cases where properties are necessary (because either the authors of the Web Component did not follow the best practice, or some other reason prevents the use of attributes) do we have to come up with something.
However, this does not mean that such web components cannot be used in React at all! We simply cannot go down the usual, purely declaratory path, but must resort to the mandatory API, which is also supported by React. We will look at how this works in the following.
React abstracts from concrete instances of DOM nodes. Even independently of web components, you have to access DOM nodes directly in some cases, for example if you want to call a method like “.focus()”. For this purpose, React uses so-called “refs” and we can use this mechanism to set JavaScript properties on our web components. In the code, for example, it looks like this:
With “const elementRef = useRef(null)” we create a kind of container into which React will put the reference to the DOM node after it has been made. “useEffect” can be used to execute a function once certain variables have been changed. To do this, we give the “elementRef” variable (wrapped into an array) as a second parameter to the “useEffect“-Hook-function. As soon as React has rendered the component for the first time, the specified function is executed, so our property is set accordingly. As you can see, the code is a lot more complicated than just setting an attribute directly on the tag. The example shows, however, that it is possible to use web components in React. In the fourth part of this series of articles, we will look at another variant, which scales better especially for larger applications where certain web components are to be used again and again. In the next article in the series, however, we will then take a closer look at the second problem of web components with React: The processing of custom events.
Conclusion
As an interim conclusion, the situation of web components with React is complicated. On the one hand, React is ideally suited for the development of comprehensive web applications and is therefore widely used. On the other hand, it is extremely annoying that React has such problems with a modern web technology like web components.
There are at least two reasons for this: On the one hand, React was created at a time when web components or “custom elements” were still a mere idea and far from being implemented in practice. At the same time, the React team places great emphasis on backward compatibility and understandably shies away from incompatible changes in the way React components are written. The discussion about which options are available to make React compatible with web components can be followed if you are interested in the issue tracker of the project.
The second factor I want to highlight is: The concepts of web components and React are quite different when it comes to how components are used. React is designed entirely for declarative programming, while web components and standard HTML tags provide a mixed form that is partly declarative, but in some places imperative. And since React developers like this declarative character of React, it is not the solution to simply blindly adopt the imperative API of web components. Instead, ways need to be found to enable these two “worlds” to work together. Unfortunately, the process of finding a solution has been going on for quite some time now, and in the meantime the discussion within the React-developer community seems to have fallen asleep a bit.
It is therefore only to be hoped that this process will pick up speed again, so that web components can be used in React projects easily and without any hassle.
We are testers and love test methods, where the focus is on human strengths like creativity and collaboration. Nevertheless, we do not want to act without rules, or rather without framework conditions, or plead for an abstinence of documentation.
We have already encountered some prejudices about exploratory testing, therefore we have asked ourselves the question how these come about. In this article we will talk about those prejudices in more detail in order to get rid of them. But first we will take a closer look at exploratory testing.
What is exploratory testing?
Exploratory testing can do much more than just working off test cases in a monotonous way: It promotes creative thinking during a test session, blasts limitations and satisfies curiosity. At the same time, it requires discipline regarding reaching the set goal during a test implementation and with regard to documentation.
ISTQB (independent panel of experts for standardized training for software testers) describes exploratory testing in its glossary as a „an approach to testing whereby the testers dynamically design and execute tests based on their knowledge, exploration of the test item and the results of previous tests“ (archived version 3.4 of the ISTQB® GTB Glossary). Unlike the “classic“ testing with prepared test cases, it is therefore an intuitive test approach where each previous idea leads to the next one. There are various tools to achieve a new starting point, to develop ideas and create more structure. These include for example the test charter, the heuristics, the test oracle or also the test tours.
Figure: Exploratory testing – an intuitive test approach
In summary, the tester creates the tests through experience, intuition, curiosity and structured approach. Nevertheless, this type of testing is not only well-suited for experienced testers but also for project newcomers who are just getting to know the test object and/or the procedure. To take the person by the hand a goal should be defined or an overview of the object should be created. This can be done either in direct exchange via pair testing or in groups via the mob-testing approach.
Prejudices against exploratory testing
But what prejudices are there now against which exploratory testing must stand its ground?
Exploratory testing is often notorious for having no structure; for not being comprehensible; and being unquantifiable – plain and simple “I-will-click-around-and-see-what-happens”. The statement of obsolete documentation further complicates it to charge for exploratory testing in client projects. This is an understandable reason, if it is assumed that exploratory testing is documentation-free and thus the test performance is not traceable. The following statement and the killer argument are therefore also made quickly that there is no time available for this test.
In the following, we will take a closer look at the allegations just presented as well as other negative statements and comment on them.
Prejudice Number1: “Exploratory testing is not comprehensible.” / “I cannot test exploratively-tested content again.” / “How am I supposed to do a bug retest?” These statements made us curious. When asked what is meant by exploratory testing, we often received the answer that it is used for spontaneous clicking around in the test object. It should promote getting to know the test object or test further variants that were not considered in the previous test-case creation. And thus, it is carried out in an unplanned as well as unstructured way. No documentation was mentioned. This explains how the prejudice comes about that this test method is not comprehensible, and that tests and bug fixes are difficult to retest. It is absolutely true that exploratory tests support spontaneous test taking. However, care must be taken to always document the tests steps, expected results, or even deviations, and thus make the tests traceable. The depth of documentation must be defined individually for each project according to its framework conditions. As a conclusion we maintain that: Exploratory testing does not mean not to document.
To counteract the first prejudice and to bring structure into exploratory testing, session-based test management can be used. During a session, the test object is checked with maximum flexibility and freedom. The framework conditions are set by means of a defined standpoint and a charter (purpose and procedure for a session). In addition to some other components, this also includes documentation by means of session reports in which the test steps carried out, deviations, the test object, and other information can be recorded. These can be adjusted depending on the person or project being tested. Various examples of session reports can be found on the Internet.
At this point, a special application should be mentioned: Exploratory testing in a regulated environment. Documentation plays a central role here. The prejudice here: Exploratory testing is impossible or very difficult to implement in a regulated environment due to regulatory requirements. In a further article, we will show how to implement it in spite of the requirements.
Prejudice Number 2: “We have no time for exploratory testing” / “First of all, we have to work through our prepared test cases before we can test exploratively.“
In order to implement the exploratory test method actively in the project, one must be prepared to adapt the previous test procedure and recognize the advantage of saving time. Because if you see the exploratory test only as a supplement, without an alignment of the test structure used up to now, this procedure is seen only as a burden or as an annoying addition, which results in the no-time prejudice. However, if we proceed as envisaged in exploratory testing, and if the test case creation takes place at the same time as the test case execution, the now superfluous creation of test cases that are not executed at the end, and thus represent a waste of time, is eliminated. The time gained allows the tester to develop new test ideas and thus to test the test object more intensively. For example, debriefings can be held to share lessons learned with other team members. This time saving can also be used to increase the test automation rate.
Prejudice Number 3: “Documentation is all well and good, but exploratory testing is not sufficient.”: This statement is correct, if it is meant that exploratory testing should be considered as a complete test approach in its own right. In addition to the exploratory tests, at least automated tests should be defined and executed (for example unit tests, integration tests and GUI tests). If the project has a high degree of automation, it is even possible to perform the manual testing purely exploratively. Alternatively, the exploratory method can be used as a complement to the classical testing approach to make manual testing easier, more flexible and freer. How much exploratory testing is applied in a project must always be carefully examined. It is not always possible to make all manual tests exploratory. This can be due to various factors, e. g. an insufficient degree of automation, or a lack of skills on the part of the testers. In our view, they should have skills such as creativity, conscientiousness, initiative, personal responsibility, an understanding of quality, and social aspects such as communication and teamwork skills.
Conclusion
In this article, we have shown the advantages of exploratory testing and put together arguments to refute the existing prejudices against it. From our point of view, it is worthwhile to rethink the previous test procedure and to engage in exploratory testing in order to exploit its positive effects. Of course, each project should be considered on its own merits and the possibilities for exploratory testing should be determined – without, however, ruling this out completely from the outset. Negative statements or experiences should be questioned where appropriate. When choosing the method and its execution, the skills of the testers must always be considered. At this point we would like to point out that documentation is also essential for exploratory testing.
This post was written by:
Katharina Warak
Katharina Warak works as a senior software test engineer at ZEISS Digital Innovation. She is responsible for automation at the API and GUI level. In addition, she helps customers in the projects to learn more about the collaborative test methods and to use these methods to improve their way of working. She also likes to share this knowledge at international and national conferences.
In the following three blog articles, I would like to present Appium to you: a test automation tool which was developed especially for testing mobile applications. Appium offers us the possibility to simulate specific mobile application scenarios e.g.: gesture control, SMS or incoming calls and to automate corresponding test cases. Apart from virtual devices, Appium offers us the possibility, as an additional feature, to perform automated test cases on real mobile devices.
Why automate on mobile devices?
But why should we run our test automation on real devices? Why not use the virtual devices from the development tools Xcode (iOS) and Android Studio (Android)? These questions are justifiable, because the acquisition of end devices generates additional costs.
The first argument for automation on real end devices may sound trivial but is of great significance: due to the fact that your users do not utilize any virtual devices.
One could assume that virtual devices reflect one-to-one real end devices. But this assumption is wrong. The main reason is that virtual devices don’t have any hardware of their own. They use the hardware of the computer on which they are installed. Experience shows also that errors which were found on a real end device could not always be replicated reliably on virtual devices.
In addition, automation on real end devices enables you to examine the performance of your application. Even if all the features of your application work perfectly, bad performance on the end device may result in your application being unusable. Tests on virtual devices provide us with no reliable data regarding this matter.
The problem of hardware and software fragmentation can also be seen as an argument for the automation on real end devices.
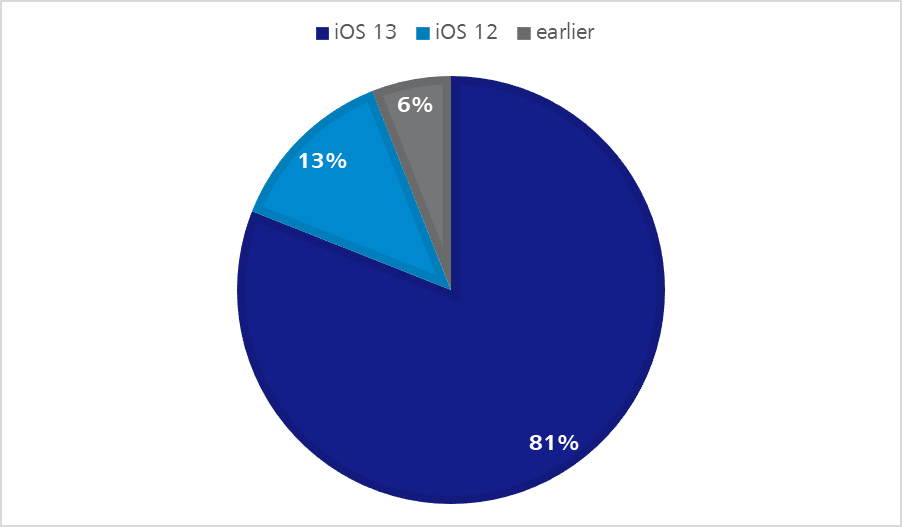
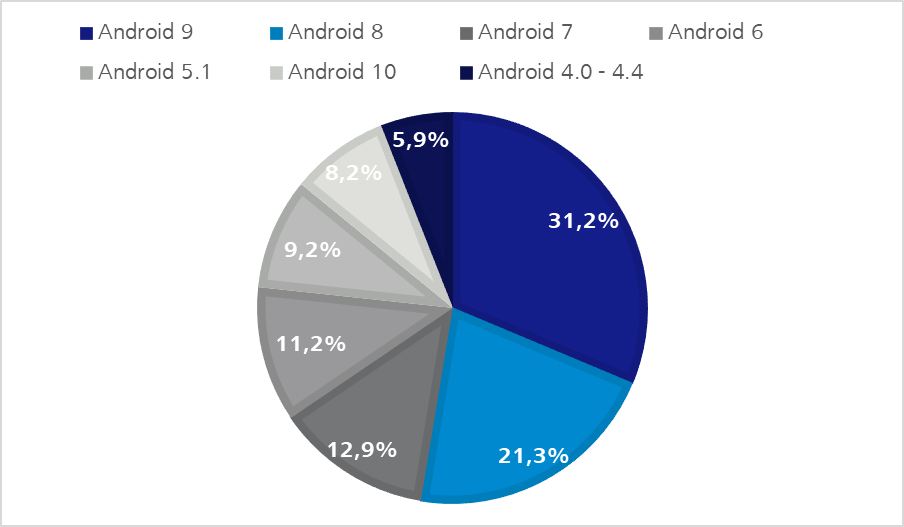
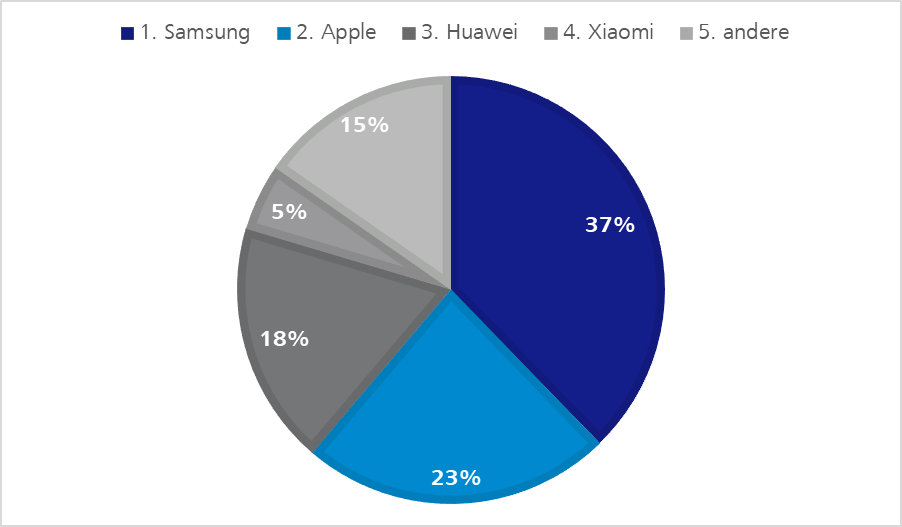
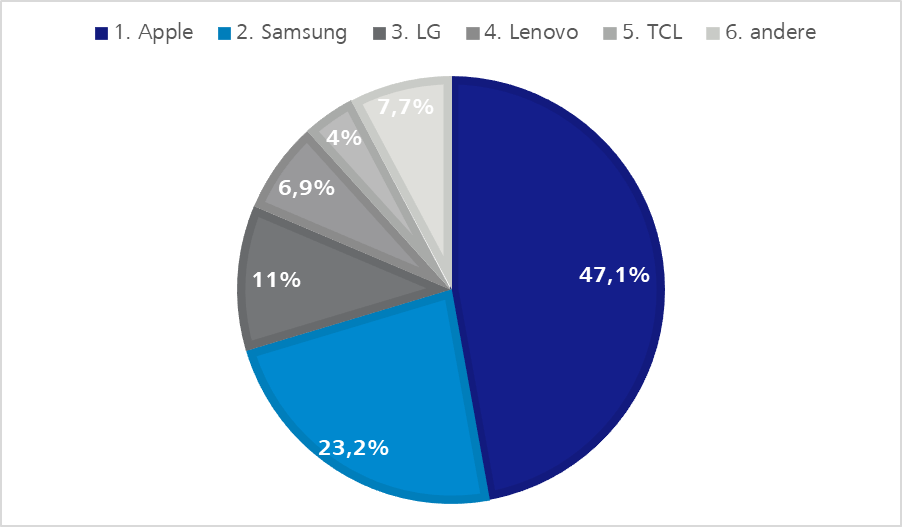
With regard to iOS as well as Android devices due to an ever-increasing product range, as well as operating system versions which remain longer and longer in circulation, a kind of natural fragmentation is developing – as shown in the following statistics.
Figure 1: iOS distribution on Apple devices – Q2 2020 | https://developer.apple.com/support/app-store/Figure 2 – Android OS distribution – Q2 2020 | https://9to5google.com/2020/04/10/google-kills-android-distribution-numbers-web
Regarding Android devices we can observe another software fragmentation. The manufacturers are able to change the Android operating system within certain parameters. So system apps, like the virtual keyboard, can operate with varying results.
Let’s take the Gboard from Google and the virtual keyboard OneU from Samsung as examples. Both support swipe-control elements or the input of gestures, but they differ in the execution.
Google‘s virtual keyboard shows you the word, which is being formed while you glide over the keyboard. Whereas Samsung’s keyboard on the other hand shows you the word only when your fingers have stopped gliding.
One should not assume that the virtual devices from xCode or Android Studio simulate those differences.
Of course, we cannot establish an infinitely large pool of mobile end devices. However, we can make a selection of devices which are strongly represented by their users.
End devices by Apple, Samsung and Huawei surely play a more decisive role in the pool than equipment constructed by other manufacturers as the following statistics show.
Having gone into the advantages of test automation on real end devices, of course this still raises the fundamental question for projects with an existing test automation: Why should Appium be introduced as an additional test automation tool?
The problem of software fragmentation can be observed also in test case automation. There are more and more tools which support certain functions and settings, but are only conditionally compatible with each other. Ideally, we would like to utilize only one single test automation tool in order to reduce the obstacles of test case automation.
To answer the last question, let‘s start from the perspective of a multi-platform project.
Our application has been programmed as a desktop website, native iOS app and hybrid Android app. Additionally, we have created a responsive web app because your website already has good coverage of automated test cases via Selenium.
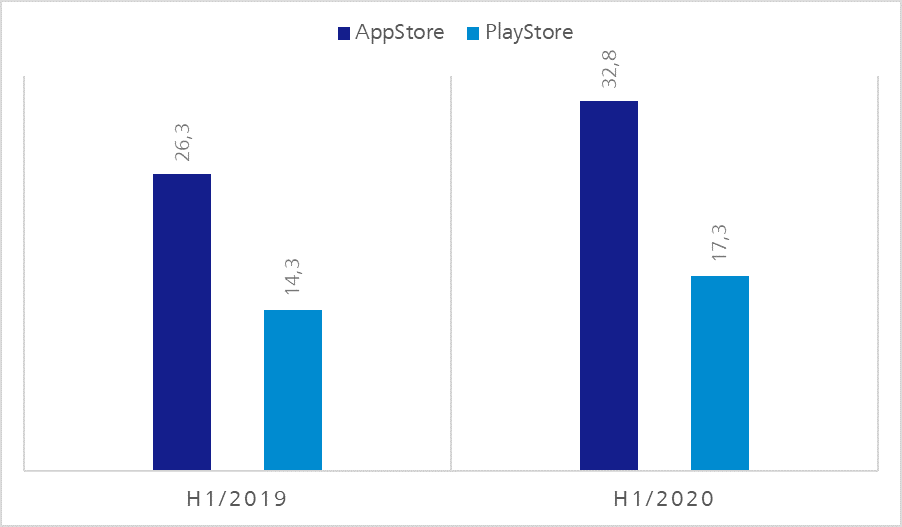
The following statistics indicate that test case automation which is merely limited to the website concerned is no longer sufficient for our multi-platform project.
Figure 5: Possession and use of smartphones according to age groups in Germany 2019 | de.statista.comFigure 6: Revenue from mobile stores in bn. US$| https://sensortower.com/blog/app-revenue-and-downloads-1h-2020
We should assume that all relevant target groups also use our application on mobile end devices.
Appium vs. Selenium
A short look back to the origins of test automation tools shows why the introduction of further tools is useful regarding our example.
The first applications for which the test cases on end devices were automated were websites, amongst other things. Due to there being an increase of browsers the automation of test cases even in the front end area became necessary.
One of the most successful test automation tools in this area is Selenium. According to the origins, however, Selenium is geared towards the test case automation of websites. Mobile-specific use cases as gesture control are no longer being supported.
But let us assume that in our multi-platform project only a small number of users utilize the mobile applications. The majority use the desktop website and this has, as we know, a good automated test case coverage via Selenium.
Is the introduction of Appium still worthwhile?
Having briefly explained the problem of tool fragmentation, the introduction of Appium may possibly be connected more with costs rather than benefits. One could suppose our teams, which are experienced in Selenium automation, could automate the most important test cases with Selenium, and a few workarounds for our mobile applications. But let‘s take a closer look at Appium to check whether this claim is true.
Automation of mobile specific application scenarios using Appium
Let us first take a look at the problem of mobile specific application scenarios. Let’s contemplate use cases which Appium supports, where difficulties surely will occur for our test-automation experts using Selenium.
Gesture control
In our application a list exists whose end our users would like to reach. In the desktop-browser version, the users certainly utilize the mouse wheel, the scroll bar or the arrow keys on the keyboard for this. In the mobile applications, however, they will fall back on diverse gestures in order to reach the end of the list. They could put their finger on the lower screen area, hold it, pull it upwards and release it again just to move a certain part of the list.
Another possibility would be to place the finger at the bottom of the screen and with a quick upward-swipe gesture trigger an automatic scroll-down. For these cases we could fall back on TouchAPI by Appium.
Calls and SMS
Incoming calls and SMS have a much heavier impact on use of our application on mobile end devices. While on the desktop, the call usually only opens another window, the running application on mobile end devices is interrupted most of the time and the respective application for telephone calls is summoned to the foreground. Furthermore, incoming SMS usually trigger a notification via the current application. For these cases we can fall back on the phone-call API from Appium.
System applications
On mobile end devices our application probably comes much more often in contact with system applications. Be it the calendar, the photo gallery or the in-house map application. Appium also offers us at this point – regardless of which Appium driver we use – the possibility to integrate these system applications into our test automation.
Automation of hybrid apps
Now let’s take a look at the tool fragmentation issue in test case automation.
One part of the problem consists of the various types of development in mobile applications. In our example project the most common types are represented.
Let’s take a closer look at how Appium deals with the more complex hybrid applications via the Context API.
To find elements, or to interact with them, Appium assumes by default that all our commands refer to native UI-components which are displayed on the screen. Our test session is therefore still in the so-called Native Context.
If we use, for example, the Appium command getPageSource within the framework of a hybrid application, we will find in the output regarding web views only elements like <XCUIElementType…>. Important elements such as Anchor Tags or Divs are not shown to us at this stage.
So as long as we move in the Native Context all web views, or so-called Web Context are a black box for Appium. Although we are able to discern Web View UI-elements, and eventually even some buttons which for example iOS implies. However, it will not be possible to discern elements on the basis of CSS-Selectors.
To get better access to the Web Context, we need to transfer our Appium Session into the Web Context. This we can do by first discerning the name of the Web Contexts with the command driver.getContextHandles. This displays an array of all context names which Appium has created to assign them to the available Context. In our case the output is a Web Context called WebView1 and a Native Context called NativeElement1.
Now to transfer our Appium session into the Web Context we use the command driver.setContext(WebView1). When this command has been executed Appium uses the Context environment which corresponds to the specified Context.
All other commands now operate within the Web Context and relate to WebView1. To be able to address again the native element we use the same command once more with the name of the Native Context which we would like to address. So in our case: driver.setContext(NativeElement1). If we would like to find out in which Context we actually are we could use the following command: String currentContext = driver.getContext();
After briefly discussing the Context API from Appium, let’s take a look at how it works.
On iOS, Appium uses the so-called „remote Debugger Protocol“ which is supported by Safari. This „remote Debugger Protocol“ enables us to receive information about the sites displayed in Safari, or to control browsing behavior. One method we can fall back on is the possibility to paste the current website into JavaScript.
Appium uses this function to perform all commands available in the WebDriver API.
Support of code languages
Appium allows you to write tests in different code languages. This is an advantage of the client-server model. The Appium development team is able to implement all Appium functions in only one server code base, which is written in JavaScript (Appium Server = NodeJS platform). Nevertheless, users who write codes in another programming languages are able to get access to these functions. The access takes place via the Appium client libraries, which Appium provides us with. If, for example, we would like to write our automatic tests in Java, we need to integrate the corresponding Appium Java Libraries into our Appium Client.
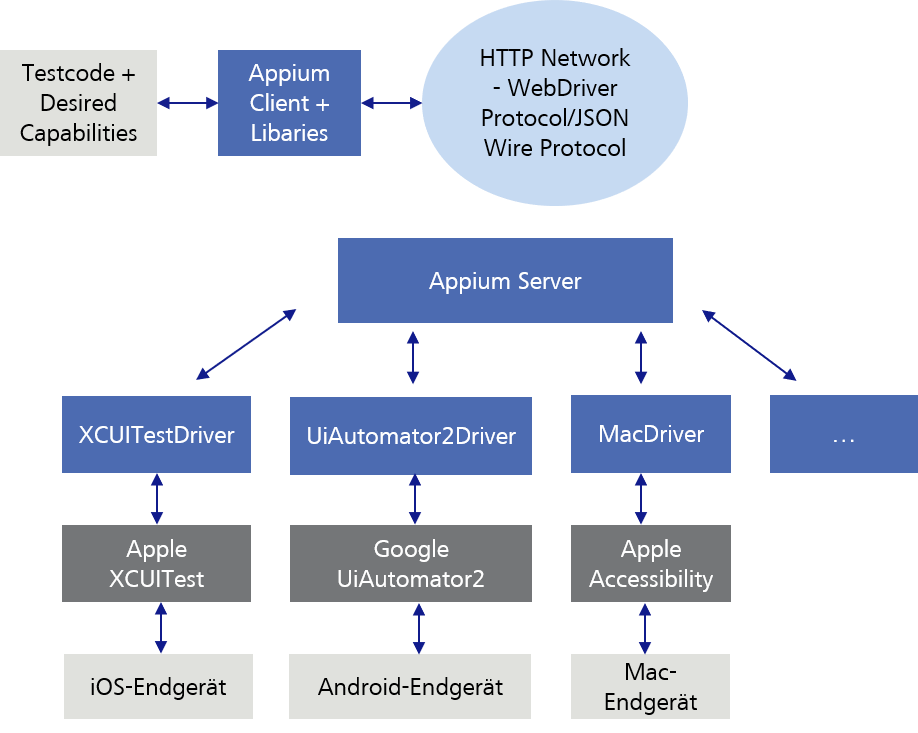
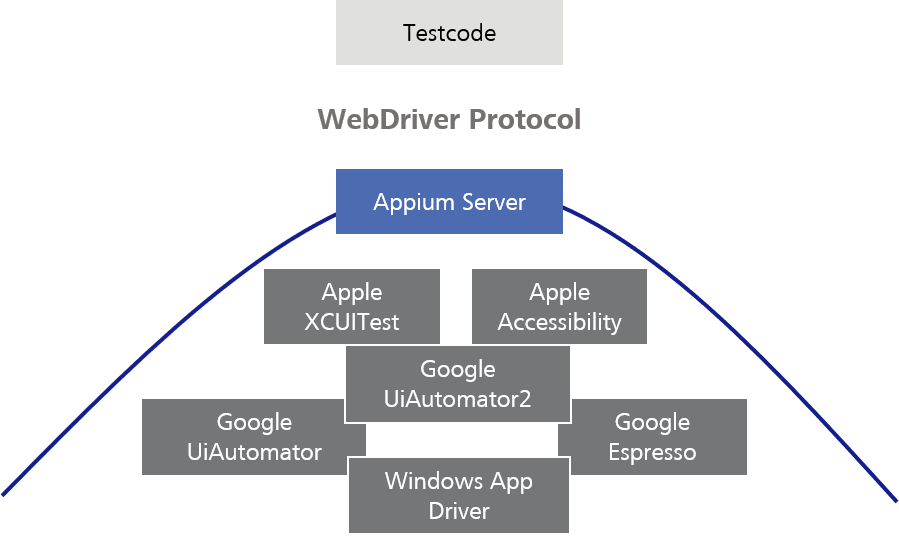
Appium client server model
As already described, we send our test code (commands/requests) via the Appium Client with the corresponding libraries to the Appium server. As Appium Client for example the developer tool Eclipse can be used. The Appium Server again sends our test code (commands/requests) to the mobile end device, on which this is then executed. But let’s go into more detail.
In order that the Appium Server can interpret the Appium Client test code (commands/requests), it uses the WebDriver Protocol, or the older JSON Wire Protocol, which convert our test code to a HTTP RESTful request.
Afterwards, the Appium Server sends our test code depending on which end device we would like to address to the platform-specific test framework which in turn executes the test code on the end device. At this point, the Appium Server is able to communicate with the different test frameworks.
In order that the Appium Server can decide with which of those platform-specific test frameworks, or with which end device it should communicate, our test code has to be sent along with the so-called „Desired Capabilities“ as JSON Object to the Appium Server. In the Desired Capabilities, for example, we specify the device name, the platform (iOS, Android…) and the platform version.
Figure 7: Appium client-server model
There is not necessarily only one test framework per platform. For example, under Android there are three different automation technologies by Google. The oldest one, UiAutomator, was replaced by UiAutomator2. UiAutomator2 has added a variety of new automation functions.
The latest test framework is called Espresso, and works with a totally different model than UiAutomator2. However, it offers much greater stability and test speed.
You can instruct your Appium tests to refer to one of those test frameworks, based on their specific functions and the platform support.
Theoretically, you could also use the test frameworks directly. However, Appium offers a practical setting for the different test frameworks, providing them with the same WebDriver Protocol and tries to balance behavioral differences between various test frameworks.
Figure 8: Appium as setting for test frameworks
When new test frameworks appear, the Appium team can create a communication protocol (Driver) for them so you can access these without having to rewrite all your test scripts. This is the strength of using a standard protocol and the Client-Server-Architecture.
It also enables cross-platform automation. Instead of learning two different test frameworks in two different languages, in most cases you could write one Appium-Script and run it on different platforms.
Whoever uses Appium does not need to know much about these underlying test frameworks, because they only deal with the Appium API and for example, do not need to write an XCUI test or an Espresso test.
Summary
In summary, we can say: Appium is a tool for automation of mobile applications which was inspired by Selenium. In fact, Appium tests are based on the same protocol as Selenium tests. Selenium offers their users the possibility to control web browsers. For historical reasons, it is sometimes called „WebDriver“ or „Selenium/WebDriver“.
As you may have already recognized by the name Appium, it was designed to be as compatible as possible with Selenium. Appium adopted the same protocol as Selenium, so that Appium and Selenium tests mostly look the same and „feel” the same. In fact, the Appium Client Libraries were constructed using Selenium Client Libraries as its basis.
But there was a problem: The Selenium Protocol was only developed for the automation of web browsers. Therefore, Appium had to add commands to the protocol to enable mobile-specific automation. This means that Appium commands are an extension of Selenium ones.
The previously made claim, that the introduction of Appium in our example project, would not be useful due to the cost-benefit factor is therefore wrong. It can even be assumed, that besides an improved coverage regarding the test automation, the introduction could also contribute to an improvement of the process.
I hope you have enjoyed this short excursion into the world of test automation and the technical background of Appium. In my second blog regarding Appium, I will show you how to set it up. In addition, I will demonstrate, using specific code examples as a basis, what we are able to achieve using Appium in our multi-platform project. There we will discuss the already addressed cases. I would be happy to welcome you to my next post in this blog series.
In an agile environment, regression testing helps to maintain a high level of quality. With each user story, newly developed functions are added, while the old functions still have to work. By the tenth sprint, the effort involved in the regression is so high that it is impossible to test everything manually. The only solution is test automation.
If a project is built from scratch, it is possible to properly integrate the test automation from the start. At the same time, the tester often feels like a lone warrior facing several developers. Now then, how can we realize the time-consuming automation of the functions in the daily work of a test analyst?
Project environment
In our project, we are creating new software in a JavaScript environment. It is implemented by means of the Electron framework. Consequently, Spectron is the preferred tool for the automation of test cases. Jira is used for the project platform, and the project is implemented based on the scrum model. The project team (based on FTE) consists of:
6 developers, incl. 1 architect
1 scrum master
1 business analyst
1.5 testers
Concept
It was obvious from the project kick-off that the testers would not be able to do the test automation. Therefore, the team came up with the following solution:
the test automation is done by the developers
the review for the test cases is done by the testers
the creation and approval of the Spectron test cases are codified in the Definition of Done
Advantages
Time saved in testing: The real reason for this procedure is the scarcity of resources on the testers’ part. If they had had to take on the automation as well, the entire project would not have been possible.
Change of perspective in testing: The testers can learn quite a lot in the discussion and review. For example, the implementation becomes clearer when questions are asked about why a test has been written this way. This can result in test cases that would otherwise not have been thought of.
Development of know-how: Since writing tests while the development is underway is routine work for programmers, the basic understanding regarding the creation of automated tests is generally very good. In our project, this has already proven useful for several reasons:
Parts of the applications could be covered using technical tricks that a tester would not have been readily able to provide, e.g. automated testing of the correct representation of a point cloud in a chart and the display of the details of a selected point.
Technical refinements enabled us to significantly improve the performance and stability of the Spectron tests.
After changing the tools used, the duration of a complete Spectron run was reduced by half an hour (time savings of 25%)
Change of perspective in development: Due to the fact that the developers concerned themselves with the user’s perspective regarding the functions and the interface of the software, a large number of errors could be avoided, and the basic understanding increased due to the intense interaction with the testers.
Disadvantages
More time required for the developers: The time saved in one place is needed elsewhere. However, the work can be shouldered by several people in this case.
Structure: Developers classify test cases into logical areas from a technical point of view. As they are not always identical to the functional logic, testers may have trouble finding and reviewing specific test cases.
Challenges and solutions
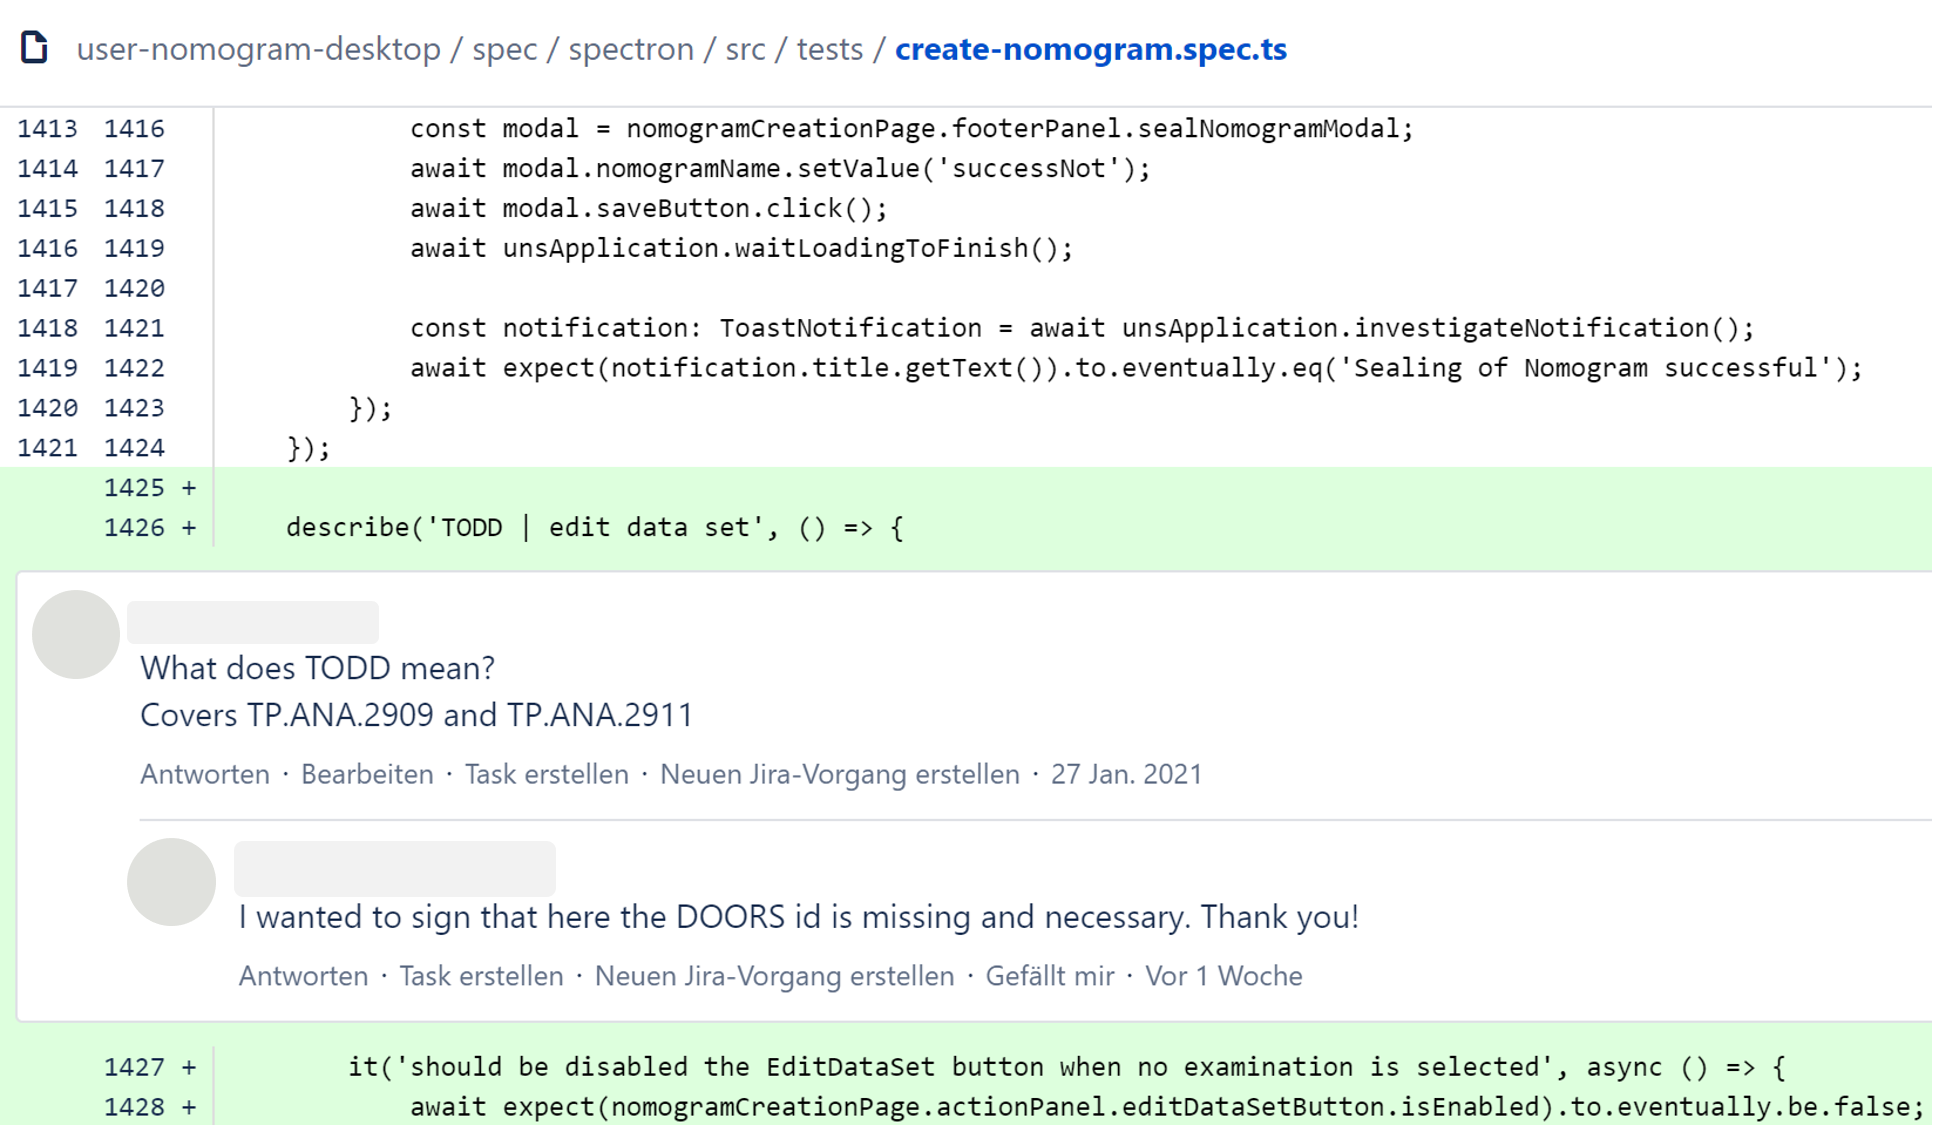
Traceability DEV QA: The review is done in Git (diff tool) in the project. In the project, the test team reviewed modified and newly created Spectron test cases, but not deleted ones, based on the assumption that those had been replaced in the course of the modification. Consequently, some requirements were no longer covered. Solution: To solve the problems with the review, training everybody who has to work in and review using Git on how to use Git is particularly helpful. Doing a walkthrough with the test team and the development team in the case of major modifications is useful as well to allow the testers to better understand the implementation by the developers.
Figure 1: Example of a Git review
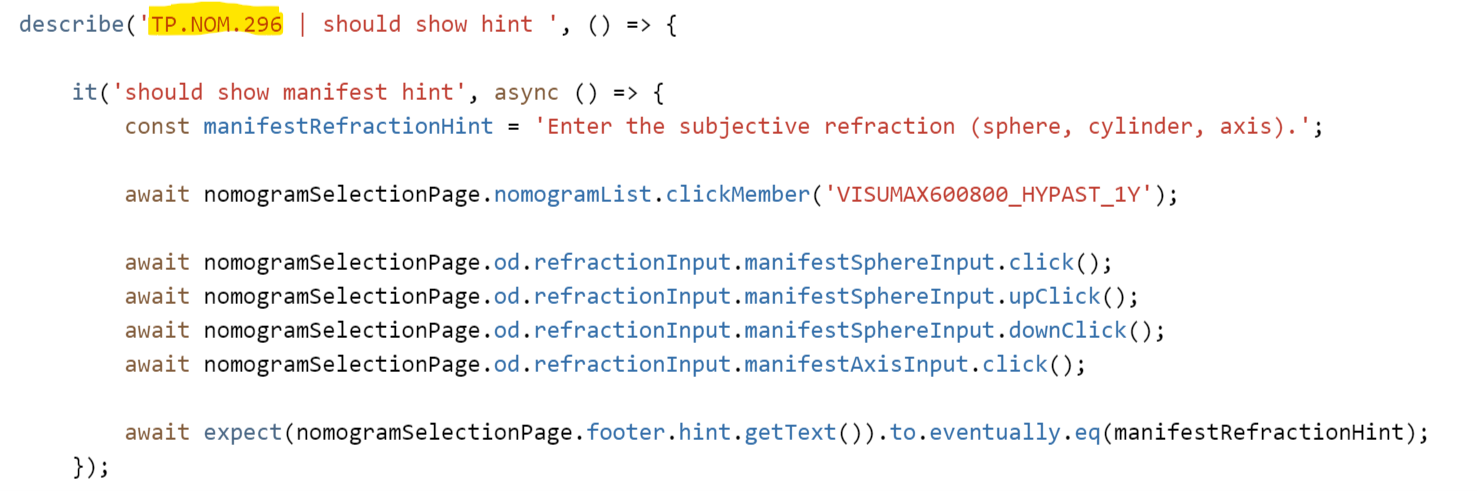
Traceability of Spectron requirements: This is a challenge that was specific to our project environment. The agile team uses Jira for the requirements and test management, but in the client’s environment, the requirements and test cases have to be specified by means of different requirements management software for legal reasons. Since the systems do not know each other, automatic traceability cannot be ensured. Solution: To overcome this obstacle, we established a direct allocation of the Req ID to the Spectron clusters.
Figure 2: Example of direct allocation
Conclusion
In conclusion, we can say that our concept of only having the test analyst review automated test cases instead of writing them proved to be effective in our project. The division of tasks between the testers and the developers fits very well with the agile method (scrum). The advantages far outweigh the disadvantages.
This approach is perfect for an agile project that is being built from scratch with a small staff and a high standard of quality. However, you should use this method from the start. Integrating it at a later time is almost impossible because gradually expanding the test cases after each user story is much more manageable and easier than creating the test cases en bloc. Furthermore, decisions regarding the implementation, structure, architecture, and most importantly, the processes (Definition of Done, …) are made at the beginning.
Possible with restrictions Has to be realized with SignalR.
Possible with restrictions Only stream response is supported.
Scope of changes to existing code
Small Due to the adoption of the service methods into the controllers and the generation of the client, few adjustments are required.
Large Mapping is required because specific data types are prescribed in some instances: An input parameter and a return value are required.
Necessary prior knowledge
Technology-specific Web API knowledge about the use of controllers and actions, HTTP verbs
Technology-specific Particularities of gRPC, creation of the *.proto file
Platform independence
Yes When you use .NET Core, client and server can run on different platforms.
Yes When you use .NET Core, client and server can run on different platforms.
Interoperability
Yes Client and server can be created using different programming languages.
Yes Client and server can be created using different programming languages.
Browser support
Yes
Optional Currently possible only with third-party libraries
Self-describing interfaces
Optional OpenAPI is possible by integrating third-party libraries.
No You have to create the *.proto file for the description of the interface yourself.
Payload size
Higher JSON, human-readable
Lower Binary format
Speed
Lower
Higher
Sustainability
Yes Microsoft currently recommends Web API as a sustainable alternative.
Yes Microsoft currently recommends gRPC as a sustainable alternative.
Debugging
Easily possible
Possible with restrictions The transferred data cannot be examined due to the compression.
Advantages and disadvantages
Web API
gRPC
Advantages
Transmission data are readable
Fewer code adjustments required for the migration
More flexible design of the endpoints and calls with respect to input parameters and return values
Faster transmission
Typed by means of Protocol Buffers interface description
Simple generation of client classes
Disadvantages
Slower transmission compared to gRPC
Generation of client classes only by means of third-party libraries
Typing of the interface not possible
Transmission data not readable
Mapping code required because no standard .NET types are used
Greater effort involved in the migration due to more necessary code adjustments
Conclusion
In our blog post series on WCF, we have presented both ASP.NET Core Web API and gRPC. We have seen that both options have advantages and disadvantages.
With Web API, the interfaces can easily be used by anybody due to the content-first approach and the use of HTTP. The transmitted data are accessible and can be read at any time.
gRPC abstracts the interface calls using the contract-first approach, making them faster and very easy to address by developers. However, the transmitted data cannot be accessed.
In principle, migration to both options is possible, and both are recommended by Microsoft. Still, we cannot definitively recommend one of the alternatives. The decision should always be project-specific and based on various criteria such as the project scope, experience with the respective technology or the existing architecture.