This post is the first in a two-part series.
In today’s DevOps world, Continuous Integration and Continuous Delivery allow software engineers to deliver values to customers rapidly. We as Digital Innovation Partners at Zeiss use Azure DevOps extensively to ensure fast software delivery.
Pipelines is a part of Azure DevOps which helps us to build, configure, and release our code, but for that, all you need is the Agent. Build or release agent is used to run your jobs and sends the result back to Azure DevOps. There are various offerings from Azure DevOps to run your build and release jobs.
Hosted Agent
Azure DevOps provides free hosted agents that have a predefined set of tools installed and configured for building and releasing your apps. Microsoft-hosted agent pool offers 7 different virtual machine images.
Hosted agents are good to start but as soon as your team grows, then you have to face long queue time for the build and release. If the free tier doesn’t meet your needs, you can still buy an additional parallel job with unlimited minutes which costs €33.74 per month.
Self Hosted Agent
There is another option where you set up and manage your own agents. This can be done by simply downloading the agent package, and run it either on your local machine or any other computing platform even on Docker container. It also gives you more freedom to install specific dependencies for your build and release.
The main disadvantages of the Hosted agent are maintenance and scalability. For instance, if you are running your agent as a docker container or directly on VM you need to make sure that the agent is not filling up disk storage.
Why not standard Hosted or self-hosted Agent
As mentioned before, we own an Azure DevOps account that contains multiple private projects. By default, Azure DevOps offers a hosted agent with one free parallel job.
We started with provided free tier hosted Agents. As there was only an agent with one parallel job, we suffered a lot from long queue times. We bought a few more parallel jobs but actually, it was not that helpful as our account was hosting around 30 projects.
As a quick workaround to reduce this long waiting time, most of the projects started setting up their own VMs and running multiple self-hosted agents as Docker containers. This enabled us to have more than one concurrent jobs running. The drawback of this solution was that almost every project was running their own VMs (not very cost-effective as VMs where mostly idling) and increasing maintenance overhead as well we slow scaling when new agents are needed (new VMs had to be set up etc.)
This leads us to implement something out-of-the-box which could be cost-effective, easily scalable and can be shared among multiple projects. We finally came up with the idea of On-Demand Agent to manage such build/release agents using some kind of outer orchestration and Kubernetes(to be specific AKS due to Microsoft Stack) was the easy choice.
The basic idea was to create a pod running as an agent for each build/release job to ensure clean and reliable agents all the time.
Note: On-Demand Agents come under the self-hosted agent category but the lifespan of such agent is specific build or release.
How does it work
Before proceeding with more details, it is important to understand the components which we are going to use in our On-Demand Agent Infrastructure on AKS.
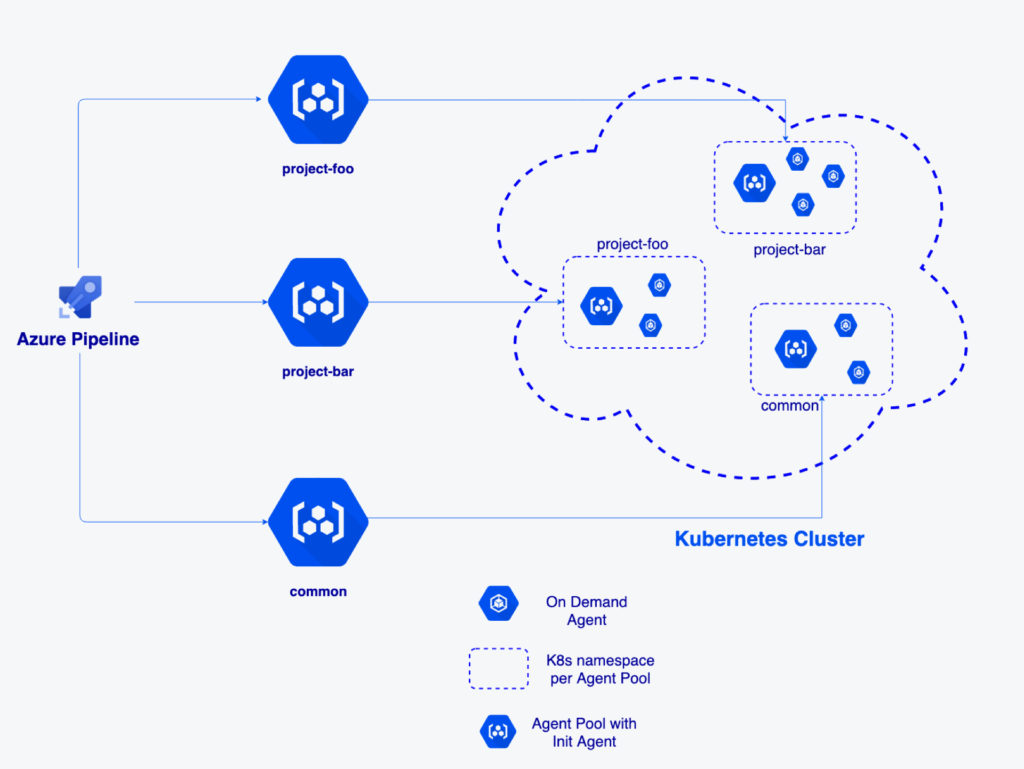
- Agent Pool: Collection of Agents. You can create an agent pool for your organization and share it among multiple projects. In our case, it is a collection of init agents.
- Init Agent: Important component of our infrastructure which is responsible for spinning up new pod/agent and deleting respective pod/agent based on your build/release.
- On-Demand Agent: Agent which will be provisioned by init agent for your build/release and will be deleted once build/release is completed.
We follow approach described above, where we have dedicated agent pools for projects that have high development activity, which will lead to more builds and releases. At the same time, we have a common agent pool, which is being shared for small projects or for prototype projects.
To incorporate on-demand agents with Azure Pipelines we need to split our existing build or release jobs into 3 phases:
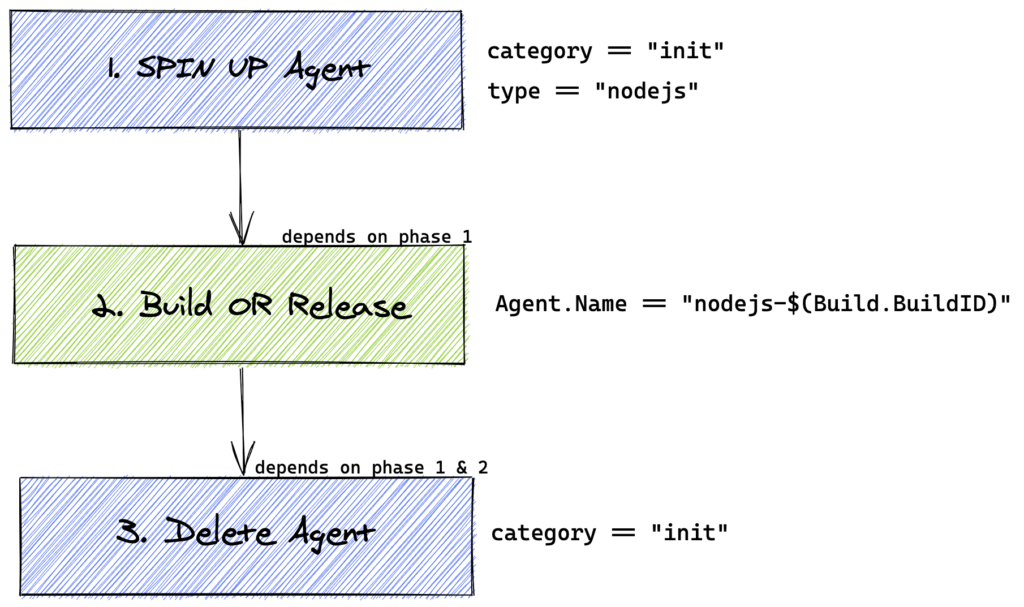
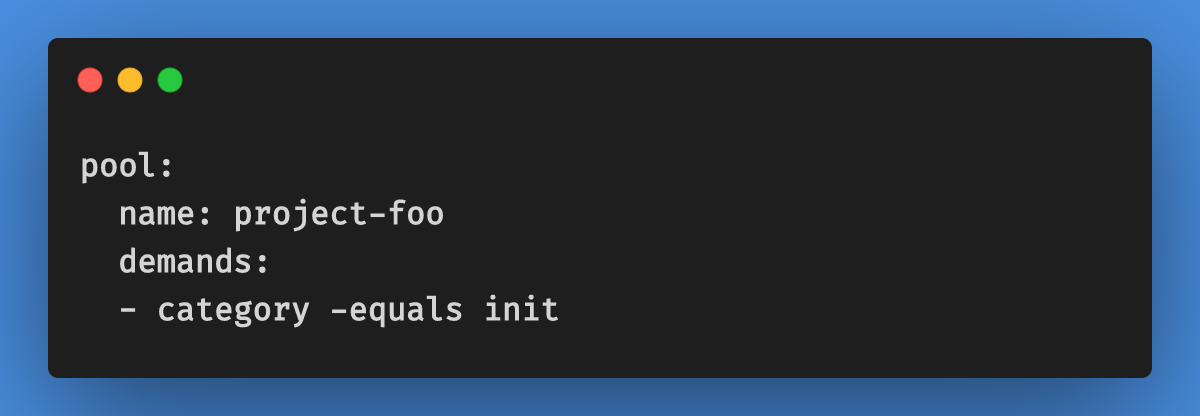
- Spin up Agent: This is the phase that creates an agent as per your need (a type of agent). Under the hood, we are triggering helm deployment which creates a Kubernetes Pod. We need to make sure that the SpinUp Agent phase is running on init agents. This can be done by specifying the demands.
Note: Init agent creates a new agent (pod) with the unique name$(type)-$(Build.BuildId)which will be used as a demand in the next phase.
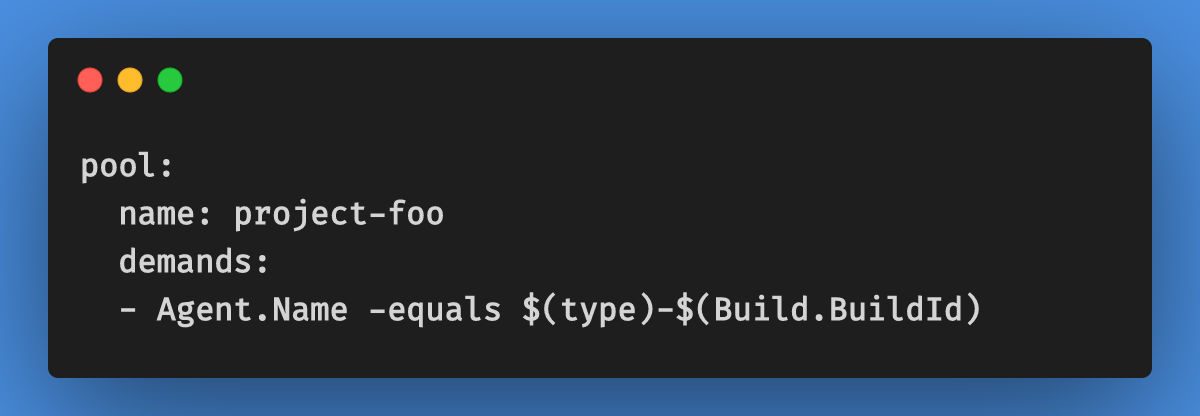
- Build or Release: This is the actual phase that will run your build or release. It is very important to pick the agent which was created earlier during the SpinUp Agent phase. To achieve that, we can use the agent name as a demand.
- Delete Agent: In this phase, we will just delete the agent (pod) which was created during the SpinUp Agent phase. We have to make sure, we are deleting the correct agent, which can be done by deleting the helm deployment by name (
$(type)-$(Build.BuildId)).
This phase must run on the ‘init’ agent.
Important: We need to preserve the sequential order which we specify for the phases as every phase is dependent on the previous phase.
For instance, the Build or Release phase depends on the Spin up Agent and its success. Moreover, Delete Agent follows the above sequential order but will continue to run on an error: continueOnError: true
This can be achieved by specifying dependencies.
What’s next
As we have just covered the most theoretical part of our On-Demand Agent. In part two of this series, I will further deep dive into underlying infrastructure, tooling, and integration with Azure Pipelines.
[Update] Part 2 has been posted!
Thanks for your post! Through your pen I found the problem up interesting! I believe there are many other people who are interested in them just like me! Thanks your shared!… I hope you will continue to have similar posts to share with everyone!
Dear akhilkpatel!
Thanks for reading this article and sharing your view. Please note that I removed the linked article from your comment. We do not intend to use this platform as an ad platform. Thanks for your understanding and best regards
Stefan Feldmann
When can we expect part 2?
The article ended abruptly. It would have been useful to know how exactly these steps were executed. We don’t know how the ‘init-agents’ are setup or what the helm-charts look like.
Do you have code you can point us to?
Hi Jay,
Thanks for reading this article and showing interest, We are coming up with part 2 of this blog series by the end of this month which will include all necessary information regarding setting up infrastructure and integration with azure pipelines.
Regards,
Cizer Pereira