Automated Website Layout Testing with Galen

Implementing tests in software projects is an important part of the development process. Due to their nature, they can be run in parallel and always in the same way without necessitating additional efforts. This facilitates a quick and cost-effective statement on the quality of the software system, which in turn improves the general quality of the software system as a whole.

Testing on the visual level is important as well. Clients usually provide clear requirements and specifications for the layout of an application or website, and for the various devices, browsers, and resolutions they support. Manually testing these specifications is extremely laborious, and even partly automated testing is often difficult because the screenshots of the application have to be compared by hand for each of the various devices, browsers, and resolutions.

Galen Framework wants to solve this problem by allowing the user to formulate their test specifications using their own program code, and thus to implement a fully automated test coverage for the layout of an application.

Galen Framework

Galen Framework is a framework for the automated testing of a website’s layout. Due to its compatibility with Selenium Grid, it can be integrated into various test environments such as BrowserStack. If, for example, BrowserStack is used to run various tests of different browsers, devices and resolutions, the layout tests can run simultaneously using Galen.

Key features

Overview of Galen’s key features:

  • Integration into Selenium Grid
    Integration into other test tools such as BrowserStack or Sauce Labs is possible
  • Responsive Design
    Galen’s design takes the importance of responsive design into account and is meant to simplify the implementation of such tests
  • Understandable language for non-users, beginners and professionals
    The Galen Specs language allows for complex specifications for the layout, including different browser window sizes

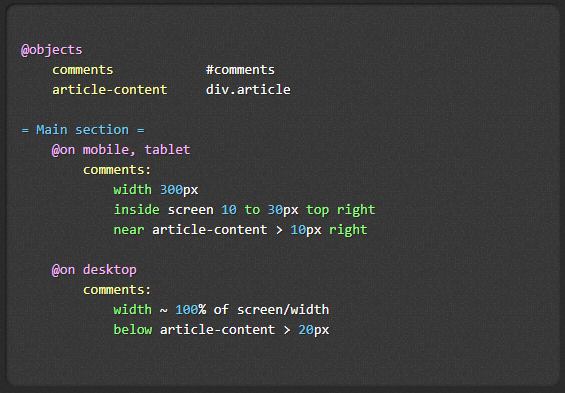
Human-readable and advanced syntax

Basic syntax

The Galen Specs language allows for the description of complex layouts. In addition to displayed controls, this also includes the definition of various screen sizes and browsers. Advantages of this language include the simple syntactic definition of the test specifications and the good readability for people who are not familiar with the framework and its syntax. » Galen Specs Language Guide
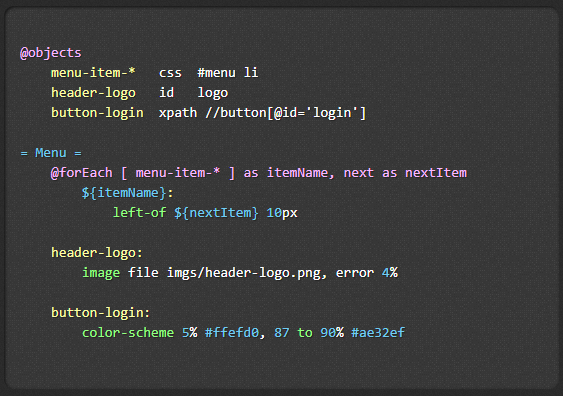
Galen Basic Syntax
Fugire 1: Basic syntax (source: galenframework.com)

Advanced techniques

More advanced users have various techniques at their disposal to help them optimize the specifications. For example, the framework provides comprehensive features for creating visual tests such as image comparisons and verification of color schemes. » Galen Specs Language Guide

Galen Advanced Syntax
Figure 2: Advanced syntax (source: galenframework.com)

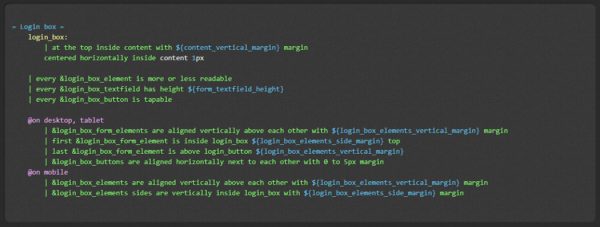
Testing for professionals

Experienced users can furthermore formulate their own, more complex expressions in order to formulate several test queries in a single line. This makes it possible to write both clear specifications and an easily maintainable and reliable test code. » Galen Extras

Galen Test Code
Figure 3: Test like a pro (source: galenframework.com)

Test documentation

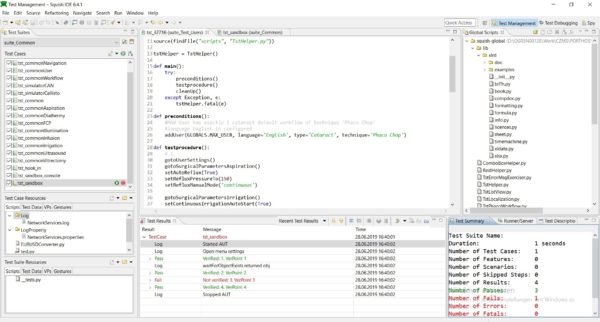
The framework provides three features for documenting the test results:

Error reporting

  • Galen generates an HTML test report
  • It contains all the test objects of a page
  • Example

Screenshots

  • In the case of faulty tests, the framework highlights the respective element
  • This makes it easier to find the error
  • Example

Image comparison

  • Galen creates image comparisons for visual checks
  • Inconsistent areas are highlighted
  • Example

Support of test runs in various languages

Die Implementierung der Tests ermöglicht Galen in drei Sprachen. Die bereits bekannte Basic Syntax sowie mit JavaScript und Java.

Basic Syntax

The basic syntax is meant to facilitate quick but powerful access. With this syntax, it is relatively simple to select various browsers such as Firefox, Chrome or Internet Explorer for the test run, or to switch to Selenium Grid.

To access pages that are more difficult to access, e.g. because they are protected by security mechanisms, it is possible to inject one’s own javascript on the client side. By injecting one’s own javascript on the test page, it is possible to prepare the website for the layout tests to be run. » Galen Test Suite Syntax

Galen Test Execution Basic Syntax
Figure 4: Test execution with basic syntax (source: galenframework.com)

JavaScript

Using JavaScript allows the user to develop their own test framework and thus map out complex issues. Galen Framework provides the following four features to implement JavaScript tests.
» JavaScript Tests Guide

  • Implementing events before and after the test suites
  • Filtering and reordering test sequences
  • Managing custom data providers
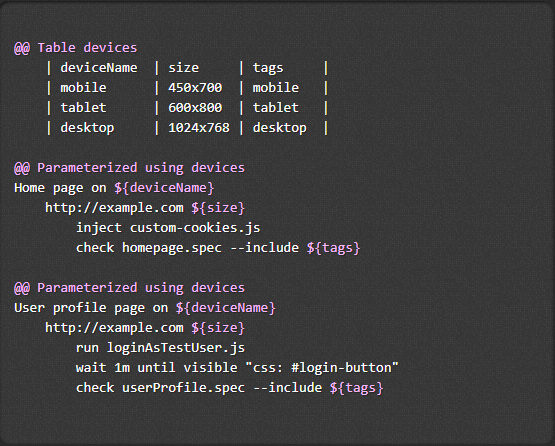
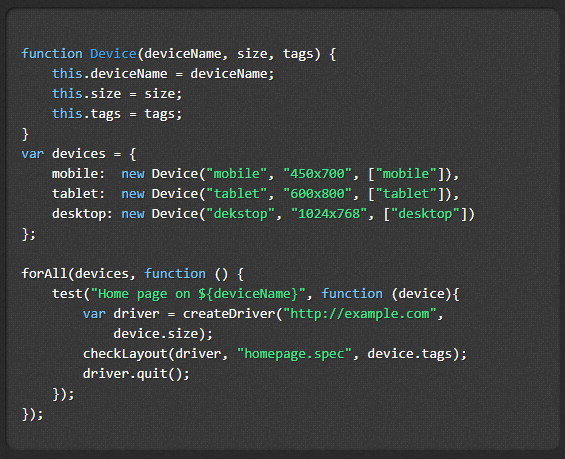
  • Parameterization of tests using arrays or maps
Galen Test Execution JavaScript Tests
Figure 5: Test execution with JavaScript tests (source: galenframework.com)

Java

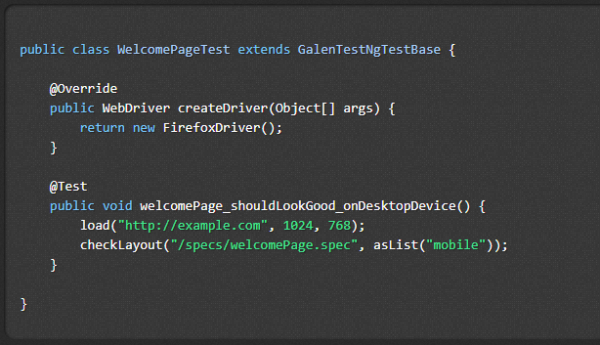
The language on which Galen is based is Java. Needless to say, therefore, that an API for Java is provided, and that a Java virtual machine needs to be installed for running the tests. The Java API can be integrated into Maven projects using the central Maven repository. » Git project example

Galen Test Execution Java API
Figure 6: Test execution with Java API (source: galenframework.com)

Conclusion

Running layout tests is a complex task, and the higher the number of tests, the more resources it will use up in software projects. Galen Framework provides a solution for the automated execution and documentation of layout tests that furthermore offers convenient integration into existing selenium-based and other test strategies. Thanks to its simple, human-readable syntax, virtually all project participants can understand it, i.e. it supports interdisciplinary cooperation in the software project.

Test Automation with Squish (Part 1) – Technical Perspective

A wide variety of test automation tools for various fields of application is available on the market today. One of our clients in the medical engineering industry, for example, has regularly used the tool “Squish” for the automation of GUI tests. That is why in this blog post, I would like to take a closer look at the technical and functional aspects to be observed in the design of test frameworks and test scripts. The second part of this blog post series will provide additional information on this topic.

With “Squish”, a GUI test automation tool produced by the software company Froglogic in Hamburg, the entire test code and everything that goes with it is written and managed using one of five programming or script languages that are commonly used today. You can choose among Ruby, JavaScript, Tcl, Perl, and Python. As Python represents the state of the art and has a vast range of functions that can be increased even more with numerous freely available libs, but most importantly because of the exceptional readability of the test scripts written in this language, Python should be the language of choice. The default language of Squish is Python 2.7.XX, but upon request, Froglogic also provides an edition of Squish with the requested Python version (e.g. Python 3.5.XX) for download. If you absolutely prefer Python 3, you are welcome to use this option, but the default Python 2.7 included in the delivery will serve you perfectly well.

Part of Squish IDE based on the open-source Eclipse IDE
Figure 1: The Squish IDE is based on the open-source Eclipse IDE

Irrespective of the script language you choose, Squish generally provides two approaches for dealing with an AUT (“application under test”) in the test execution. Either Squish implicitly starts and stops the AUT for each test case, or you connect to a running AUT for each test case. As most software applications are not continually stopped and restarted in practice, the second approach is closer to real-life behavior and should therefore definitely be preferred to the first approach.

In the world of Squish, this approach is also called “attachable AUT”. However, Froglogic only provides some of the test script functions required to control an “attachable AUT”, and you have to implement them yourself.

Over the years, “TstHelper” has been tried and tested by our client. As the name implies, this is a servant for test execution which implements a mechanism to handle the “attachable AUT” approach, among others. In order to minimize redundant test code in a test script, the entire mechanism was integrated into the constructor. Thus, a single line instantiating an object of the “TstHelper” class at the beginning of a test script is sufficient—more about this in the second post.

In principle, the mechanism consists of a single “try…except” block:

    try:
         attachToApplication()
    except RuntimeError:
         AppUnderTest.start() 

The Squish function “attachToApplication” throws a “RuntimeError” if and only if a connection is to be established to an AUT that has not yet been started. In that case, the static function AppUnderTest.start() is called up, which—as the name implies—starts the AUT. You have to implement both the class and the function yourself. The name “AppUndertest” should be replaced by the name of the application that is actually going to be tested. This name also constitutes the name of the namespace that provides the start() function.

Python does not have its own notation for namespaces, which is why namespaces are realized by means of classes. In simplified terms, the class structure should look like this:

    class AppUnderTest:
        
        @staticmethod
        def start():
             os.system("{BatchSkript}")
         
        @staticmethod
        def stop():
             ToplevelWindow.byName("{MainWindowObjID}", 10).close()

With the “attachable AUT” approach, the AUT runs in a process separate from Squish. It is therefore started by way of an external batch script that has to be written once. The script call is then integrated into the start() function using the Python command “os.system” (see above).

To stop the AUT, Squish provides the function “ToplevelWindow.byName(“{MainWindowObjID}”, 10).close()”. The parameter “MainWindowObjID” represents the object ID of the top element in the hierarchy from the object map. The function call is encapsulated in the static function stop(). Consequently, the call in the test script has to be preceded by the class name as well: AppUnderTest.stop(). This syntax was chosen on purpose because of its good and clear readability. All functions attached to the AUT should be summarized into this class or this namespace. Other functions, e.g. to return the AUT to its original state, wait for or react to specific system events, or encapsulate the “attachToApplication()” call, can be added, possibly to add logging.

The organization into namespaces is also ideal for integrating additional test tools that are to be controlled from a test script. For each test tool, a separate Python class is created according to the pattern described above. The call to start and stop the test tool is to be integrated into the start() and stop() methods. This method list can be extended as required, e.g. to include functions to secure the logfiles, etc. In the test script, they are called analogously by means of “Testtool.start()” and “Testtool.saveLogfilesTo()”. Obviously, the class name has to be replaced by the name of the test tool. The resulting syntax will be something like “CanSimuator.start()”, which improves readability and facilitates the review of the test scripts. Read more about this topic in the second blog post.