Automated Website Layout Testing with Galen

Implementing tests in software projects is an important part of the development process. Due to their nature, they can be run in parallel and always in the same way without necessitating additional efforts. This facilitates a quick and cost-effective statement on the quality of the software system, which in turn improves the general quality of the software system as a whole.

Testing on the visual level is important as well. Clients usually provide clear requirements and specifications for the layout of an application or website, and for the various devices, browsers, and resolutions they support. Manually testing these specifications is extremely laborious, and even partly automated testing is often difficult because the screenshots of the application have to be compared by hand for each of the various devices, browsers, and resolutions.

Galen Framework wants to solve this problem by allowing the user to formulate their test specifications using their own program code, and thus to implement a fully automated test coverage for the layout of an application.

Galen Framework

Galen Framework is a framework for the automated testing of a website’s layout. Due to its compatibility with Selenium Grid, it can be integrated into various test environments such as BrowserStack. If, for example, BrowserStack is used to run various tests of different browsers, devices and resolutions, the layout tests can run simultaneously using Galen.

Key features

Overview of Galen’s key features:

  • Integration into Selenium Grid
    Integration into other test tools such as BrowserStack or Sauce Labs is possible
  • Responsive Design
    Galen’s design takes the importance of responsive design into account and is meant to simplify the implementation of such tests
  • Understandable language for non-users, beginners and professionals
    The Galen Specs language allows for complex specifications for the layout, including different browser window sizes

Human-readable and advanced syntax

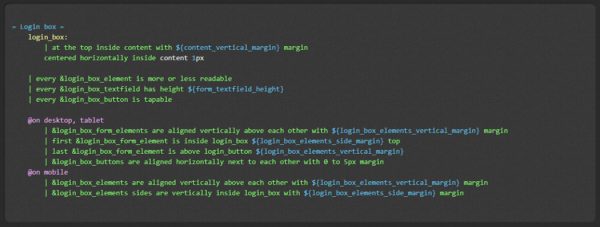
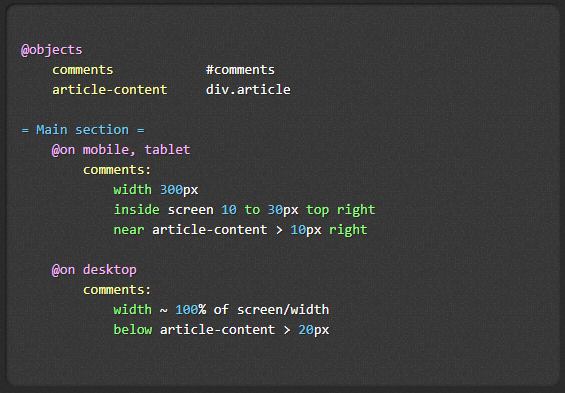
Basic syntax

The Galen Specs language allows for the description of complex layouts. In addition to displayed controls, this also includes the definition of various screen sizes and browsers. Advantages of this language include the simple syntactic definition of the test specifications and the good readability for people who are not familiar with the framework and its syntax. » Galen Specs Language Guide

Galen Basic Syntax
Fugire 1: Basic syntax (source: galenframework.com)

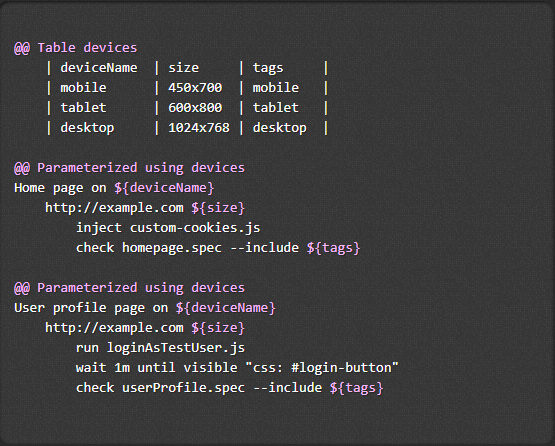
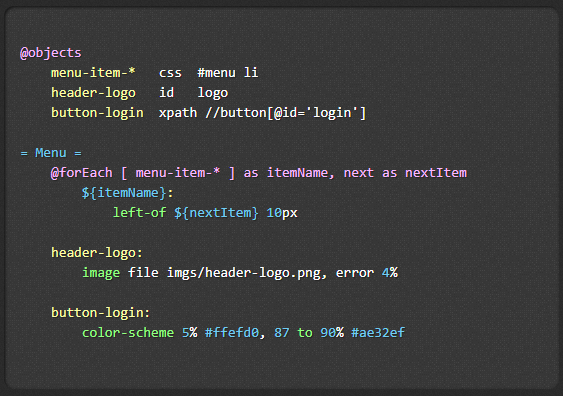
Advanced techniques

More advanced users have various techniques at their disposal to help them optimize the specifications. For example, the framework provides comprehensive features for creating visual tests such as image comparisons and verification of color schemes. » Galen Specs Language Guide

Galen Advanced Syntax
Figure 2: Advanced syntax (source: galenframework.com)

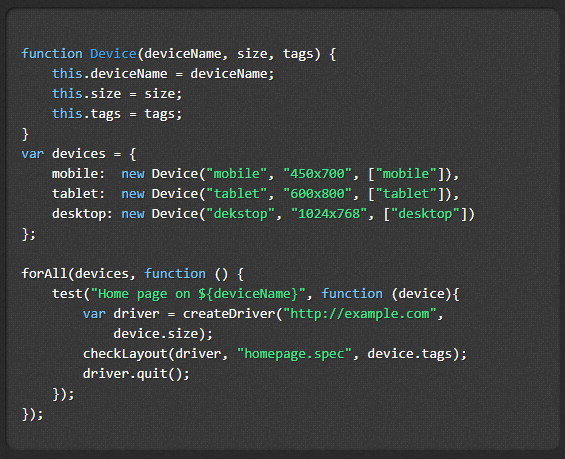
Testing for professionals

Experienced users can furthermore formulate their own, more complex expressions in order to formulate several test queries in a single line. This makes it possible to write both clear specifications and an easily maintainable and reliable test code. » Galen Extras

Galen Test Code
Figure 3: Test like a pro (source: galenframework.com)

Test documentation

The framework provides three features for documenting the test results:

Error reporting

  • Galen generates an HTML test report
  • It contains all the test objects of a page
  • Example

Screenshots

  • In the case of faulty tests, the framework highlights the respective element
  • This makes it easier to find the error
  • Example

Image comparison

  • Galen creates image comparisons for visual checks
  • Inconsistent areas are highlighted
  • Example

Support of test runs in various languages

Die Implementierung der Tests ermöglicht Galen in drei Sprachen. Die bereits bekannte Basic Syntax sowie mit JavaScript und Java.

Basic Syntax

The basic syntax is meant to facilitate quick but powerful access. With this syntax, it is relatively simple to select various browsers such as Firefox, Chrome or Internet Explorer for the test run, or to switch to Selenium Grid.

To access pages that are more difficult to access, e.g. because they are protected by security mechanisms, it is possible to inject one’s own javascript on the client side. By injecting one’s own javascript on the test page, it is possible to prepare the website for the layout tests to be run. » Galen Test Suite Syntax

Galen Test Execution Basic Syntax
Figure 4: Test execution with basic syntax (source: galenframework.com)

JavaScript

Using JavaScript allows the user to develop their own test framework and thus map out complex issues. Galen Framework provides the following four features to implement JavaScript tests.
» JavaScript Tests Guide

  • Implementing events before and after the test suites
  • Filtering and reordering test sequences
  • Managing custom data providers
  • Parameterization of tests using arrays or maps
Galen Test Execution JavaScript Tests
Figure 5: Test execution with JavaScript tests (source: galenframework.com)

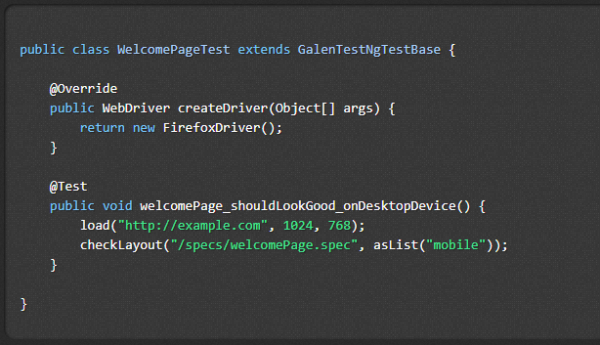
Java

The language on which Galen is based is Java. Needless to say, therefore, that an API for Java is provided, and that a Java virtual machine needs to be installed for running the tests. The Java API can be integrated into Maven projects using the central Maven repository. » Git project example

Galen Test Execution Java API
Figure 6: Test execution with Java API (source: galenframework.com)

Conclusion

Running layout tests is a complex task, and the higher the number of tests, the more resources it will use up in software projects. Galen Framework provides a solution for the automated execution and documentation of layout tests that furthermore offers convenient integration into existing selenium-based and other test strategies. Thanks to its simple, human-readable syntax, virtually all project participants can understand it, i.e. it supports interdisciplinary cooperation in the software project.

Recipes for Test Automation (Part 3)

In my previous two posts, „Ingredients and appliances for test automation, and who is the chef“ and „Testomatoes on data salad with stressing“, I described the prerequisites for test automation and the challenges with respect to the test data that have to be met in order to successfully implement automated processes. Now we have to ask ourselves, what is the recipe, i.e. a test case for test automation, supposed to look like?

Figure 1: Recipe for test automation

Let us first take a look at a typical recipe. Generally, it consists of two parts: the list of ingredients (test data) and a description of the sequence in which the ingredients are to be used. The description contains both the steps required to prepare the recipe and the names of the ingredients from the list of ingredients. Recipes are more or less detailed, depending on the person for whom they are intended. Recipes for a trained chef are often much less detailed because the chef already knows certain work processes, i.e. they do not need to be described in detail. Recipes for a private household or even a novice in the kitchen have to look different. The same is true for test cases. For a tester with corresponding domain knowledge regarding the domain-driven design of their application, the test cases can be less detailed. But what about automation? Let us compare a baker with a bread-making machine. All the baker needs for a recipe is the instruction “Bake a rye bread”. The bread machine needs a precise recipe description, i.e. the sequence in which the ingredients have to be put into the machine, which program and temperature have to be selected, etc.

In quality assurance, however, where we have more than one recipe or one test case, we want to make the work easier for ourselves. Like in industrial kitchens, we make preparations that will make our work easier later. In the kitchen, the salad garnish, for example, is used for various dishes; similarly, reusable test case modules are created for test cases. For this purpose, several test steps are summarized into blocks and stored as reusable test step blocks. This method can be used both in manual testing and in test automation. Here, too, the difference is in the level of detail:  while a low level of detail may be sufficient for manual testing, automation will always require the highest level of detail.

Hands kneading a dough, baking ingredients and utensils lying on the side
Figure 2: Baking bread

vs.

Part of Code for test case preparation
Figure 3: Creating test cases

From this point of view, test automation is in fact the world’s worst cook. It would even burn water if we didn’t tell it to remove the pot from the stove when the water is bubbling. But then, why do we even use test automation? Well, test automation has some important benefits: A cook can forget an ingredient or deviate from the recipe. Consequently, the dish comes out different every time. The automation does not forget anything, and it always sticks to the sequence prescribed in the recipe. The greatest advantage of test automation, however, is the speed at which it can run the test cases. Furthermore, the cook needs a break every now and then. If we imagine such automation in the kitchen, we would get a kind of field kitchen that processes all kinds of recipes in seconds, and accurately places the result on the plate.

That makes test automation sound very tempting, but you should always keep an eye on the cost-benefit ratio. The work involved in feeding the automation with perfectly designed test cases (recipes) is often underestimated: If I have a birthday party with ten guests once a year, a cooking machine probably won’t pay off. But if I have an event business that provides à la carte food to a wedding party every day, such automation is definitely worth considering.

Test Automation with Squish (Part 2) – Functional Perspective

With active Testautomatisierung, the number of test scripts often increases every day. Without structural specifications, it is easy to lose track, and thus lose the added value of test automation. The effort required to maintain unstructured test script that, in some instances, only the original author understands, should not be underestimated and can affect the progress of the entire project.

This is one of the reasons why Python was specified as the most suitable script language for test automation with Squish in the first part. For the testing, Python has few unnecessary characters and no complicated parentheses, making the test scripts easily readable even for employees without expert knowledge. Python uses indentation instead of brackets, with each indentation consisting of four spaces. This further improves the readability of the test code.

In medical engineering in particular, test script review are required from time to time, and have recently even become mandatory. Well-structured test scripts significantly reduce the time required for such reviews. A clearly structured test framework also has positive effects on the error analysis in testing. How do you structure your test scripts?

Our client found the following method to be effective: Firstly, test management is used to create a test case that can be executed manually, i.e. one that could be executed with the manually controlled mouse pointer on the AUT (“application under test”) in the respective test environment and without Squish. Secondly, the implementation of the test script begins. It is recommended, not only from the review perspective, to use the test case ID to name the test script (i.e. the test script “tst_1134” automates the test case with the ID 1134).

The test scripts themselves are based on a template with the following general structure:

    tstHelper = TstHelper()
     
    def main(): 
        try:
            preconditions()
            testprocedure()
            cleanUp()
        except Exception, e:
            tstHelper.fatal(e)
     
    def preconditions():
        'preconditions of the test case'
          
    def testprocedure():
        'test steps and expected results'
            
    def cleanUp():
        'return AUT to its original state'

As described in part 1, a single line at the beginning is enough to start the AUT or connect with the running process simply by instantiating an object of the TstHelper class. What is also worth noting is that all the preconditions and test steps are dealt with in a single “try…except” block. Any unexpected exception that must not occur during a clean test execution are intercepted in order to start individual error processing.

To prevent a faulty state of the AUT becoming the basis for subsequent tests, error processing should consist of terminating the AUT and cleaning up the test environment. This way, you can also avoid carrying the error forward and producing “false negative” test results in subsequent tests.

All the preconditions described in the manual test case have to be integrated into the “preconditions()” method. To keep maintainability at the highest possible level, a separate test script function should preferably be created for each precondition, and named in such a way that the name clearly reflects the functional content. The precondition “User A selected” for example becomes the test script function “selectUser(“User A”)”, “Menu for lighting configuration opened” becomes “gotoConfigMenuLight()”, etc.

The “testprocedure()” method is used analogously. It will later contain all the test steps and expected results. For a clearer structure, a brief comment can be added before each test step (e.g. “# 1.”). Here, too, a separate test script function should be written for each action in the test case if possible. The verification of the expected result, on the other hand, should not be included in the function, but separately and easily readable in the test script of the function. This makes a review much easier, and it also improves the maintainability of the scripts.

A 1:1 correspondence between test script function and test step is not always possible. Therefore, summarizing several functions in the test script into blocks and connecting them to the underlying test step by means of appropriate comments is admissible as well.

A great advantage of this approach is that the technical and functional level of testing are automatically separated. A library of test script functions is automatically created, and this library can then be used to create other test scripts. However, it is possible that the library also contains (technical) errors. Often, errors in the test execution are not found on the functional, but on the technical level. Wrongly implemented test script functions can easily lead to “false negative” or “false positive” test results.

To prevent this, a separate test suite should be created for the sole purpose of testing the library of test script functions by way of unit testing. Each test script function should be tested at least once for all possible input and output values. As far as possible, the tests should contain little domain-driven design, and basically always run successfully. The AUT itself is not tested in this context:  it only serves as an appropriate test environment for the unit tests of the test script functions.

Furthermore, this test suite should preferably be run before the actual productive tests. If errors are identified, this has to result in the termination of the entire GUI test automation to prevent technical errors in the test script functions from generating “false negative” or “false positive” test results, which in turn would cause additional work for the error analysis (if they are found at all).

In summary, we can say that Python’s vast range of functions allows for almost any GUI test to be automated with Squish. Froglogic’s exceptional customer support is another great advantage. It was rare for the support team to take more than a day to answer a question. However, to make full use of the range of functions offered by Squish, basic programming skills are indispensable.

Teaching a Machine to Test Using AI

These days, we distinguish between two ways of testing: manual testing and automated testing. Automated testing is becoming ever more important. And why would anyone mind? With automated tests, test scenarios can be run more quickly, and the cost of manual testers can be reduced.

The topic of Artificial Intelligence (AI) is being considered more and more frequently in the field of quality assurance today. Is this the end of manual testing?

After all, we are currently developing software that is able to autonomously analyze programs and write corresponding test cases. Furthermore, AI-based test software can cover a much wider range using brute force than a manual tester ever could.

But before we continue to compare manual testing and testing with AI, we should take a look at the operating principles and limitations of AI.

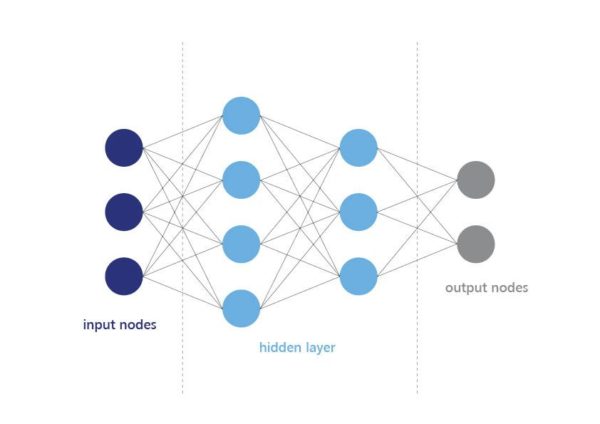
In human beings, logical thinking is stimulated by the neural connections in our brains. The same concept is used in the attempts to develop AI. A neural network is constructed that can evolve on several levels and has several nodes.

Structure of a neural network
Figure 1: Structure of a neural network

As illustrated in the figure above, there are input and output nodes. The input nodes can, for example, be compared to the human eye. They react to a stimulus and process it in a hidden layer using various algorithms. The output nodes reflect the reaction to which the human responds. AI-based software processes information the same way.

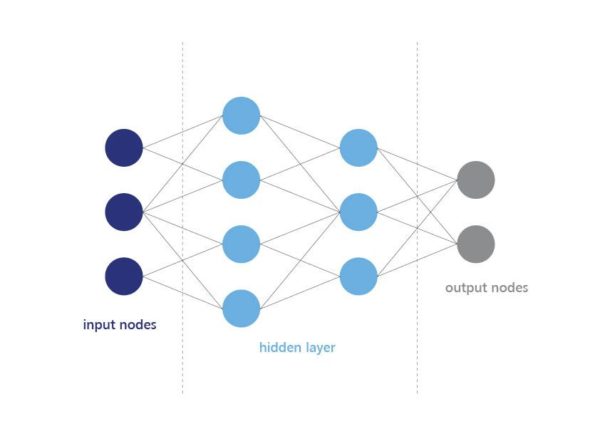
The number of input and output nodes has to increase in proportion to the task of the AI-based software. The number of nodes and hidden layers reflects the complexity of the resulting algorithm. Obviously, as the number of nodes increases, the required processing power of the hardware increases as well. All nodes are not necessarily interconnected. You can group certain nodes for certain tasks by creating only a certain number of connections between the nodes. For example, the algorithms for seeing and hearing can be implemented separately at first and connected at a later point. Then, an incoming stimulus will cause a reaction.

Grouping nodes in a neural network
Figure 2: Grouping nodes in a neural network

We have built a neural network. And how does this network work? To put it simply, the input nodes signal “1” when they receive a stimulus and “0” when they do not. Each node multiplies this “1” or “0” by a certain factor. At the end, each output node gets a result, and the output node with the highest value triggers the desired reaction.

But where do the factors for the nodes in the hidden layer come from? This is the point where human involvement remains indispensable. AI can calculate numerous approaches and possibilities, but it does not know what is right or wrong. When a person sees a ball flying towards them, they would immediately react to what their eyes see by raising their arms and catching the ball. AI could of course do this too, but it could also do nothing, dodge, knock the ball away, or react in any number of different ways to the stimulus. AI first needs a person to tell it what reaction is correct in the respective situation. For this purpose, we predefine several situations for the AI-based software and tell it how to react to them. The AI-based software adjusts the factors of its nodes accordingly to develop an algorithm. In the next step, we present situations to the AI-based software that it has to react to on its own, while the human evaluates AI’s response to fine-tune the algorithm. Only then can the AI-based software work autonomously. This approach is called deep learning because it shapes the hidden layers of the neural network.

And this is the key point as to why automated testing cannot replace manual testers completely. The AI-based software must first be adapted to the respective software. The AI-based software itself does not know what the software is for or which reactions are correct.

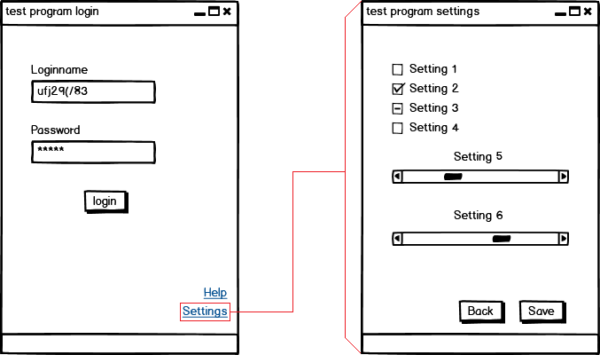
Manual adjustment of the test program settings
Figure 3: Manual adjustment of the test program settings

First, the operable fields to be used by the AI-based software have to be defined. There is, of course, software that can search for all operable objects on the GUI and use them for testing. But this way, all possible combinations would be run using a brute-force search. Consequently, a tester would have to compile a blacklist and a whitelist. Or you can let the AI-based software run freely for several hours during which every variant of the setting check marks or countless text combinations in the name field are tried out. But focusing on the primary test objectives by means of restrictions would be more efficient. The AI-based software delivers all the results obtained in hours of testing, delivering them in the form of newly written test scenarios with a failed or passed state. Then, a tester is again needed to analyze which tests really constitute a software or user error. Furthermore, the test scenarios created by the AI-based software can then be stored during its autonomous testing and later reused for automated tests.

There are several companies today who offer this kind of AI software, e.g. Eggplant.io, Test.ai or Retest. In addition, almost half of all German software companies continually develop their QA department in the field of AI.

The World Quality Report summarizes the results of a global survey regarding application quality and testing methods. The current issue reports that AI is being used in the field of intelligent automation as the most important tool to improve quality assurance in the next two to three years.

I hope this blog post gives you some insight into testing with AI and shows that automation has been taking a great step forward thanks to AI. Still, that does not mean that manual testers are doomed to become extinct—no one can tell exactly what the future will bring.

Test Automation with Squish (Part 1) – Technical Perspective

A wide variety of test automation tools for various fields of application is available on the market today. One of our clients in the medical engineering industry, for example, has regularly used the tool “Squish” for the automation of GUI tests. That is why in this blog post, I would like to take a closer look at the technical and functional aspects to be observed in the design of test frameworks and test scripts. The second part of this blog post series will provide additional information on this topic.

With “Squish”, a GUI test automation tool produced by the software company Froglogic in Hamburg, the entire test code and everything that goes with it is written and managed using one of five programming or script languages that are commonly used today. You can choose among Ruby, JavaScript, Tcl, Perl, and Python. As Python represents the state of the art and has a vast range of functions that can be increased even more with numerous freely available libs, but most importantly because of the exceptional readability of the test scripts written in this language, Python should be the language of choice. The default language of Squish is Python 2.7.XX, but upon request, Froglogic also provides an edition of Squish with the requested Python version (e.g. Python 3.5.XX) for download. If you absolutely prefer Python 3, you are welcome to use this option, but the default Python 2.7 included in the delivery will serve you perfectly well.

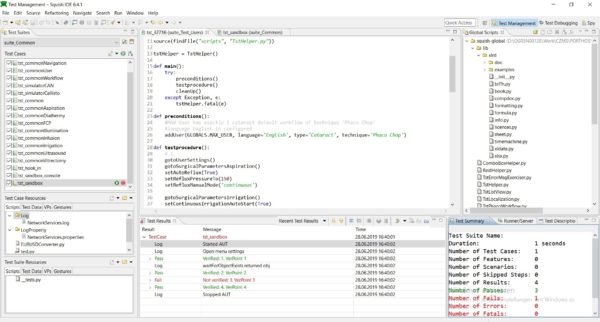
Part of Squish IDE based on the open-source Eclipse IDE
Figure 1: The Squish IDE is based on the open-source Eclipse IDE

Irrespective of the script language you choose, Squish generally provides two approaches for dealing with an AUT (“application under test”) in the test execution. Either Squish implicitly starts and stops the AUT for each test case, or you connect to a running AUT for each test case. As most software applications are not continually stopped and restarted in practice, the second approach is closer to real-life behavior and should therefore definitely be preferred to the first approach.

In the world of Squish, this approach is also called “attachable AUT”. However, Froglogic only provides some of the test script functions required to control an “attachable AUT”, and you have to implement them yourself.

Over the years, “TstHelper” has been tried and tested by our client. As the name implies, this is a servant for test execution which implements a mechanism to handle the “attachable AUT” approach, among others. In order to minimize redundant test code in a test script, the entire mechanism was integrated into the constructor. Thus, a single line instantiating an object of the “TstHelper” class at the beginning of a test script is sufficient—more about this in the second post.

In principle, the mechanism consists of a single “try…except” block:

    try:
         attachToApplication()
    except RuntimeError:
         AppUnderTest.start() 

The Squish function “attachToApplication” throws a “RuntimeError” if and only if a connection is to be established to an AUT that has not yet been started. In that case, the static function AppUnderTest.start() is called up, which—as the name implies—starts the AUT. You have to implement both the class and the function yourself. The name “AppUndertest” should be replaced by the name of the application that is actually going to be tested. This name also constitutes the name of the namespace that provides the start() function.

Python does not have its own notation for namespaces, which is why namespaces are realized by means of classes. In simplified terms, the class structure should look like this:

    class AppUnderTest:
        
        @staticmethod
        def start():
             os.system("{BatchSkript}")
         
        @staticmethod
        def stop():
             ToplevelWindow.byName("{MainWindowObjID}", 10).close()

With the “attachable AUT” approach, the AUT runs in a process separate from Squish. It is therefore started by way of an external batch script that has to be written once. The script call is then integrated into the start() function using the Python command “os.system” (see above).

To stop the AUT, Squish provides the function “ToplevelWindow.byName(“{MainWindowObjID}”, 10).close()”. The parameter “MainWindowObjID” represents the object ID of the top element in the hierarchy from the object map. The function call is encapsulated in the static function stop(). Consequently, the call in the test script has to be preceded by the class name as well: AppUnderTest.stop(). This syntax was chosen on purpose because of its good and clear readability. All functions attached to the AUT should be summarized into this class or this namespace. Other functions, e.g. to return the AUT to its original state, wait for or react to specific system events, or encapsulate the “attachToApplication()” call, can be added, possibly to add logging.

The organization into namespaces is also ideal for integrating additional test tools that are to be controlled from a test script. For each test tool, a separate Python class is created according to the pattern described above. The call to start and stop the test tool is to be integrated into the start() and stop() methods. This method list can be extended as required, e.g. to include functions to secure the logfiles, etc. In the test script, they are called analogously by means of “Testtool.start()” and “Testtool.saveLogfilesTo()”. Obviously, the class name has to be replaced by the name of the test tool. The resulting syntax will be something like “CanSimuator.start()”, which improves readability and facilitates the review of the test scripts. Read more about this topic in the second blog post.

Protractor – Automated Testing with Angular

Critical errors that become evident only in live operation constitute a major financial risk, and they also mean negative publicity both for the product and the companies involved. This is why testing is a fundamental, integral part of modern software development. High test coverage and prompt feedback of the test results allow for the quality and maturity of the product to be appropriately documented and confirmed.

Using test automation tools constitutes a solution that enables quick execution of such tests and meets the requirements of modern development projects. These tools work according to the principle of tool-based collection of information via the graphic interface of the product to be tested, which enables the automated execution of scripted interactions, and, as a result, the assessment of the respective application.

Test automation tools ensure quick and continuous feedback regarding the quality of the software to be tested. But there are some points that have to be observed when using them. There are various tools available on the market which use different approaches as to how they are integrated into the development and testing process, or which technologies they support. The efficient use of a test automation solution depends primarily on the engine used to control the graphic interface. This engine has to optimally support the technology to be tested. Development projects using “new” technologies such as Angular2 in particular face the problem that available and familiar tools are not always the same state of the art as the technology on which they are used.

CLINTR project and testing with Protractor

We use Angular2 as the development framework for our current software development project, Clintr, and we wanted a high frequency of automated test cases from the start. Clintr is a web application that alerts service providers to prospective customers in their contact network. For this purpose, it uses and analyzes data of the provided XING API to derive a demand for services in companies according to defined criteria in a fully automated manner. If a demand for services in a company has been identified, Clintr searches the service provider’s network of contacts (e.g. XING or CRM systems) for contact paths to the prospective customer. Spring Boot-based micro-services with Kubernetes are used as container cluster manager in the back-end, while Angular (>2) is used in the front-end. In order to be able to release new versions of the application at a high frequency, a continuous delivery pipeline into the Google cloud was established, both for the test and the production environment.

Because we used Angular2, we chose the automation test tool Protractor. Protractor is based on Selenium and the WebDriver framework. As usual, the interface tests are done in the browser, simulating the behavior of a user using the application. Since Protractor was written directly for Angular, it can access all the Angular elements without limitation. Furthermore, additional functions for waiting for components such as “sleeps” or “waits” are not necessary because Protractor recognizes the state the components are in and whether they are available for the intended interaction.

How to

For the execution, you need AngularCLI and NodeJS. Then the interface tests (end-to-end or e2e) can be created in the project. To prepare for the local test run, you use the console to switch to the project directory and enter “ng serve”. After entering “ng e2e”, the test cases are then run on the localhost.

The end-to-end tests consist of type script files with the extension .e2e-spec.ts, .po.ts, or just .ts. The test cases are described in the .e2e-spec.ts files. Only tests contained in these files are executed. The following example shows the header of a .e2e-spec.ts file:

    import { browser, by, ElementFinder } from 'protractor';
    import { ResultPage } from './result-list.po';
    import { CommonTabActions } from './common-tab-actions';
    import { SearchPage } from './search.po';
    import { AppPage } from './app.po';
    import { CardPageObject } from './card.po';
    import * as webdriver from 'selenium-webdriver';
    import ModulePromise = webdriver.promise;
    import Promise = webdriver.promise.Promise;
     
    describe('Result list', function () {
     
     let app: AppPage;
     let result: ResultPage;
     let common: CommonTabActions;
     let search: SearchPage;
     
     beforeEach(() => {
     app = new AppPage();
     result = new ResultPage();
     common = new CommonTabActions();
     search = new SearchPage();
     result.navigateTo();
     });

Like the other file types, it starts with the imports. Then the test cases start with describe. The string in brackets specifies which area is to be tested. Below that, the individual .po.ts files required for the subsequent tests are created and instantiated. The beforeEach function allows for preconditions for the test to be defined. For the purpose of reusability, the tests can also be exported to modules (see the following code example):

    it('should display the correct background-image when accessing the page', require('./background'));
    it('should send me to the impressum page', require('./impressum'));
    it('should send me to the privacy-policy page', require('./privacy-policy'));
     
    it('should open the search page after clicking clintr logo', require('./logo'));

The following code lists common e2e tests. First, it specifies what is expected, and then the test is executed. You should keep in mind that the e2e tests in the .e2e-spec.ts only calls the methods of the .po.ts and then waits for the result to be returned. The executing methods belong in the .po.ts.

    it('should still show the elements of the searchbar', () => {
     expect(result.isSearchFieldDisplayed()).toBe(true);
     expect(result.isSearchButtonDisplayed()).toBe(true);
    });
     
    it('should show the correct Search Term', () => {
     expect(result.getSearchTerm()).toBe(result.searchTerm);
    });

The following code example shows the .po.ts relating to the .e2e-spec.ts above. Each .e2e-spec.ts does not necessarily have its own .po.ts or vice versa. A .po.ts can, for example, contain tab-related actions such as switch or close tabs. As long as a .e2e-spec.ts only uses methods from other .po.ts, it does not necessarily need its own .po.ts. As mentioned above, the .po.ts starts with the imports, and then the class (ResultPage in the example) is created.

When called up, the navigateTo method causes the test to navigate to the specified page. Since the test is not supposed to do this directly in the present case, it navigates to the Search page first. There, a search term is entered and the search is started. Thus, the test arrives at the result_list page where the tests are subsequently run.

    import { element, by, ElementFinder, browser } from 'protractor';
    import { SearchPage } from './search.po';
    import * as webdriver from 'selenium-webdriver';
    import { CardPageObject } from './card.po';
    import ModulePromise = webdriver.promise;
    import Promise = webdriver.promise.Promise;
     
    export class ResultPage {
     
     public searchTerm: string = 'test';
     
     search: SearchPage;
     
     navigateTo(): Promise<void> {
     this.search = new SearchPage();
     return this.search.navigateTo()
     .then(() => this.search.setTextInSearchField(this.searchTerm))
     .then(() => this.search.clickSearchButton());
     }

Each of the following three methods queries an element of the page. The first two tests have a Union Type return value. This means they can either return a boolean or a Promise<boolean>, i.e. either a Boolean or a promise of a Boolean. When using Promise as the return value, it should always be followed by a then; otherwise, asynchronous errors may occur.

    isSearchButtonDisplayed(): Promise<boolean> | boolean {
     return element(by.name('searchInputField')).isDisplayed();
    }
     
    isSearchFieldDisplayed(): Promise<boolean> | boolean {
     return element(by.name('searchButton')).isDisplayed();
    }
     
    getSearchTerm(): Promise<string> {
     return element(by.name('searchInputField')).getAttribute('value');
    }

Example

An implementation example of a test case in ClintR is the test of the link to the legal notice. First, it is supposed to click on the link. Then, the test is supposed to switch to the newly opened tab and confirm that the URL contains /legal-notice. Lastly, it is supposed to close the tab. This test was initially created only for the home page.

    it('should send me to the impressum page',() => {
     impressum.clickImpressumLink();
     common.switchToAnotherTab(1);
     expect(browser.getCurrentUrl()).toContain('/legal-notice');
     common.closeSelectedTab(1);
    })

As, according to the acceptance criteria, the legal notice has to be accessible from every subpage, the test was later adopted into all the other specs. To keep the code clear, it was decided to export this test into a module (impressum.ts).

    import { browser } from 'protractor';
    import { AppPage } from './app.po';
    import { CommonTabActions } from './common-tab-actions';
     
    module.exports = () => {
     let common: CommonTabActions = new CommonTabActions();
     new AppPage().clickImpressumLink().then(() => {
     common.switchToAnotherTab(1);
     expect(browser.getCurrentUrl()).toContain('/legal-notice');
     common.closeSelectedTab(1);
     });
    };

It is used in the e2e-spec.ts this way:

    it('should send me to the impressum page', require('./impressum'));

Particularities, notes & problems

Certain given functions can be written in each e2e-spec.ts, e.g. beforeEach, beforeAll or afterEach and afterAll. As the names suggest, the code contained in one of these functions is executed before or after each test or all the tests. In our example, each test should include its own page view. Accordingly, the navigateTo method can, for example, be written in the beforeEach function. afterEach can, for example, be used to close tabs that were opened during the tests.

Each test starts with the word it. If you add an x before this word, i.e. xit, this test will be skipped in the test run. But, contrary to a commented-out test, notice will be given that one or more tests have been skipped in the test run. If you write a test case with f, i.e. fit, only those tests starting with fit will be taken into account in the test run. This is expedient when you have a large number of test cases and only want to run some of them.

When working with Promise, which you get from some methods, you should keep in mind that incorrect handling can cause asynchronous errors. Many events, such as pressing a button or querying whether an element is displayed, return such a Promise. Even opening a page returns a Promise<void>. To avoid errors, each Promise that entails further actions such as pressing a button or outputting a resulting value should explicitly be followed by a then. For example:

    pressButton().then( () => {
     giveMeTheCreatedValue();
    });
    //If this value is again a Promise, which should trigger something, then the whole thing would look like this:
    pressButton().then( () => {
     giveMeTheCreatedValue().then( () => {
     doSomethingElse();
     });
    });
    // or slightly shorter
    pressButton()
     .then(giveMeTheCreatedValue)
     .then(doSomethingElse);

Further information on Promises is available here.

Conclusion

Protractor is highly suitable for the automation of interface tests in a software development project using Angular2. The documentation on the project side is very detailed and comprehensive. Using Selenium allows the tests to be easily integrated into the build process.
Recipes for Test Automation (Part 2) – Data Salad

Testomatoes on data salad with stressing

The test data always pose a particular challenge in manual testing, and even more so with respect to test automation. In most manual tests, the test cases frequently only include general information regarding the test data to be used. This method does not work for test automation.

In my previous post, „Ingredients and appliances for test automation, and who is the chef“, I described the prerequisites for test automation that have to be met in order to successfully implement automated processes. I also mentioned another challenge in this context: The test data. I would like to take a closer look at this issue in this blog post.

What happens if we fail to focus on the test data in the test automation, and we rely on test data that do not take the test automation into account?

Testing can be compared with cooking. The test case is the recipe, and the test data are the ingredients. With manual testing, we follow the recipe/test case and find the ingredients/test data as required. This does not work with automated testing. Here, the test data, or ingredients, have to be provided spot-on, in the exact quantities required. This means that it is not enough to indicate the type and form of the test data: the exact instance of the test date has to be specified in the test script as well.

Furthermore, the test data are used up, or the test data age over the course of the testing. Just like in a restaurant, where you eventually run out of tomatoes or the green salad wilts. So then, where do we get the ingredients we need, and in sufficient quantities.

In projects, I often hear: “We’ll just create a—hopefully anonymized—clone of the production data.” However, such a clone only provides a part of the data required for the test automation. This means that such a clone is quite useful for unchanging master data. But the cook in the kitchen will not always get the same order for the exact same salad. One guest wants olives on their salad, another does not; one wants yogurt dressing, the other wants oil and vinegar. Depending on the ingredients and changes to the order, the price changes as well. This means that we also need dynamic data for our test data, so-called transactional data, to comprehensively represent the business processes. There are two approaches to providing the necessary dynamic data for the test automation, each of which has its advantages and disadvantages. With the first approach, the required data are picked from the anonymized clone of the production data. However, the effort required to determine the respective filter criteria and then formulate a corresponding query can quickly become very high. The disadvantage of this approach is the fact that the quantity of the filtered data is limited, and the data can be used up during testing.

With the second approach, the required test data are newly created in the database, ensuring that all the test data required for the test case are provided. Although these test data are used up as well, they can be recreated time and again by the automated scripts. Creating the so-called synthetic test data can be arduous as well, e.g. when there are large amounts of dependent data. Therefore, the decision of which approach is to be used for which test case has to be evaluated for each individual case.

Furthermore, the test data often have to be dynamized in the test automation. What does that mean? Let us look at another example from the kitchen. Everyone knows that a good Peking duck should be ordered 24 hours before it is to be eaten. As the date of consumption is a variable date, dynamization can offer a solution for the automation. The result then looks like this: Date of consumption = order date + 24 hours. This and similar kinds of dynamic test data are also used in test automation.

Conclusion: In most cases, the solution is like a good salad—it’s all in the mix. Let us once more summarize the recipe: Take an anonymized clone of the production data for the basic, unchanging master data (you can also create smaller amounts of data yourself), and add some well-selected dynamic data from the clone of the production data by means of a query in the test case. Now add a well-selected dose of synthetic test data. All of this should be well balanced to match the test case template. Lastly, top the whole thing off with a splash of dynamized test data in the template, and you have the perfect data salad for your test automation. After serving the test data to the database, it is important to thoroughly clean up the data kitchen. That means returning all the static, synthetic and dynamic test data to their original state if they were modified by the test case. Simply put, every test case necessarily entails a clean-up of the test data because tidiness is the top priority in a good data kitchen.

As we all know, various appliances are also used in the kitchen to automate the cooking process. My next blog post in this series on recipes for test automation addresses the question how much test automation is good for a project. Until then: Happy testing, and keep your data kitchen neat and tidy.

Recipes for Test Automation (Part 1) – Soup

Ingredients, appliances, and who is the chef?

A colleague recently approached me and asked me whether I know a recipe for good test automation. I told him that, just like with a good soup, it takes more than a recipe: The kitchen appliances, ingredients, and the cook are important as well. Accordingly, the project framework, the selection of the test tools, and the testers involved in the test automation are decisive in test automation.

How do we find out if the framework is right for test automation? Generally speaking, we have to differentiate between software projects that are still in the pre-planning stage where test automation is planned from the start, and projects that are already underway, where test automation is intended to support the project.

First of all: The earlier well-planned test automation is started, the more likely it will be successful. This is often due to the fact that the initial effort involved in test automation is underestimated, and the benefits, in terms of figures at least, are not reaped until after the project has been completed.

To counter this, a project that is about to start requires good planning, and a project in progress requires a preliminary study of the ongoing processes, test cases, and framework. Such a preliminary study is used to analyze and evaluate the existing test case portfolio, the test object and the testers’ knowledge, among other aspects. This way, we can identify the project’s true weaknesses in the field of testing.

Test automation is often used to try and solve problems that have nothing to do with the test automation, and that can sometimes even be exacerbated by it. Just like with cooking: When the soup tastes bad, replacing the cook with an automaton will not necessarily improve it. The result will, in fact, often be even worse—just think of the coffee maker out in the hallway. It is important to ensure that the prerequisites for the test automation have reached a minimum quality before you can start selecting the tools or begin the actual automation. Test automation is the dab of cream that tops off the soup, i.e. test automation can only be successful with a well-functioning test process. The test cases also need a sufficient level of detail for automation The level of detail required depends on the level of technical know-how the tester has in regard to the test object. Some people might suggest that the technical department, i.e. those who have the technical know-how, could carry out the test automation. However, that is usually not a good idea because these colleagues cannot spare the time. On the one hand, their everyday work always comes before the test automation in terms of priorities, and on the other hand, they would need to gain proficiency in the use of the tools and testing experience first. Therefore, the technical department should preferably provide the manual test cases with a sufficient level of detail that the tester understands even without knowledge of the domain. The tester then uses their testing experience and knowledge of the tools to carry out the automation.

It is illusory to believe that you can automate everything, which is why the test cases are prioritized in the preliminary study. In this context, it must be checked whether the test object or the software that is to be tested can be automated. Dynamic object IDs that change every time they are requested, for example, pose a particular challenge in test automation.

And then, like the cook in the kitchen, the tester who carries out the test automation also plays an important role. Firstly, they need the necessary knowledge of the tools, and secondly, they have to be able to decide where, specifically, test automation is worthwhile. For example, it makes no sense to automate a feature of the software that is rarely needed, yet takes great effort to automate.

This is why you should always adhere to the recipe:

  • Use common sense and an instinct for the effort involved to create a harmonious composition: Keep an eye on the cost and benefits.
  • Do not rely on technology alone: Your craftsmanship is important as well.
  • Test automation only works if the basic test tasks and processes work first: First, you learn to slice and dice onions, then you get to work on the bouillabaisse.

The test data are another challenge in test automation. I will address this issue in my next blog post. Until then: Happy Holidays—and don’t rely on some machine to prepare your Christmas dinner.

“Heisenberg’s” Test Uncertainty with Automated Test Tools

Critical errors that become evident only in live operation mean negative publicity for both the product and the companies involved. To prevent this, test automation is a fundamental, integral part of modern software development. However, the technical implementation with test automation tools gives rise to problems that we need to be aware of.

Only high test coverage and prompt feedback of the results allows for the quality and maturity of the product to be appropriately documented and confirmed. The parties involved use various testing methods and types of tests, such as automated code analysis or automated unit tests by the developers, and automated interface tests by the testers. From an early stage, attempts were made to allocate the various types of tests to general categories, such as the differentiation between black-box and white-box tests.

Laut dem German Testing Board (archived version 2.1 of the ISTQB® GTB Glossary) black-box testing means “functional or non-functional testing without using information about the inner workings of a system or a component”, and white-box testing means a “test based on the analysis of the internal structure of a component or system”. Up until a few years ago, black- and white-box testing methods were all but synonymous with two other categories: the dynamic test, i.e. “testing of the test object by running it on a computer”, and the static test, i.e. “testing of software development artifacts, e.g. requests or source text, without running them, e.g. by way of reviews or a static analysis”. This distinction is no longer possible today because unit tests or testing methods such as test-driven development (TDD) have dissolved the original lines between white- and black-box tests. I call this new area “gray-box test”. Gray-box tests try to optimally combine the desirable benefits of black-box tests (specification-driven) and white-box tests (developer-driven) while eliminating the unwanted disadvantages as far as possible.

The advantage: sub-components and entire systems can be tested with the low administrative effort involved in white-box tests, but without possibly “circumventing errors” in the tests. In TDD, for example, the component tests are prepared based on the specifications prior to the actual development of the code. The development of the components is finished only after all the test routines have successfully been run. Besides the benefits, however, there are some important aspects that need to be considered. TDD or gray-box tests require a high level of discipline in order for them to be used effectively and in a practical manner. But what is even more important is the fact that gray-box tests should not indiscriminately be considered to be an adequate replacement of black-box tests.

Why should you not rely on automated gray-box tests exclusively?

Gray-box tests affect and change the system they are supposed to test. This aspect results from the very nature of the test. What is a test, really? It is basically empirical evidence. We propose a hypothesis and then test it in an experiment. And the same rule that applies for physical experiments is also true for software tests: The closer I get to the test object, the more this can influence the result of the test. Black-box tests are run in their own test environments, which should have a structure similar to that of the production environment. Nevertheless, it is still “a test setup”. Mocks are inserted to replace missing components, and the log level is increased to gather more data.

Gray-box tests, i.e. code-related tests where the software to be tested is executed partially or in its entirety are not only very close to the test object. With tools such as JUnit or TestFX, we expand the code basis to include new components. New lines of test code are written, and new test frameworks are integrated into the software solutions as a library.

But even with software solutions like QF-Test, Expecco or Squish, which run automated interface tests, we get very close to the object to be tested. In older versions of the automation tools for graphical interfaces, the data were captured by saving the position data of the GUI element, such as a button, and sending a corresponding event at the time of execution. The software then creates a screenshot and compares it with another one created before in order to verify the test results. Which is largely harmless. Modern tools, on the other hand, take a different path. They connect to the application to be tested via their own engine. This enables them to capture all the control elements of the interface, read their properties, and remote-control them. The corresponding data are deposited as a model of the application in so-called GUI maps, and they constitute the basis for the subsequent preparation of test scripts.

This proximity to the software to be tested can have the effect that certain errors occur only because of it, or, even worse, are concealed or do not occur at all. We change the basis of the test with the “complicated” test setup, and we cannot be sure that the software to be tested would in fact have responded the same way if we had tested it “just” manually.

This is why it is important to know the tool and its characteristics, and to be aware of the possibility of errors being masked by the closeness of the code of the tests. If we consider this to be a risk, we should complement our automated tests with other, manual types of tests.

The Life of a Tester

Sometimes, during your daily project routine, you ask yourself, what am I doing here, and do the others on the team know what I’m actually doing? As a tester, I have asked myself this question before, and I have put together some of my thoughts. In the following post, you will find some anecdotes from my life as a tester.

Daily

Another day, another daily, and I as a tester wonder how to favorably present the specification of test cases today, as work done, current work, and future work. Usually, I say “I specified test cases for the user story xyz and will continue doing that”, or something to that effect.  Rather monotonous, and often cause for a condescending smile, but this is in fact the main task during the first days of a sprint. After all, I, as a tester, am the one laying the foundation for the proper testing of current user stories.

Things get more exciting when I report that I am now running test cases as well, proud to have verified an error here and there. But pride is really the wrong word in this context. It all depends on the developers, the current mood in the team, the priority of the error, or the tester’s (i.e. my) self-confidence. Sometimes I just kind of mumble the word “bug” and then let someone else take the floor. But why be so reticent, really?

As a tester, I am responsible for pointing out if the software does not work as defined. And that is a good thing. How are we supposed to deliver high-quality software if we do not accept that mistakes happen, and that they cause stressful situations or conflicts? Have courage—the error does not disappear if you do not address it (on the contrary, it gets worse the longer you wait to fix it), and it can easily be forgotten in the jumble of the daily development work if it is simply pinned to the task board between the major user stories.

Regression testing/test automation

Speaking of the task board: This is a good tool for keeping an eye on the user stories with the tasks they contain and the progress made during the current sprint. If you take the time to stop and consider the work in the team with the help of the task board over a period of weeks or even months, you could come to the following conclusion: The developers work with shiny new tools, and the testers dig through the dirt of the past, always looking at all the glossy new things. That does not mean that I as a tester am not aware that the developers also have to adapt existing code and fix bugs from time to time. But as a tester, I have a very different perspective. Despite all the automated tests that our developers write, I have to keep track of everything that is affected by any changes made, i.e. I keep looking back at the relics of the past while the programmer forges ahead.

And this is where the greatest challenge in my everyday work comes in: regression testing. Although this can be automated as well, the tools for that are not always kind to me. If I do not use them from the start, I am continuously busy chasing the changes made by the developers. But even if I use them from the start, I have to use them on the UI level to fulfill my tasks, which is tedious and, unfortunately, prone to errors as well. Some thoughts on this:

Test automation tools suggest that I can automate testing simply by recording test steps. Unfortunately, my initial enthusiasm is replaced with the realization that this is not enough because my test records usually do not persist for more than a day. So let us try something new: This time, we program, leaving the recording tools behind. Immediately, new obstacles appear. I am not good at programming, and now I have to deal with some cryptic things. And the next idea is born: Use the developers’ experience. Again, there are limits to this idea because it usually only works as long as the developer has time and is willing to do this. Which is understandable, considering that the developer wants to create something new.

So I am torn: Do I write automated tests, or do I do everything manually? I definitely need to plan for regression tests. Whether they turn out to be automated, manual, or exploratory depends on a wide variety of parameters. For me, at least, test case automation is no cure-all. I appreciate the value of automated test cases that can be done in every sprint: greater test coverage, less manual testing of defined work flows. But test case automation by itself is no cure-all because it cannot replace my experience as a tester, and the corresponding ability to “think outside the box”.

Conclusion

In any case, testing as such—be it manual testing, regression testing or test automation—should be acknowledged within the team, and everybody should work together on the quality assurance. Otherwise, the tester will quickly start to feel like an outsider, not a part of the team, if their work is not taken seriously.