The automated testing of graphical user interfaces is an important topic. For each GUI technology, there are several libraries that need to be carefully selected in order to achieve a high-quality and accurate result in the shortest possible time.
When it comes to web technologies, there are many well-known frameworks such as Selenium, Playwright, Cypress and many more. There are also suitable alternatives for WPF or Winforms. Today I would like to introduce you to FlaUI.
FlaUI is a .NET class library for automated testing of Windows apps, especially the UI. It is built on the in-house Microsoft libraries for UI Automation.
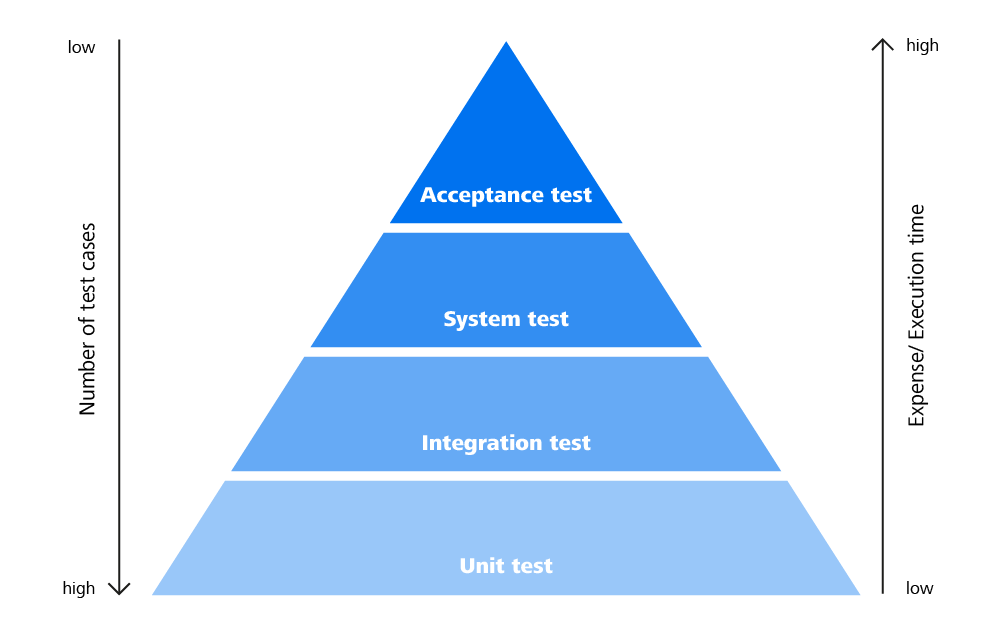
Image: Pyramid of test automation
History
Roman Roemer published the first version of FlaUI on Github on December 20, 2016. Version 0.6.1 was the first step towards a class library for testing .NET products. Since then, the library has been developed further with consistency and great enthusiasm in order to expand it with new and better functions. The newest version is 4.0.0 and it includes features such as the automation of WPF and Windows Store app products as well as the FlaUI Inspect tool, which reads and displays the structure of .NET products.
Installation
FlaUI can be downloaded and installed via GitHub or NuGet. For this article and the following example, I will also use other plugins/frameworks and class libraries such as:
C# by OmniSharp
C# Extensions by Jchannon
NuGet Package Manager by Jmrog
.NET Core Test Explorer by Jun Han
The latest Windows SDK
NUnit Framework
Example
For this example, I will use several different methods to maximize a typical Windows app, here the task manager, and restore it to its original state. Also, different elements should be highlighted.
While working on this article, I noticed that Windows exhibits a special behavior: When a program is maximized, not only the name and other properties of the button change, but also the AutomationID. As a result, I had to give the method calls two different transfer strings for the AutomationID, “Maximize” and “Restore”, which both address the same button.
Code (C#)
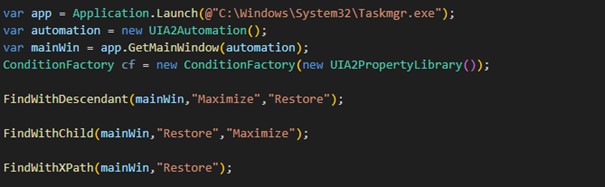
First of all, we start the relevant application and create an instance of the window for further use:
var app = Application.Launch(@"C:\Windows\System32\Taskmgr.exe");
var automation = new UIA2Automation();
var mainWin = app.GetMainWindow(automation);
Furthermore, we also need the ConditionFactory helper class:
ConditionFactory cf = new ConditionFactory(new UIA2PropertyLibrary());
This helper class enables us to search for objects according to certain conditions. For instance, searching for an object with a specific ID.
As mentioned above, we want to maximize the program and restore the initial state in the following methods. We also want to highlight elements:
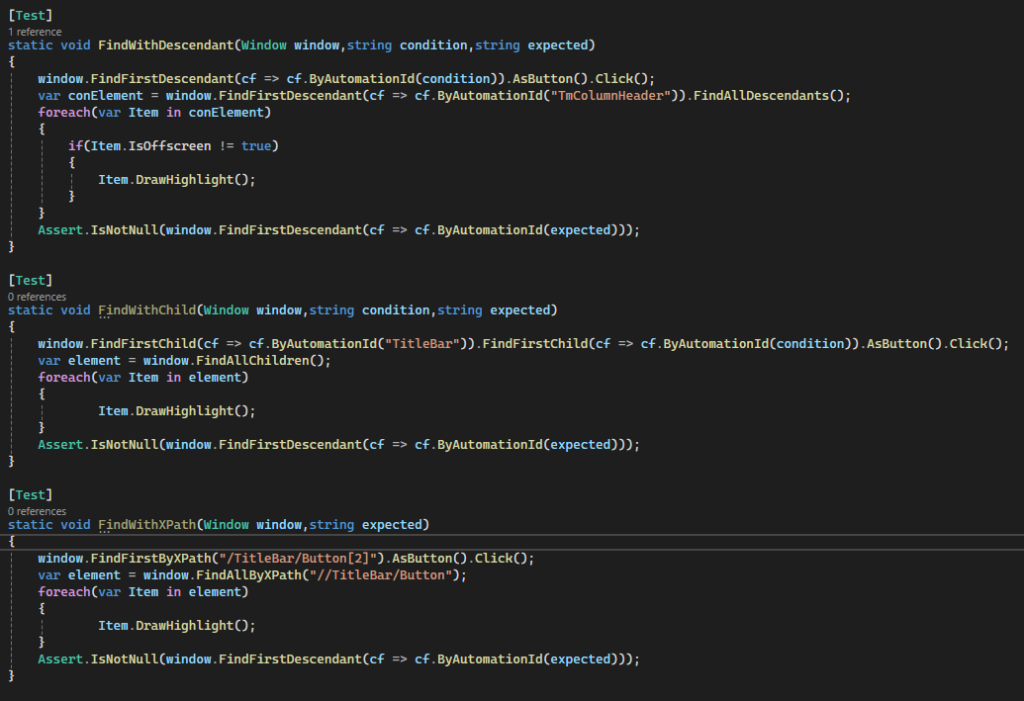
For the first method, we will work with FindFirstDescendant and FindAllDescendant. FindAllDescendant searches for all elements that are below the source element. FindFirstDescendant finds the first element below the source element matching the specified search condition and DrawHighlight creates a red frame around the element.
For the second method, we use FindFirstChild and FindAllChildren. Both function in almost the same way as Descendant, except that not all elements are found here, but only those that are directly below the starting element.
        static void FindWithChild(Window window, string condition, string expected)
        {
            window.FindFirstChild(cf => cf.ByAutomationId("TitleBar")).FindFirstChild(cf =>
            cf.ByAutomationId(condition)).AsButton().Click();
            var element = window.FindAllChildren();
            foreach(var Item in element)
            {
                    Item.DrawHighlight();
            }
            Assert.IsNotNull(window.FindFirstDescendant(cf => cf.ByAutomationId(expected)));
        }
And for the third method, we use FindFirstByXPath and FindAllByXPath. This is where we have to specify the path, as the name suggests. With First it should be the exact path to the desired element and with FindAll all elements found within the path are searched for. If you want to inspect an unknown program, it helps to use FlaUI Inspect, which can display properties such as the path, but also other information about elements of Windows apps.
        static void FindWithXPath(Window window, string expected)
        {
            window.FindFirstByXPath("/TitleBar/Button[2]").AsButton().Click();
            var element = window.FindAllByXPath("//TitleBar/Button");
            foreach(var Item in element)
            {
                    Item.DrawHighlight();
            }
            Assert.IsNotNull(window.FindFirstDescendant(cf => cf.ByAutomationId(expected)));
        }
Finally, we just need to call the methods and pass them the desired values. The first is the window that we created at the beginning and the second is the AutomationID of the maximize button, which changes as soon as the button is pressed.
One problem is self-made objects, e.g. we had created buttons in a project with self-made polygons. These could not be found by either FlaUI Inspect or FlaUI itself, which severely limited their use in our automated tests. For such objects, an AutomationPeer (provides a base class that makes the object usable for UI automation) must be created so that they can be found.
Summary and conclusion
FlaUI supports Forms and Win 32 applications with UIA2 and WPF and Windows Store apps with UIA3. It is user-friendly and straightforward to operate, as it requires relatively few basic functions. Furthermore, it can be extended with your own methods and objects at any time.
Similarly, the software developers are satisfied because they do not have to install any extra interfaces and therefore no potential sources of error for test automation. Since FlaUI gives us the possibility to directly access the objects of the program to be tested, we do not need to spend additional time planning and managing major and error-prone adjustments to the existing program structure for testing.
On the other hand, in order to be able to address each object automatically, its AutomationID must be stored at least once in the test code so that it can also be used for the test. Consequently, the approximate structure of the program to be tested must be reproduced, which can be time-consuming, especially with more complex programs. And for the sake of clarity, these should be clustered in several classes with meaningful names.
We will definitely continue to use it and recommend it to our colleagues.
Everybody knows what it’s like in a poorly run restaurant. At the table, everyone gets their food at different times, the schnitzel has the consistency of a shoe sole or we get something we didn’t order at all. The chef in the kitchen is completely overwhelmed and cannot cope with the flood of orders and constant changes to the recipe.
Software testing is not all that different. Let’s see a tester as the chef trying out a new recipe. This means that the new recipe is our test object, which is checked by the chef by means of cooking. The test team cannot keep up with the flood of changes. Tests are unnecessarily duplicated or forgotten again or overlooked. Errors are not detected and may then get incorporated during production. The chaos is perfect and the quality is poor. What to do in this case? Urge the chef on, automate the chaos, or simply hire more testers? No! Because, what would happen then?
Support and urge the staff to get things done?
Since the chef is already on the verge of collapsing due to the chaos, urging everyone on will only lead to short-term improvement followed by a knockout. This does not lead to long-term optimization of the situation of the situation.
Automate the chaos (introduce test automation)?
Since there is an initial additional effort related to the automation and it is not clear where to start in this chaos, this would only result in even more chaos and overload in the kitchen. Reducing the quality even more.
Simply hire more staff?
As the saying goes: “Too many cooks spoil the broth.” So simply providing the chef with additional assistants does not necessarily mean that all issues are solved. It should not be underestimated here that the new staff must first be trained. This, in turn, can lead to delays in workflows. This definitely needs to be carefully planned, as it will otherwise result in even more kitchen chaos.
So what’s the solution?
First of all, we have to analyze why there is chaos in the kitchen and what causes it. It often turns out that there are bottlenecks in unexpected places. For example, a waiter writes the orders illegibly on a piece of paper rendering it unclear what was ordered for each table. This means that the chef (tester) has to constantly make inquiries about the orders. In this comparison, we consider the waiter as an analyst and the order placed by the waiter as a partial request. So even in the test (in the kitchen), the problems can already be present in the recorded requests and the tester must constantly ask what the request might mean.
Likewise, the chef might always first go look for the ingredients and start preparations only once the order is placed, i.e., the test person only creates the test cases when they get the finished product.
Also, it is important that communication in the kitchen runs smoothly. Not only in the kitchen, though, but also with the waiter, the patron and the creator of the recipe, communication must run smoothly. In the test, this means that communication must be ongoing not only with the test team, but also with the analyst, the product owner and the developer.
Another problem could be that the distance between stove and sink is too far. For our testers, this means that their test tool is simply too slow and takes too much time to create or perform a test case.
Consequently, the work process must be examined more closely:
Starting situation
Communication
Work steps
Tools used
Documentation
etc.
The analysis can be used to identify shortcomings and take appropriate measures. To put it briefly, this analysis with appropriate measures must become a regular process. That’s right: I’m talking about retrospective analysis at regular intervals. It is also important that a retrospective analysis of this kind not only identifies the issues, but also defines the measures to be implemented and reviewed in the next retrospective analysis. If only an analysis of problems is made and no measures are taken, then nothing will change.
Also with regard to test automation, it is important for work processes to be optimized or they will not be successful. In other words, the schnitzel turns black if cooked without oil, regardless of whether it is automated or not.
Unfortunately, there is no one-size-fits-all formula that works in every project. However, there are some “best practices” in the form of suggestions and as an impetus for improving the project. For an initial introduction to a regular improvement process, you are welcome to contact us and conduct the first retrospective analysis with one of our experienced consultants.
Please have a look at my other articles on test automation:
In the first part of this blog series, we outlined the challenges that arise when selecting the right tool for test automation. The second part was about the relevance and possible classification of tool selection criteria, some of which can be standardised, but some of which need to be variable. In this third article we will look at the list of criteria, the criteria catalogue, how it was validated and the results of this validation.
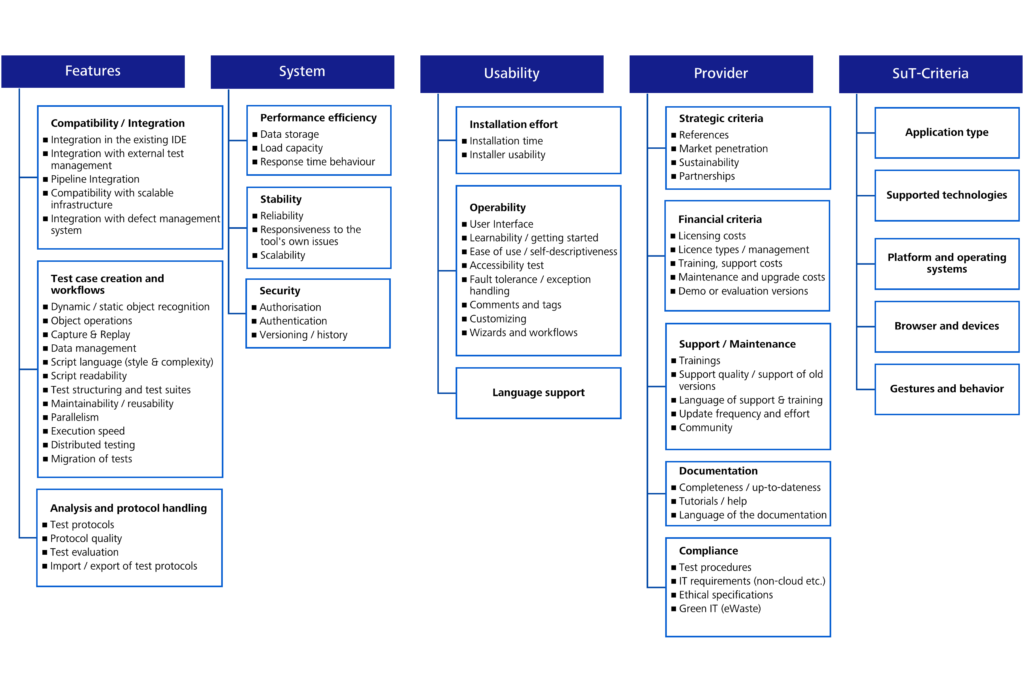
The following figure shows the final list of selection criteria. The variable criteria have been marked as “SuT criteria” (software under test). The criteria identified can be modified, supplemented and updated.
Figure 1: List of criteria
The standard criteria are divided into fourteen (14) main criteria, including compatibility, operability, performance and documentation. Sub-criteria are assigned to the main criteria. For example, the main criterion “documentation” has three (3) sub-criteria.
Criteria catalogue
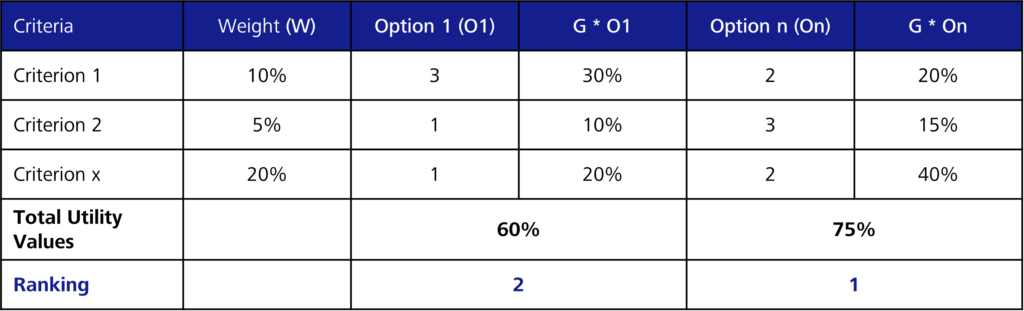
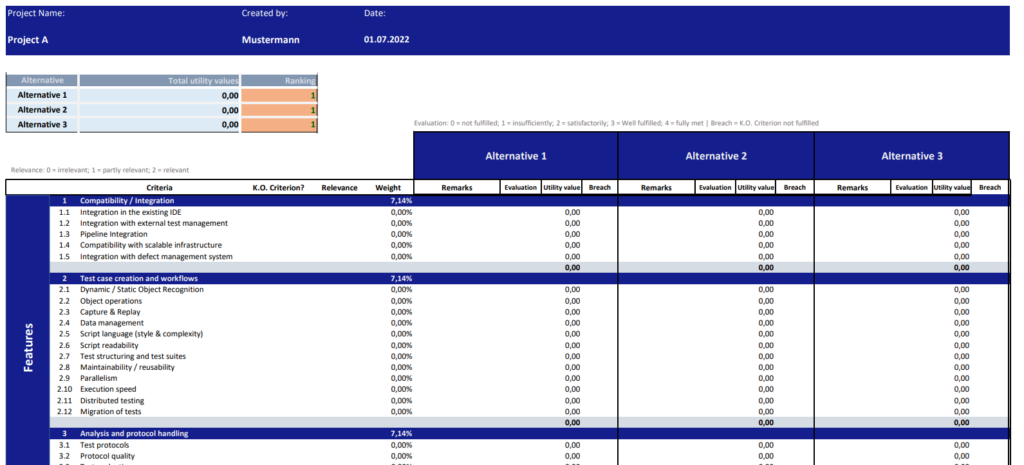
Once the criteria had been established, the next step was to create the actual criteria catalogue. Since there are different, multi-dimensional goals involved in making decisions, it is advisable to take a systematic approach. This requires multi-criteria decision analysis (MCDA). Utility value analysis is one method of multi-criteria decision analysis (Gansen 2020, p. 5). Utility value analysis can be applied whenever an evaluation is being carried out or an assessment is being made, e.g. in project management or controlling.
Figure 2: Sample table showing a utility value analysis
Requirements for the criteria catalogue
Before actually compiling the criteria catalogue, we started by defining its requirements. These are summarised in the table below in the form of user stories and outline all the work steps required.
Nr.
User Stories
1
As a user, I would like to be able to enter project master data in order to better understand by whom, when and for which project the catalogue was created.
2
As a user, I would like to compile a new catalogue in order to perform a utility value analysis.
3
As a user, I would like to perform a utility value analysis in order to make an objective decision.
4
As a user, I would like to apply fair and moderate weighting to the criteria in order to better control their relevance to the project.
5
As a user, I would like an overview of the basis for evaluation in order to better assess alternative solutions.
6
As a user, I would like a clear overview of the utility value analysis performed in order to quickly identify the most useful tool.
7
As a user, I would like to access to the most recently edited utility value analysis in order to make further edits.
8
As a user, I would like to be able to export the catalogue in order to share it.
Table 1: Requirements for the criteria catalogue
Structure of the criteria catalogue
The criteria catalogue was developed using Excel as well as Visual Basic for Applications (VBA). The developed tool was divided into different workbooks, each reflecting a specific task.
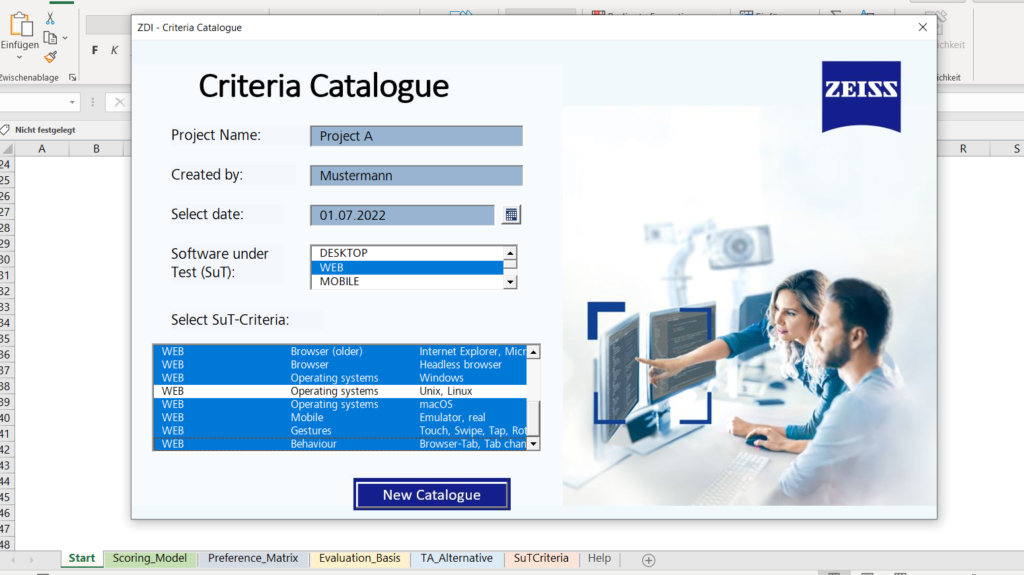
The starting screen
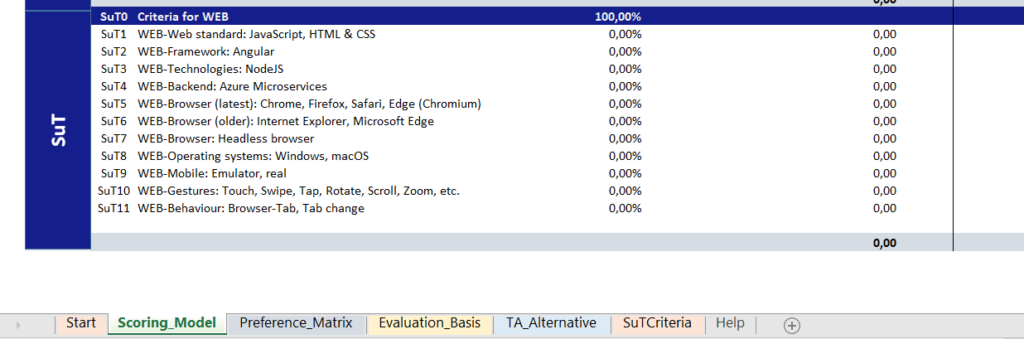
When you open the file, a dialogue window appears (see figure 3). You first have to choose whether to open the most recently edited catalogue or to create a new catalogue. If you want to create a new catalogue, a form is displayed which has to be filled in. SuT criteria entries are added to the catalogue as variablecriteria (see figure 4).
Figure 3: Starting screen of the criteria catalogue
Figure 4: SuT criteria entries in the catalogue
Utility value analysis
A utility value analysis is performed in four steps. Once the criteria have been identified, they are weighted. Then fulfilment of the criteria is measured and finally the utility value is calculated for each alternative (Gansen 2020, p. 6). Once the evaluation criteria have been properly assessed, an objective, rational decision can be made with the help of the utility value analysis (Kühnapfel 2014, p. 4).
Weighting the criteria
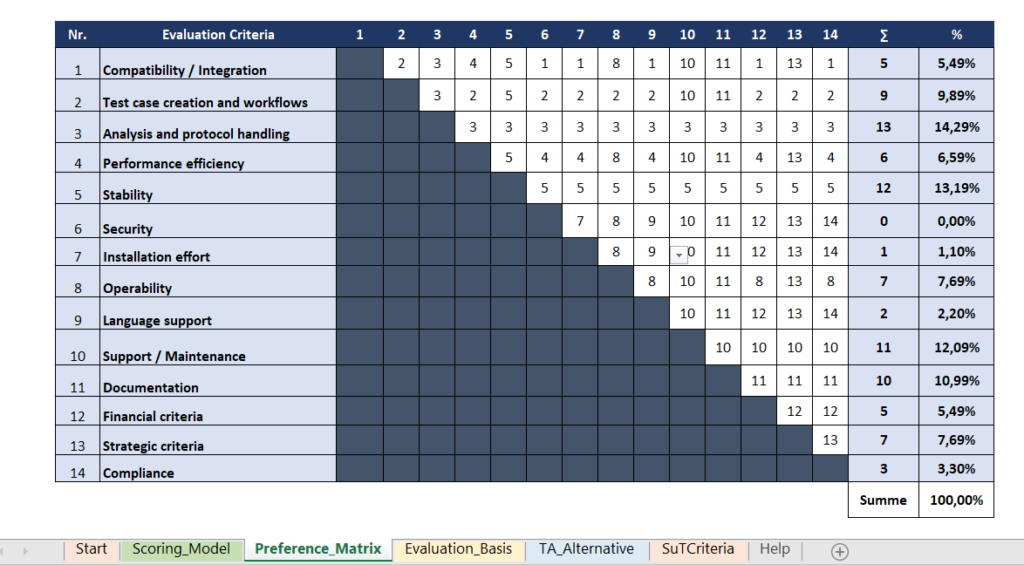
Once the criteria, especially the variable criteria, have been established, these criteria need to be weighted. It is crucial to weight the criteria according to their importance for the specific test automation project in order for them to make the best possible contribution towards the achievement of the project’s goals. The sum of the weightings for standard criteria and variable criteria should always add up to 100%. For the standard criteria, the main criteria are weighted first using the pairwise comparison method in the form of a matrix and are compared with each other in pairs (Wartzack 2021, p. 315).
Figure 5: Pairwise comparison of main criteria for a sample project
Main criteria: security, installation effort, language support
The importance of each sub-criterion is then determined using an ordinal scale from zero to two:
The points awarded are added up and multiplied by the corresponding weighting of the main criterion. This produces a proportional weighting for all standard criteria. The same procedure is applied to the other main criteria and sub-criteria. In the end, the sum of all weightings for the standard criteria equals 100%.
Measuring the fulfilment of criteria
The starting point is to answer the following question: “To what extent is the criterion fulfilled by the test automation tools being assessed?”. A 5-step model is used to determine the degree of criteria fulfilment, as shown in figure 7 (Gansen 2020, p. 17).
0
Not fulfilled.
1
Insufficiently fulfilled.
2
Partially fulfilled.
3
Fulfilled to a satisfactory extent.
4
Well / completely fulfilled.
Table 2: Evaluation scheme for criteria fulfilment
If a score of 4 is given, the tool completely fulfils a criterion. If it does not fulfil the criterion, a score of 0 is given. This method converts the relevant properties of a test automation tool into a measurable quantity.
Evaluation consolidation
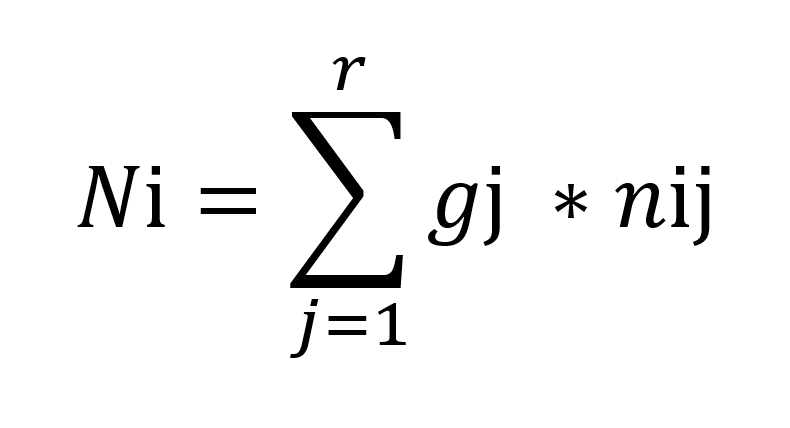
Once the degree of fulfilment has been established for each criterion, the utility value can be calculated. The following formula is used to determine the utility value:
N i = utility values of the alternative i
Gj = weighting of the criterion j
nij = partial value of the alternative i with respect to the criterion j
The partial values are added up. The result represents the actual value of a tool. The alternatives being considered can then be ranked according to the calculated utility values and this can subsequently be used for decision-making (Gansen 2020, p. 6). The tool solution that best meets all requirements and has the highest utility value can be selected.
Certain criteria can be identified as essential. These are called knock-out criteria (K.O. criteria). If a knock-out criterion (K.O. criterion) is not fulfilled (0), this is deemed a “breach”, which leads to the immediate exclusion of the alternative solution.
Figure 6: Evaluation and selection
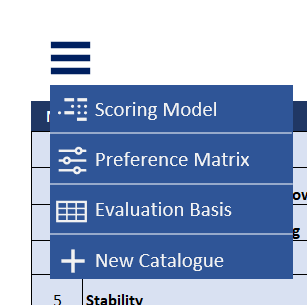
Navigation bar and export
The navigation bar provides the user with an overview of the catalogue’s structure and allows them to navigate through it effortlessly.
Figure 7: Navigation bar of the criteria catalogue
The catalogue can be exported as a PDF or Excel file and saved in any location.
Figure 8: Excerpt of the blank template for the criteria catalogue
Results of the criteria catalogue validation
The following insights were gained from the validation:
The target model for identifying variable criteria was useful for collecting together ideas for the SuT criteria.
The use of pairwise comparison helped to identify the important factors and main criteria. The matrix made it possible to make comparisons. This resulted in a significant reduction in “gut decisions”.
The criteria catalogue offered a systematic, understandable and transparent method for recommending a suitable tool. It was also possible to determine the strengths of the recommended test automation framework. This verified the framework’s coverage of selection criteria with higher relevance. This reduces the need for discussions within the team that would delay the final decision.
The 5-step model used for evaluation required very in-depth knowledge of test automation tools, which is usually lacking. This would result in staff evaluating some of the criteria based on their own feelings and perceptions. Consequently, the evaluations would be partially subjective and the selected alternative would ultimately not be the optimal one. In order to obtain a more reliable result in this scenario, at least one other person with testing expertise should be involved in the evaluation.
Conclusion & outlook
In this work, we have examined a structured and systematic approach to the selection process. This can be used to select a suitable GUI test automation tool that meets the requirements of both the project and the company. A corresponding criteria catalogue was developed, which primarily provides transparency and comprehensibility in the decision-making process.
We intend to use the criteria catalogue in other projects. The experience gained during this process will be incorporated into the next version of the criteria catalogue (version 2.0).
This article was technically supported by:
Kay Grebenstein
Kay Grebenstein works as a tester and agile QA coach for ZEISS Digital Innovation, Dresden. Over the last few years, he has ensured quality and tested software in projects in various specialist domains (telecommunications, industry, mail order, energy, …). He shares his experiences at conferences, meetups and in publications of various kinds.
The first article presented the general challenges and influencing factors that arise when selecting test automation tools, based on the results of various interviews. It showed that no standard method exists for selecting test automation tools, although there are some initial approaches involving checklists. The purpose of the thesis was therefore to find a simple, productive approach that would support the search for appropriate test automation tools on the basis of a criteria catalogue, taking account of the project application.
The basic requirement in the development of a criteria catalogue is to determine which criteria are actually relevant in the selection of a tool. I will look at this in the second part of the blog series.
Relevance of the selection criteria
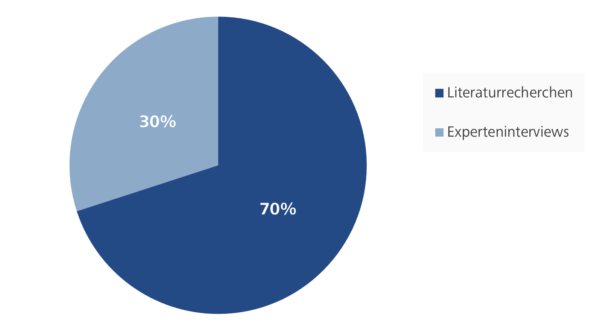
There is extensive discussion in the literature on suitable criteria for determining the quality of software products and, by extension, of test automation tools. The criteria identified for the criteria catalogue were largely developed on the basis of literature research. The sources used are presented briefly below:
The ISO 25010 list of software quality characteristics provides a useful checklist when deciding whether or not to test each criterion. Similar lists of quality characteristics can be found elsewhere (Spillner/Linz 2019, p. 27). In each case, the authors provide guidance that can be used to determine whether the individual quality characteristics have been fulfilled for a project. In the field of test automation, there are lists of criteria in Baumgartner et al. 2021, Lemke/Röttger 2021, Knott 2016 and others. These criteria relate to such factors as the supported technologies, options for test case description and modularisation, target group, integration into the tool landscape and costs. However, the objective here is simply to identify relevant criteria, not to evaluate them. There are additional criteria from the expert interviews and the analysis of the ZDI projects.
The selection criteria identified in this work therefore take findings and experience from existing papers on the subjects of quality, test automation and the creation and review of requirements for test automation tools, and combine them into one approach with practical relevance.
Figure 1: Sources of the criteria catalogue
Classification of criteria
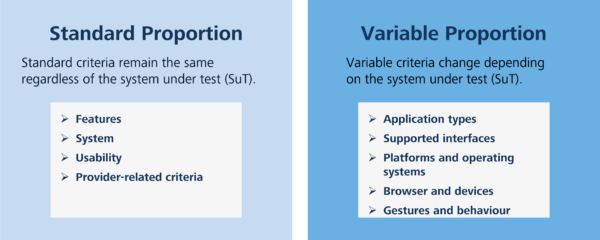
In the selection of test automation tools, influencing factors such as experience, costs or interest groups were mentioned. For many, costs were the key factor. During the course of this work, it was found that criteria such as integration or compliance are defined differently depending on the role, but are included more or less as standard in the list of criteria. And they are unchangeable, regardless of the application undergoing testing. But there is a small proportion of criteria that vary depending on the application being tested. Here is a scenario to illustrate the problem: In the medical technology industry, a new, web-based application is being developed – the frontend with Angular 8 and NodeJS and the backend with Java Microservices. The test automation tool to be selected must primarily be appropriate for the framework conditions specified by the web application undergoing testing. Before an automation tool can be used, the interface technologies of the application must be examined. In practice, test automation tools have specific characteristics and are therefore used for different technologies. Some tend to specialise in web testing while others are more at home in desktop testing. Whether it’s a web application or mobile application, there are always certain expectations that apply to the test automation tool. This means the most critical factor is the test object or the system under test (SuT). This forms the basis for selecting the tool (Baumgartner et al. 2021, p. 45). In summary, the criteria can be classified in two types: the standard proportion and the variable proportion.
Figure 2: The two types of criteria
The standard criteria are not dependent on the test object. These criteria have been grouped into four categories based on the quality criteria: features, system, usability and provider-related criteria. By contrast, the variable criteria are dependent on the SuT. The variable criteria may include the supported application types, operating systems, interface technologies, browser and devices.
Variable selection strategy
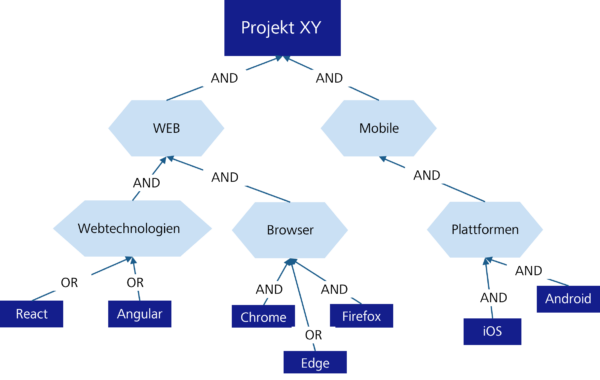
Variable selection means selecting a number of variables to be included in the list of criteria. To support the selection of variable criteria, a target model with AND/OR decomposition based on GORE (Goal Oriented Requirements Engineering) and the work of Lapouchnian (2005) and Liaskos et al. (2010) was introduced during the course of my work. It had proven to be effective at recording exact alternatives or variabilities (Mylopoulos/Yu 1994, p. 159-168) so that alternative designs can be evaluated during the analysis process (Mylopoulos et al. 2001, p. 92-96). The targets and requirements are linked via AND/OR decomposition. The AND decomposition expresses that fulfilment of the relevant targets or requirements is required. An OR-link means that the fulfilment of one of these targets or requirements is sufficient. In this process, the initial expectations for the tool are formulated in explicit terms and irrelevant requirements are avoided.
Figure 3: Simplified target model for sample project XY
Approach to tool selection
Based on the types of criteria identified (Spillner et al. 2011), this work designs a structured approach to selecting the appropriate test automation tool. The new approach can be divided into five stages:
Develop the project requirements
Identify the variable criteria using the AND/OR target model
Weight the categories and criteria
Evaluate the different tool solutions
Evaluation and selection
The next blog article looks at how the criteria catalogue has been structured on the basis of the approach outlined above. We will also show how the variable criteria have been included in the catalogue and present the results of the validation of the criteria catalogue.
This article was technically supported by:
Kay Grebenstein
Kay Grebenstein works as a tester and agile QA coach for ZEISS Digital Innovation, Dresden. Over the last few years, he has ensured quality and tested software in projects in various specialist domains (telecommunications, industry, mail order, energy, …). He shares his experiences at conferences, meetups and in publications of various kinds.
Software systems are becoming increasingly complex due to the constantly growing number of applications on different platforms. A decisive factor for the success of a software product is its quality. For this reason, more and more companies are carrying out systematic checks and tests, if possible, on the various platforms, in order to be able to ensure a given quality standard. In order to be able to keep short release cycles despite the higher testing effort, it becomes necessary to automate the tests. This in turn leads to the need to define a test automation strategy. One of the first steps in introducing a test automation strategy is to evaluate suitable test automation tools. Since each project is unique, both the requirements and the choice of tools vary. This blog series is intended to provide guidance in selecting the appropriate solution.
Figure 1: Evaluating suitable test automation tools is an important part of introducing a test automation strategy.
Introduction
As part of my final thesis, I took on the task of providing the Scrum teams at ZEISS Digital Innovation (ZDI) with an aid to help them find the right test automation tool quickly and flexibly. The challenge here was that the projects have specific scenarios and the requirements may have to be weighted separately. I would like to present the status of the work and the results to you in this and the next blog articles.
Software development has long been an area of rapid change. But while in the past these developments have mainly taken place at the technological level, we are currently observing major changes in the area of processes, organisation and tools in software development. However, these new trends come with challenges such as changes in requirements management, shortened timelines and especially the increased demands on quality. Today, the development of needs-based solutions and the optimisation of quality increase both efficiency and effectiveness within software development.
In addition, software systems are becoming more and more complex due to the constantly growing number of applications on different platforms. Since quality is a decisive factor for the success of a software product, more and more companies are carrying out systematic checks and tests, if possible, on the various platforms, in order to ensure a given quality standard. A SmartBear survey conducted in early 2021 found that many companies, regardless of the sector, already perform different types of testing, with web application testing leading the way at 69% and API/web services testing second at 61%. Desktop testing is done by 42% of the respondents. A total of 62 % of the respondents state that they perform mobile testing, 29 % of which for native applications (apps) (SmartBear, 2021, p. 12). In order to be able to maintain short release cycles despite the higher testing effort, it is becoming necessary to automate the tests.
As ZDI, we support our customers inside and outside the ZEISS Group in their digitisation projects. We also offer individual test services. That is why we have a large number of projects with different technologies and different solutions. As a small selection, keywords such as Java, .Net, JavaFX, WPF, Qt, Cloud, Angular, Embedded etc. should be mentioned here. In such complex projects, quality assurance is always in the foreground and the projects are dependent on the use of modern test tools that support the project participants in the manual, but especially in the automated tests. It would be desirable to have a tool that supports this automation effectively and efficiently. However, testers face a variety of challenges when selecting a test automation tool.
Challenges
In the research and interviews conducted as part of my work, the greatest challenges in test automation were named as the variety of test tools available. Due to this fragmentation a variety of tools is available for the same purpose.
The choice becomes even more difficult because the tools differ not only in the technology they can test, but also in their work approach. When automation is mentioned, it is always associated with scripting. In recent years, however, a new approach to GUI testing has been developed called NoCode/LowCode. This approach basically requires no programming knowledge and is therefore popular with automation beginners. Nevertheless, scripting remains the dominant method, although sometimes both approaches are used to involve as many of the quality assurance team as possible (SmartBear, 2021, p. 33).
The type of test automation approach, and therefore the use of a test automation tool, depends on the requirements in the project. This means that the requirements must always be re-examined for each new project.
Inventory
In the course of the interviews, the analysis of the current approach and the evaluation of an internal survey, I was able to identify the following procedures for the selection of tools in the projects, which have become established as a “quasi-standard”:
Das The tool is Open Source and costs nothing.
The tool has been used before and is considered trustworthy.
One aim of the survey was to find out to what extent the project situation has an influence on the tool selection. Therefore, the next step was to examine the project situations and the process models used in the projects and their influence. It turned out that it is not the process models that have a direct influence on the tool selection, but the people or groups who use the tool as future users or who approve its use.
When examining the influence of these operationally-involved participants, it became apparent that there are other interest groups that have a direct or indirect influence on the selection of a tool. These are, for example:
Software architects, who define the technology or tool chains within the project,
The management, which sets guidelines for the purchase or use of tools (OpenSource, GreenIT, strategic partnerships, etc.) or
The company’s IT, which prevents the use of certain tools through the infrastructure used (firewall, cloud, etc.).
Furthermore, the first approaches of checklists for the selection of test tools were already found during the research. They were mostly based on a few functional criteria and were determined in workshops by the project members. The evaluation showed that there was no uniform method and that the tools selected in this way were very often later replaced by other tools. This became necessary because essential requirements for the tool were overlooked during the selection.
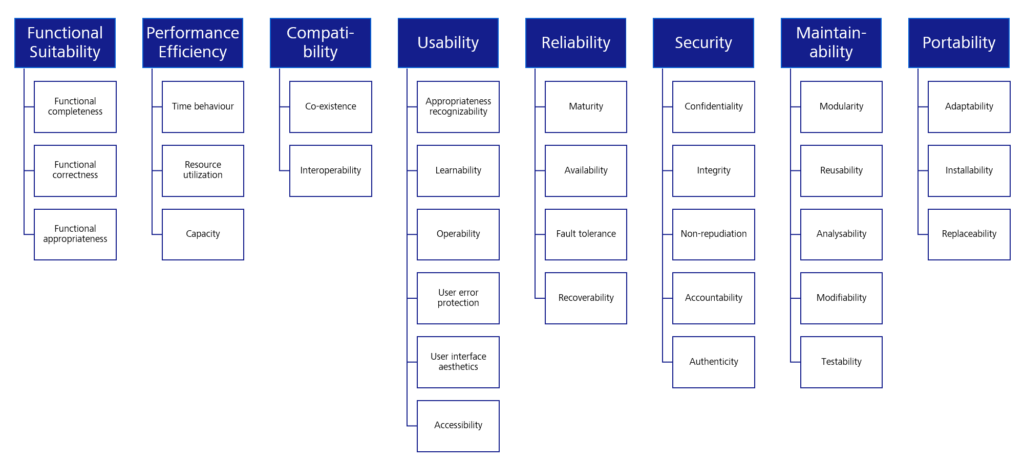
In the majority of cases, the forgotten requirements were of a non-functional nature, such as usability criteria or performance requirements. Therefore, a next step in checking relevant criteria was to refer to ISO/IEC 25000 Software Engineering (Quality criteria and evaluation of software products.
Figure 2: Criteria for software according to ISO/IEC 25010
The next blog article in this series will show how the criteria catalogue is structured and how the final list of criteria is composed.
Literature
SmartBear (2021): State of Software Quality | Testing.
This article was technically supported by:
Kay Grebenstein
After graduating in computer sciences, Kay Grebenstein was drifting over to “The Dark Side” of software development and he is now working as a software tester and agile QA coach at ZEISS Digital Innovation, Dresden. Over the last few years, he was responsible for quality assurance and software testing in many projects in different business domains (telecommunications, industry, commerce, energy sector, …). He has experience with both the classical as well as the agile process models.
In the following three blog articles, I would like to present Appium to you: a test automation tool which was developed especially for testing mobile applications. Appium offers us the possibility to simulate specific mobile application scenarios e.g.: gesture control, SMS or incoming calls and to automate corresponding test cases. Apart from virtual devices, Appium offers us the possibility, as an additional feature, to perform automated test cases on real mobile devices.
Why automate on mobile devices?
But why should we run our test automation on real devices? Why not use the virtual devices from the development tools Xcode (iOS) and Android Studio (Android)? These questions are justifiable, because the acquisition of end devices generates additional costs.
The first argument for automation on real end devices may sound trivial but is of great significance: due to the fact that your users do not utilize any virtual devices.
One could assume that virtual devices reflect one-to-one real end devices. But this assumption is wrong. The main reason is that virtual devices don’t have any hardware of their own. They use the hardware of the computer on which they are installed. Experience shows also that errors which were found on a real end device could not always be replicated reliably on virtual devices.
In addition, automation on real end devices enables you to examine the performance of your application. Even if all the features of your application work perfectly, bad performance on the end device may result in your application being unusable. Tests on virtual devices provide us with no reliable data regarding this matter.
The problem of hardware and software fragmentation can also be seen as an argument for the automation on real end devices.
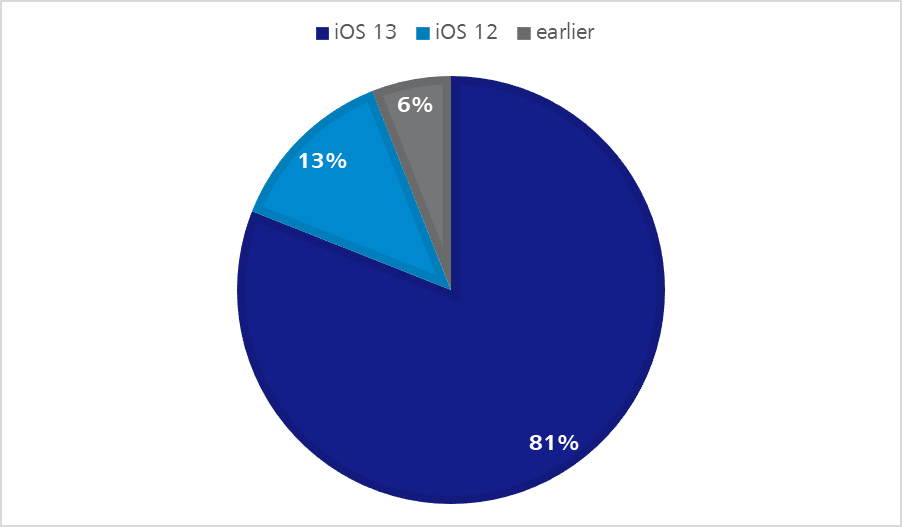
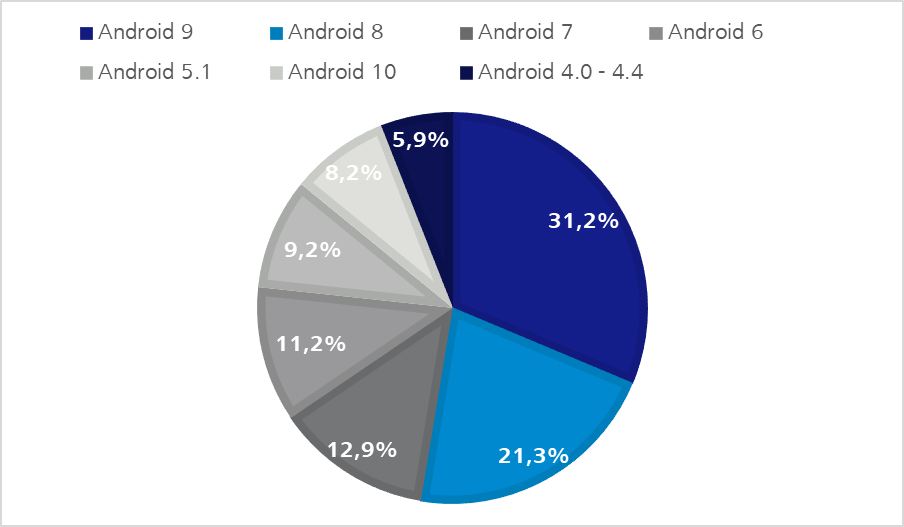
With regard to iOS as well as Android devices due to an ever-increasing product range, as well as operating system versions which remain longer and longer in circulation, a kind of natural fragmentation is developing – as shown in the following statistics.
Figure 1: iOS distribution on Apple devices – Q2 2020 | https://developer.apple.com/support/app-store/Figure 2 – Android OS distribution – Q2 2020 | https://9to5google.com/2020/04/10/google-kills-android-distribution-numbers-web
Regarding Android devices we can observe another software fragmentation. The manufacturers are able to change the Android operating system within certain parameters. So system apps, like the virtual keyboard, can operate with varying results.
Let’s take the Gboard from Google and the virtual keyboard OneU from Samsung as examples. Both support swipe-control elements or the input of gestures, but they differ in the execution.
Google‘s virtual keyboard shows you the word, which is being formed while you glide over the keyboard. Whereas Samsung’s keyboard on the other hand shows you the word only when your fingers have stopped gliding.
One should not assume that the virtual devices from xCode or Android Studio simulate those differences.
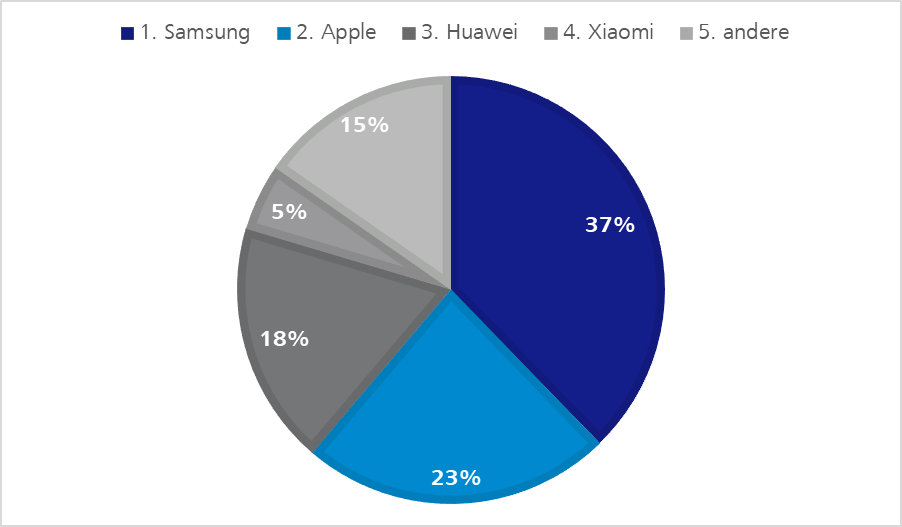
Of course, we cannot establish an infinitely large pool of mobile end devices. However, we can make a selection of devices which are strongly represented by their users.
End devices by Apple, Samsung and Huawei surely play a more decisive role in the pool than equipment constructed by other manufacturers as the following statistics show.
Having gone into the advantages of test automation on real end devices, of course this still raises the fundamental question for projects with an existing test automation: Why should Appium be introduced as an additional test automation tool?
The problem of software fragmentation can be observed also in test case automation. There are more and more tools which support certain functions and settings, but are only conditionally compatible with each other. Ideally, we would like to utilize only one single test automation tool in order to reduce the obstacles of test case automation.
To answer the last question, let‘s start from the perspective of a multi-platform project.
Our application has been programmed as a desktop website, native iOS app and hybrid Android app. Additionally, we have created a responsive web app because your website already has good coverage of automated test cases via Selenium.
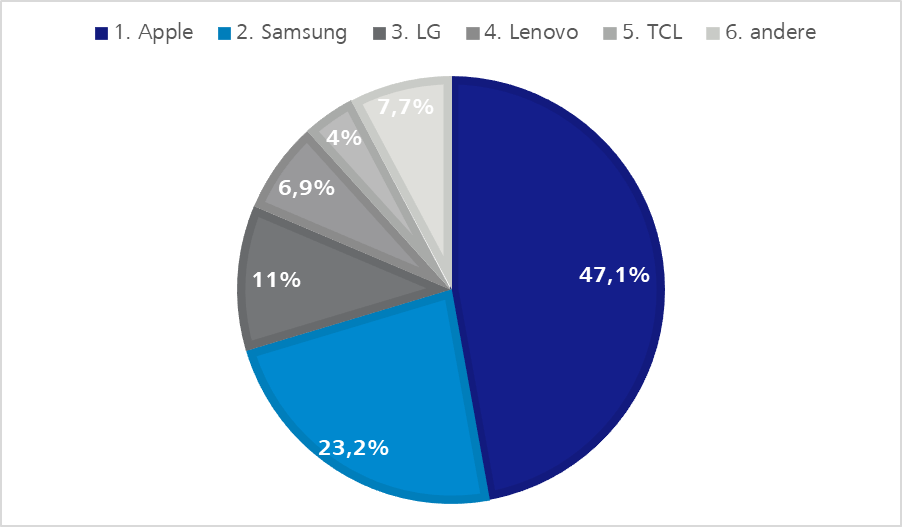
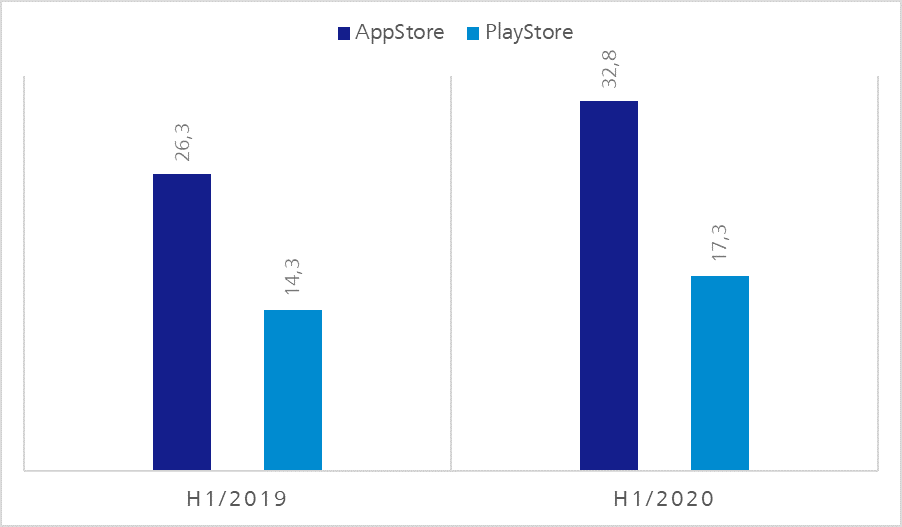
The following statistics indicate that test case automation which is merely limited to the website concerned is no longer sufficient for our multi-platform project.
Figure 5: Possession and use of smartphones according to age groups in Germany 2019 | de.statista.comFigure 6: Revenue from mobile stores in bn. US$| https://sensortower.com/blog/app-revenue-and-downloads-1h-2020
We should assume that all relevant target groups also use our application on mobile end devices.
Appium vs. Selenium
A short look back to the origins of test automation tools shows why the introduction of further tools is useful regarding our example.
The first applications for which the test cases on end devices were automated were websites, amongst other things. Due to there being an increase of browsers the automation of test cases even in the front end area became necessary.
One of the most successful test automation tools in this area is Selenium. According to the origins, however, Selenium is geared towards the test case automation of websites. Mobile-specific use cases as gesture control are no longer being supported.
But let us assume that in our multi-platform project only a small number of users utilize the mobile applications. The majority use the desktop website and this has, as we know, a good automated test case coverage via Selenium.
Is the introduction of Appium still worthwhile?
Having briefly explained the problem of tool fragmentation, the introduction of Appium may possibly be connected more with costs rather than benefits. One could suppose our teams, which are experienced in Selenium automation, could automate the most important test cases with Selenium, and a few workarounds for our mobile applications. But let‘s take a closer look at Appium to check whether this claim is true.
Automation of mobile specific application scenarios using Appium
Let us first take a look at the problem of mobile specific application scenarios. Let’s contemplate use cases which Appium supports, where difficulties surely will occur for our test-automation experts using Selenium.
Gesture control
In our application a list exists whose end our users would like to reach. In the desktop-browser version, the users certainly utilize the mouse wheel, the scroll bar or the arrow keys on the keyboard for this. In the mobile applications, however, they will fall back on diverse gestures in order to reach the end of the list. They could put their finger on the lower screen area, hold it, pull it upwards and release it again just to move a certain part of the list.
Another possibility would be to place the finger at the bottom of the screen and with a quick upward-swipe gesture trigger an automatic scroll-down. For these cases we could fall back on TouchAPI by Appium.
Calls and SMS
Incoming calls and SMS have a much heavier impact on use of our application on mobile end devices. While on the desktop, the call usually only opens another window, the running application on mobile end devices is interrupted most of the time and the respective application for telephone calls is summoned to the foreground. Furthermore, incoming SMS usually trigger a notification via the current application. For these cases we can fall back on the phone-call API from Appium.
System applications
On mobile end devices our application probably comes much more often in contact with system applications. Be it the calendar, the photo gallery or the in-house map application. Appium also offers us at this point – regardless of which Appium driver we use – the possibility to integrate these system applications into our test automation.
Automation of hybrid apps
Now let’s take a look at the tool fragmentation issue in test case automation.
One part of the problem consists of the various types of development in mobile applications. In our example project the most common types are represented.
Let’s take a closer look at how Appium deals with the more complex hybrid applications via the Context API.
To find elements, or to interact with them, Appium assumes by default that all our commands refer to native UI-components which are displayed on the screen. Our test session is therefore still in the so-called Native Context.
If we use, for example, the Appium command getPageSource within the framework of a hybrid application, we will find in the output regarding web views only elements like <XCUIElementType…>. Important elements such as Anchor Tags or Divs are not shown to us at this stage.
So as long as we move in the Native Context all web views, or so-called Web Context are a black box for Appium. Although we are able to discern Web View UI-elements, and eventually even some buttons which for example iOS implies. However, it will not be possible to discern elements on the basis of CSS-Selectors.
To get better access to the Web Context, we need to transfer our Appium Session into the Web Context. This we can do by first discerning the name of the Web Contexts with the command driver.getContextHandles. This displays an array of all context names which Appium has created to assign them to the available Context. In our case the output is a Web Context called WebView1 and a Native Context called NativeElement1.
Now to transfer our Appium session into the Web Context we use the command driver.setContext(WebView1). When this command has been executed Appium uses the Context environment which corresponds to the specified Context.
All other commands now operate within the Web Context and relate to WebView1. To be able to address again the native element we use the same command once more with the name of the Native Context which we would like to address. So in our case: driver.setContext(NativeElement1). If we would like to find out in which Context we actually are we could use the following command: String currentContext = driver.getContext();
After briefly discussing the Context API from Appium, let’s take a look at how it works.
On iOS, Appium uses the so-called „remote Debugger Protocol“ which is supported by Safari. This „remote Debugger Protocol“ enables us to receive information about the sites displayed in Safari, or to control browsing behavior. One method we can fall back on is the possibility to paste the current website into JavaScript.
Appium uses this function to perform all commands available in the WebDriver API.
Support of code languages
Appium allows you to write tests in different code languages. This is an advantage of the client-server model. The Appium development team is able to implement all Appium functions in only one server code base, which is written in JavaScript (Appium Server = NodeJS platform). Nevertheless, users who write codes in another programming languages are able to get access to these functions. The access takes place via the Appium client libraries, which Appium provides us with. If, for example, we would like to write our automatic tests in Java, we need to integrate the corresponding Appium Java Libraries into our Appium Client.
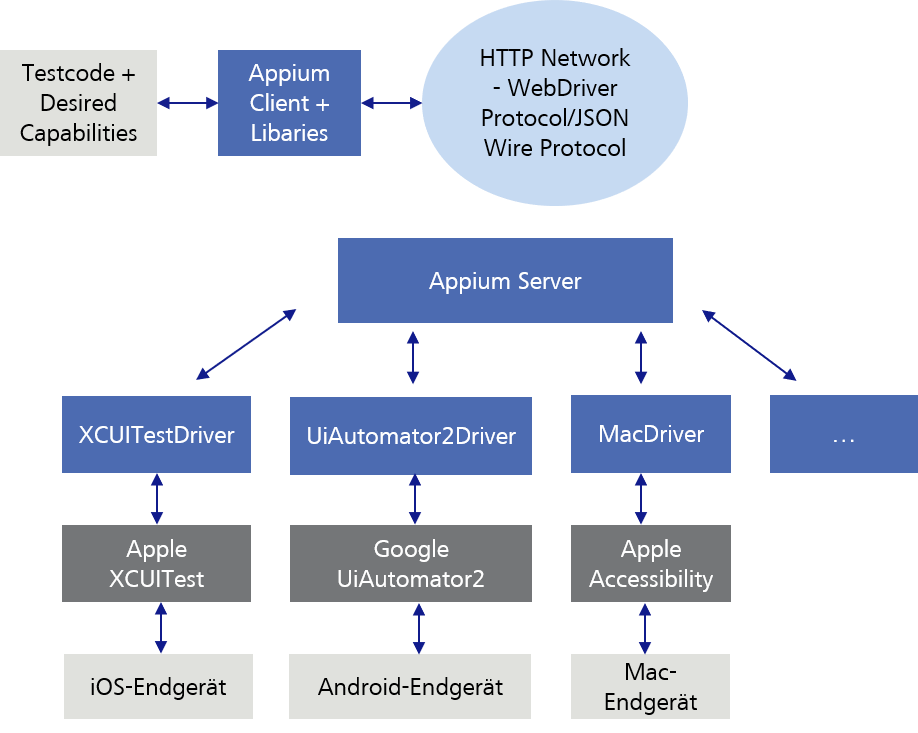
Appium client server model
As already described, we send our test code (commands/requests) via the Appium Client with the corresponding libraries to the Appium server. As Appium Client for example the developer tool Eclipse can be used. The Appium Server again sends our test code (commands/requests) to the mobile end device, on which this is then executed. But let’s go into more detail.
In order that the Appium Server can interpret the Appium Client test code (commands/requests), it uses the WebDriver Protocol, or the older JSON Wire Protocol, which convert our test code to a HTTP RESTful request.
Afterwards, the Appium Server sends our test code depending on which end device we would like to address to the platform-specific test framework which in turn executes the test code on the end device. At this point, the Appium Server is able to communicate with the different test frameworks.
In order that the Appium Server can decide with which of those platform-specific test frameworks, or with which end device it should communicate, our test code has to be sent along with the so-called „Desired Capabilities“ as JSON Object to the Appium Server. In the Desired Capabilities, for example, we specify the device name, the platform (iOS, Android…) and the platform version.
Figure 7: Appium client-server model
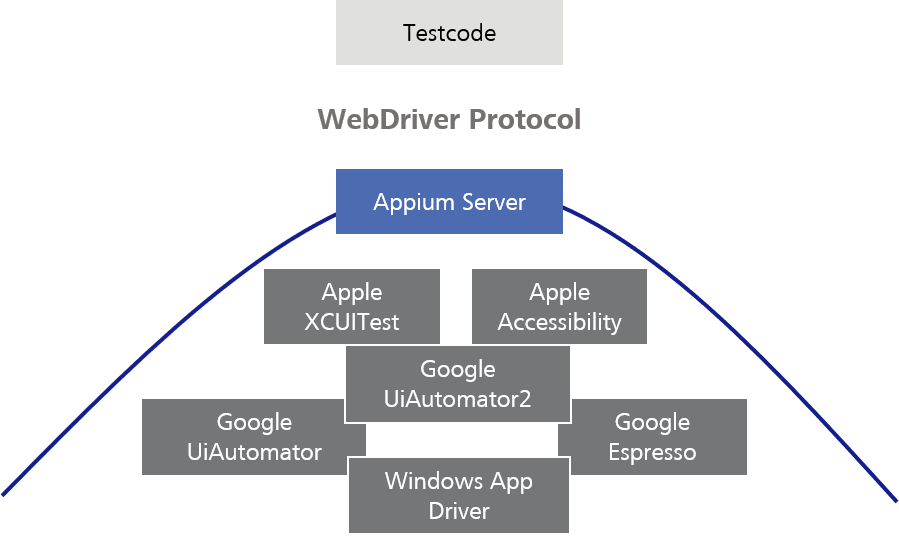
There is not necessarily only one test framework per platform. For example, under Android there are three different automation technologies by Google. The oldest one, UiAutomator, was replaced by UiAutomator2. UiAutomator2 has added a variety of new automation functions.
The latest test framework is called Espresso, and works with a totally different model than UiAutomator2. However, it offers much greater stability and test speed.
You can instruct your Appium tests to refer to one of those test frameworks, based on their specific functions and the platform support.
Theoretically, you could also use the test frameworks directly. However, Appium offers a practical setting for the different test frameworks, providing them with the same WebDriver Protocol and tries to balance behavioral differences between various test frameworks.
Figure 8: Appium as setting for test frameworks
When new test frameworks appear, the Appium team can create a communication protocol (Driver) for them so you can access these without having to rewrite all your test scripts. This is the strength of using a standard protocol and the Client-Server-Architecture.
It also enables cross-platform automation. Instead of learning two different test frameworks in two different languages, in most cases you could write one Appium-Script and run it on different platforms.
Whoever uses Appium does not need to know much about these underlying test frameworks, because they only deal with the Appium API and for example, do not need to write an XCUI test or an Espresso test.
Summary
In summary, we can say: Appium is a tool for automation of mobile applications which was inspired by Selenium. In fact, Appium tests are based on the same protocol as Selenium tests. Selenium offers their users the possibility to control web browsers. For historical reasons, it is sometimes called „WebDriver“ or „Selenium/WebDriver“.
As you may have already recognized by the name Appium, it was designed to be as compatible as possible with Selenium. Appium adopted the same protocol as Selenium, so that Appium and Selenium tests mostly look the same and „feel” the same. In fact, the Appium Client Libraries were constructed using Selenium Client Libraries as its basis.
But there was a problem: The Selenium Protocol was only developed for the automation of web browsers. Therefore, Appium had to add commands to the protocol to enable mobile-specific automation. This means that Appium commands are an extension of Selenium ones.
The previously made claim, that the introduction of Appium in our example project, would not be useful due to the cost-benefit factor is therefore wrong. It can even be assumed, that besides an improved coverage regarding the test automation, the introduction could also contribute to an improvement of the process.
I hope you have enjoyed this short excursion into the world of test automation and the technical background of Appium. In my second blog regarding Appium, I will show you how to set it up. In addition, I will demonstrate, using specific code examples as a basis, what we are able to achieve using Appium in our multi-platform project. There we will discuss the already addressed cases. I would be happy to welcome you to my next post in this blog series.
In an agile environment, regression testing helps to maintain a high level of quality. With each user story, newly developed functions are added, while the old functions still have to work. By the tenth sprint, the effort involved in the regression is so high that it is impossible to test everything manually. The only solution is test automation.
If a project is built from scratch, it is possible to properly integrate the test automation from the start. At the same time, the tester often feels like a lone warrior facing several developers. Now then, how can we realize the time-consuming automation of the functions in the daily work of a test analyst?
Project environment
In our project, we are creating new software in a JavaScript environment. It is implemented by means of the Electron framework. Consequently, Spectron is the preferred tool for the automation of test cases. Jira is used for the project platform, and the project is implemented based on the scrum model. The project team (based on FTE) consists of:
6 developers, incl. 1 architect
1 scrum master
1 business analyst
1.5 testers
Concept
It was obvious from the project kick-off that the testers would not be able to do the test automation. Therefore, the team came up with the following solution:
the test automation is done by the developers
the review for the test cases is done by the testers
the creation and approval of the Spectron test cases are codified in the Definition of Done
Advantages
Time saved in testing: The real reason for this procedure is the scarcity of resources on the testers’ part. If they had had to take on the automation as well, the entire project would not have been possible.
Change of perspective in testing: The testers can learn quite a lot in the discussion and review. For example, the implementation becomes clearer when questions are asked about why a test has been written this way. This can result in test cases that would otherwise not have been thought of.
Development of know-how: Since writing tests while the development is underway is routine work for programmers, the basic understanding regarding the creation of automated tests is generally very good. In our project, this has already proven useful for several reasons:
Parts of the applications could be covered using technical tricks that a tester would not have been readily able to provide, e.g. automated testing of the correct representation of a point cloud in a chart and the display of the details of a selected point.
Technical refinements enabled us to significantly improve the performance and stability of the Spectron tests.
After changing the tools used, the duration of a complete Spectron run was reduced by half an hour (time savings of 25%)
Change of perspective in development: Due to the fact that the developers concerned themselves with the user’s perspective regarding the functions and the interface of the software, a large number of errors could be avoided, and the basic understanding increased due to the intense interaction with the testers.
Disadvantages
More time required for the developers: The time saved in one place is needed elsewhere. However, the work can be shouldered by several people in this case.
Structure: Developers classify test cases into logical areas from a technical point of view. As they are not always identical to the functional logic, testers may have trouble finding and reviewing specific test cases.
Challenges and solutions
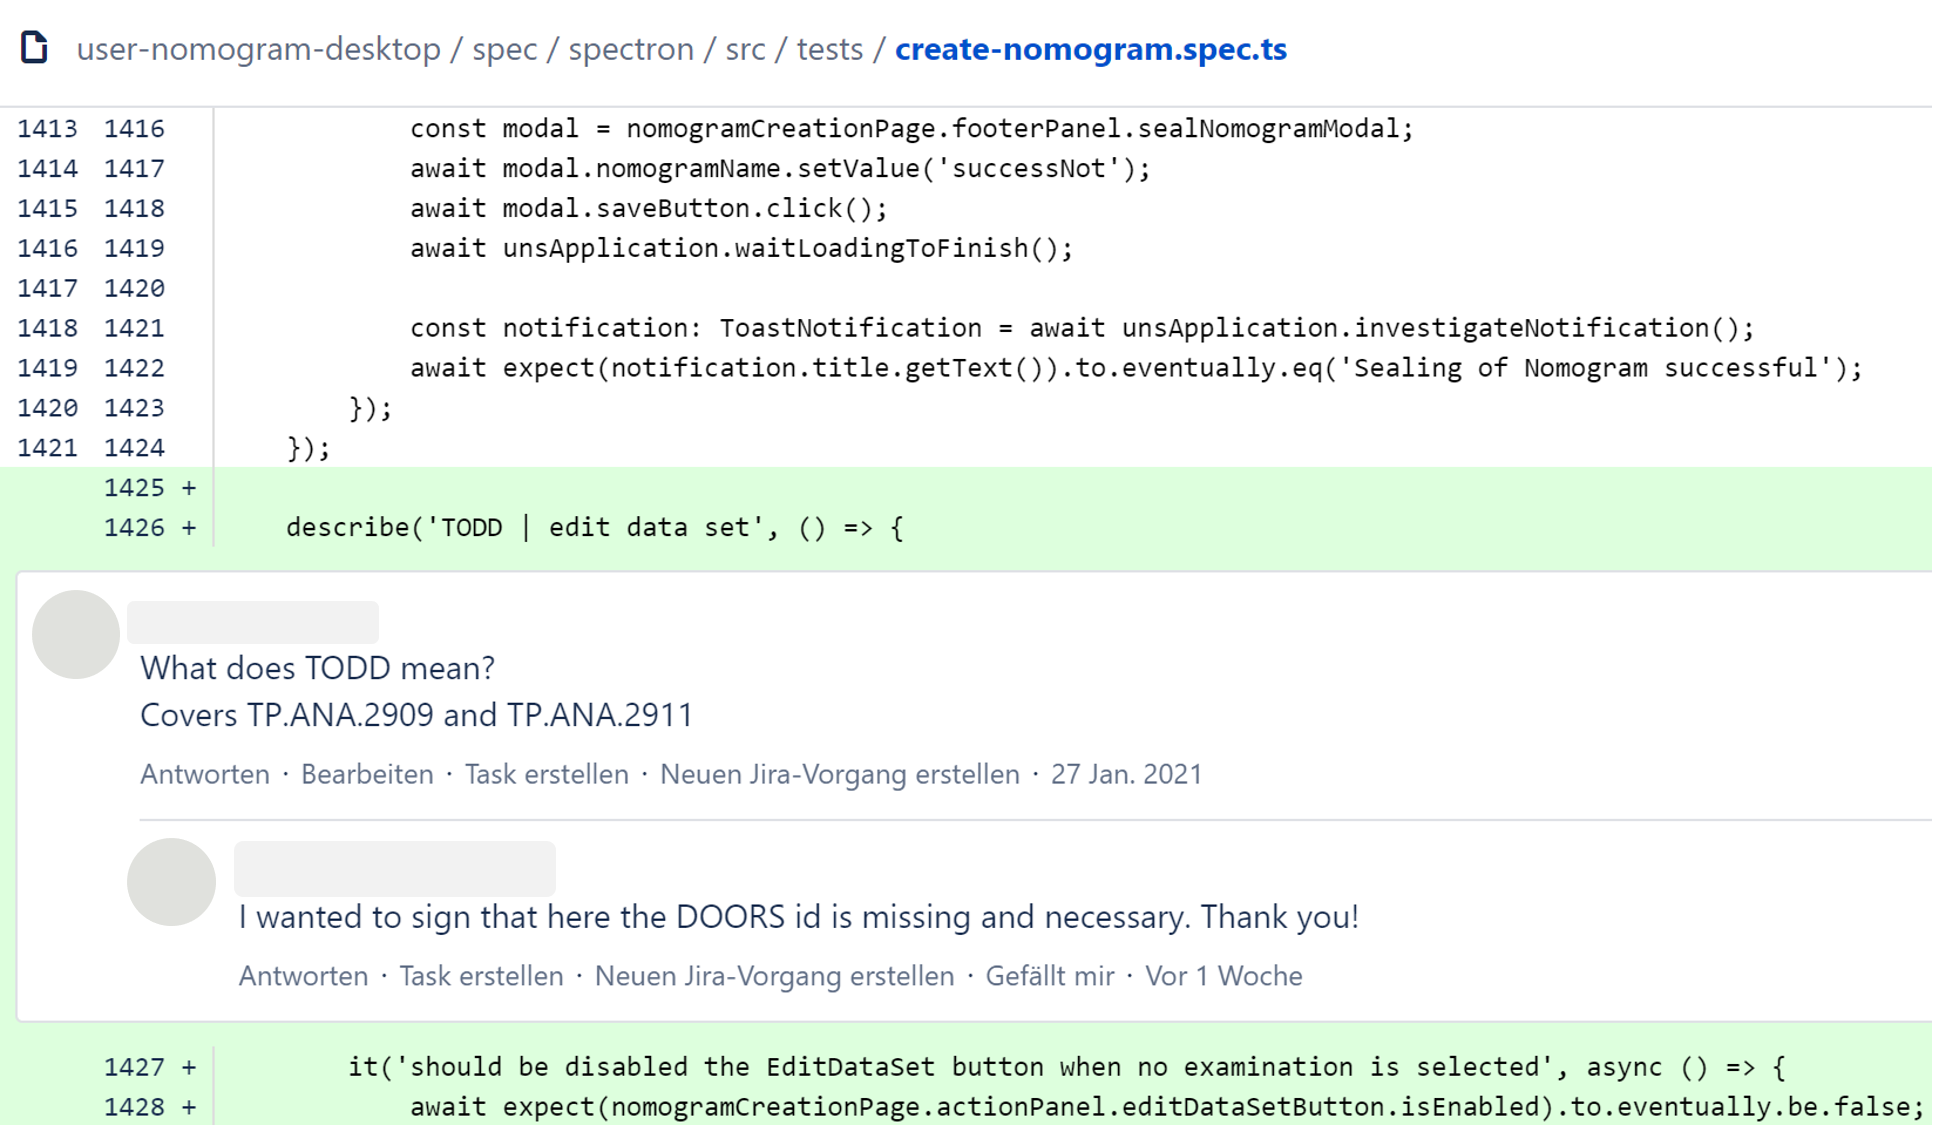
Traceability DEV QA: The review is done in Git (diff tool) in the project. In the project, the test team reviewed modified and newly created Spectron test cases, but not deleted ones, based on the assumption that those had been replaced in the course of the modification. Consequently, some requirements were no longer covered. Solution: To solve the problems with the review, training everybody who has to work in and review using Git on how to use Git is particularly helpful. Doing a walkthrough with the test team and the development team in the case of major modifications is useful as well to allow the testers to better understand the implementation by the developers.
Figure 1: Example of a Git review
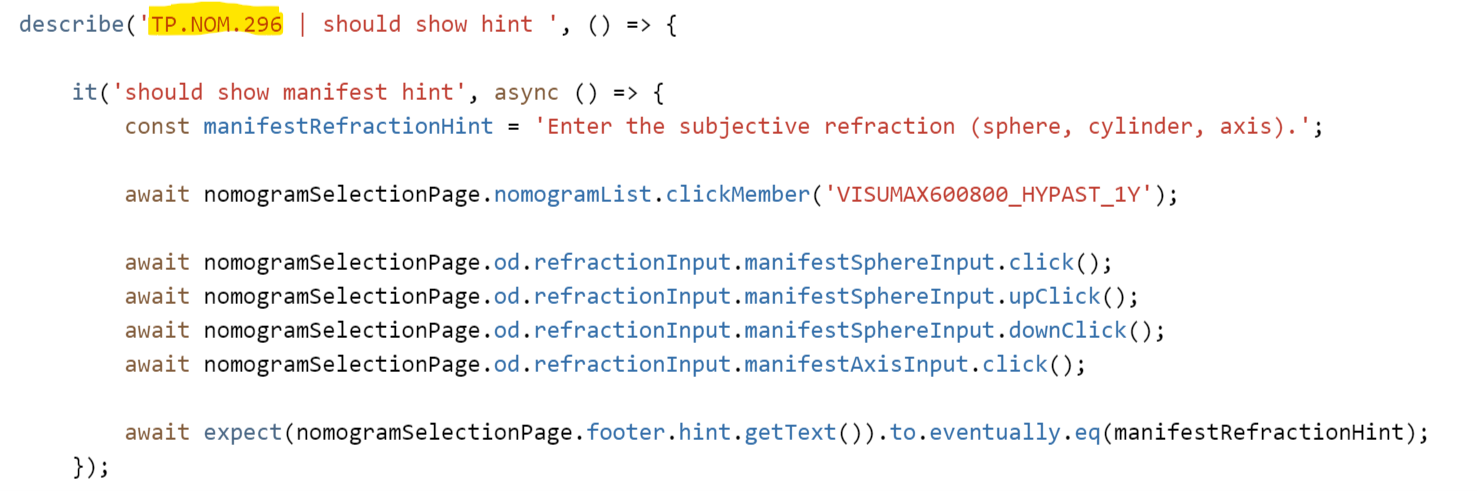
Traceability of Spectron requirements: This is a challenge that was specific to our project environment. The agile team uses Jira for the requirements and test management, but in the client’s environment, the requirements and test cases have to be specified by means of different requirements management software for legal reasons. Since the systems do not know each other, automatic traceability cannot be ensured. Solution: To overcome this obstacle, we established a direct allocation of the Req ID to the Spectron clusters.
Figure 2: Example of direct allocation
Conclusion
In conclusion, we can say that our concept of only having the test analyst review automated test cases instead of writing them proved to be effective in our project. The division of tasks between the testers and the developers fits very well with the agile method (scrum). The advantages far outweigh the disadvantages.
This approach is perfect for an agile project that is being built from scratch with a small staff and a high standard of quality. However, you should use this method from the start. Integrating it at a later time is almost impossible because gradually expanding the test cases after each user story is much more manageable and easier than creating the test cases en bloc. Furthermore, decisions regarding the implementation, structure, architecture, and most importantly, the processes (Definition of Done, …) are made at the beginning.
With Selenium, as with most test automation tools, result reports can be generated. These machine-readable documents in formats such as XML or JSON are not very user-friendly, but they can be easily integrated into other tools and thus made more readable. With this blog series I want to show how important functions in Selenium can be extended or enhanced with simple means. In the first part I introduced what Selenium 4 brings and how screenshots can be used. In the second part we made a video of the test and the third part is about reports. I try to evaluate the approaches according to their added value (The Good) and their challenges (The Bad) and give useful hints (… and the Useful) if necessary.
Why do we need reports?
To answer the “why” question, I start with the “worst” case: The evaluation and audit-proof storage of all test results is mandatory in some projects, because legal or other requirements must be met. In the case of contract development, this may be a requirement of the customer. In the case of software and hardware development in the medical field, it is a mandatory requirement for approval and licensing by the authorities. But even without these specifications, reports and clear protocols offer added value for the project. They can be used to derive key figures and trends that the team needs for its retrospectives or further development.
Just a protocol…
There are many ways to generate simple machine-readable test protocols. When using automated tests (Selenium, JUnit) in Java projects, you can use Maven to integrate the maven-surefire plugin, which creates an XML file during the build process that records the results of a test run. The XML file contains the name of the test class and all test methods, the total duration of the test execution, the duration of each test case / method and the test results (tests, errors, skipped, failures).
… and what do you do with it.
The machine-readable logs are usually generated automatically in the build tool and included in the result report of the build tool. Thus, Jenkins includes all results of automated testing for projects organized with Maven. In addition, most build tools have plug-ins that include the test logs or even graphically display them.
The projects that need to document all of their test results usually face the problem that the test results for the different types of tests (manual, automated, etc.) are generated in different tools and therefore exist in different formats. Therefore, different test management tools offer the possibility to read in the machine-readable reports. This means that the test results of the automated tests stand next to the manual tests and can be summarized in a test report/test report.
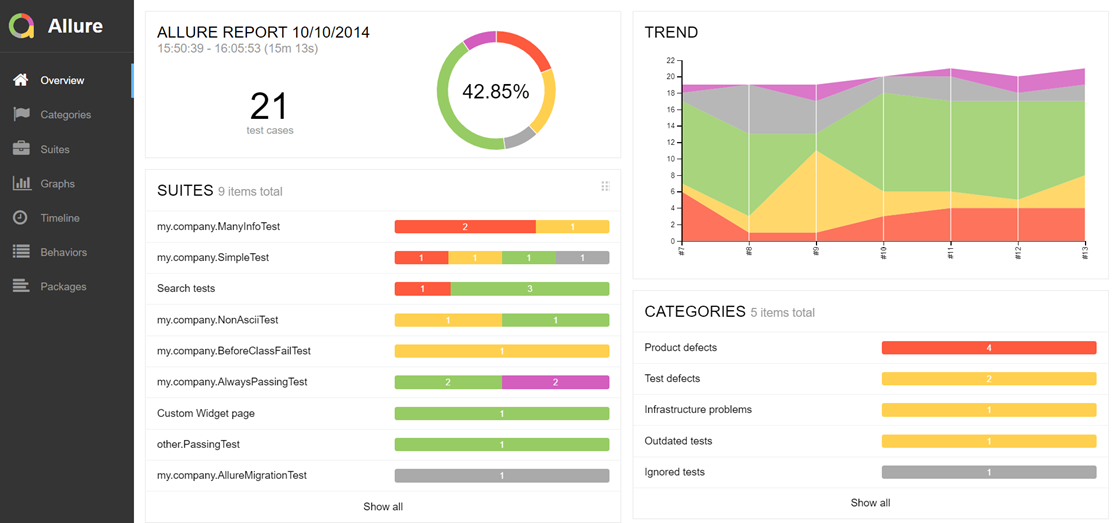
If no suitable test management tool is available or if you need a stand-alone version, I would like to introduce the Allure Test Report tool. The Allure framework is a flexible, lightweight and multilingual test report tool with the possibility to add screenshots, protocols etc. It offers a modular architecture and clear web reports with the possibility to save attachments, steps, parameters and much more. Different test frameworks are supported: JUnit4, JUnit5, Cucumber, JBehave, TestNG, …
To create better evaluation and clarity in the reports, the Allure framework uses its own annotations. This allows the results of test classes and test methods to be linked to features, epics or stories. Annotations such as @Story, @Feature or @Epic can be used to link test classes or test methods with requirements (story, epic, feature). These links can then be evaluated in the report view and statements about test coverage or project progress can be made.
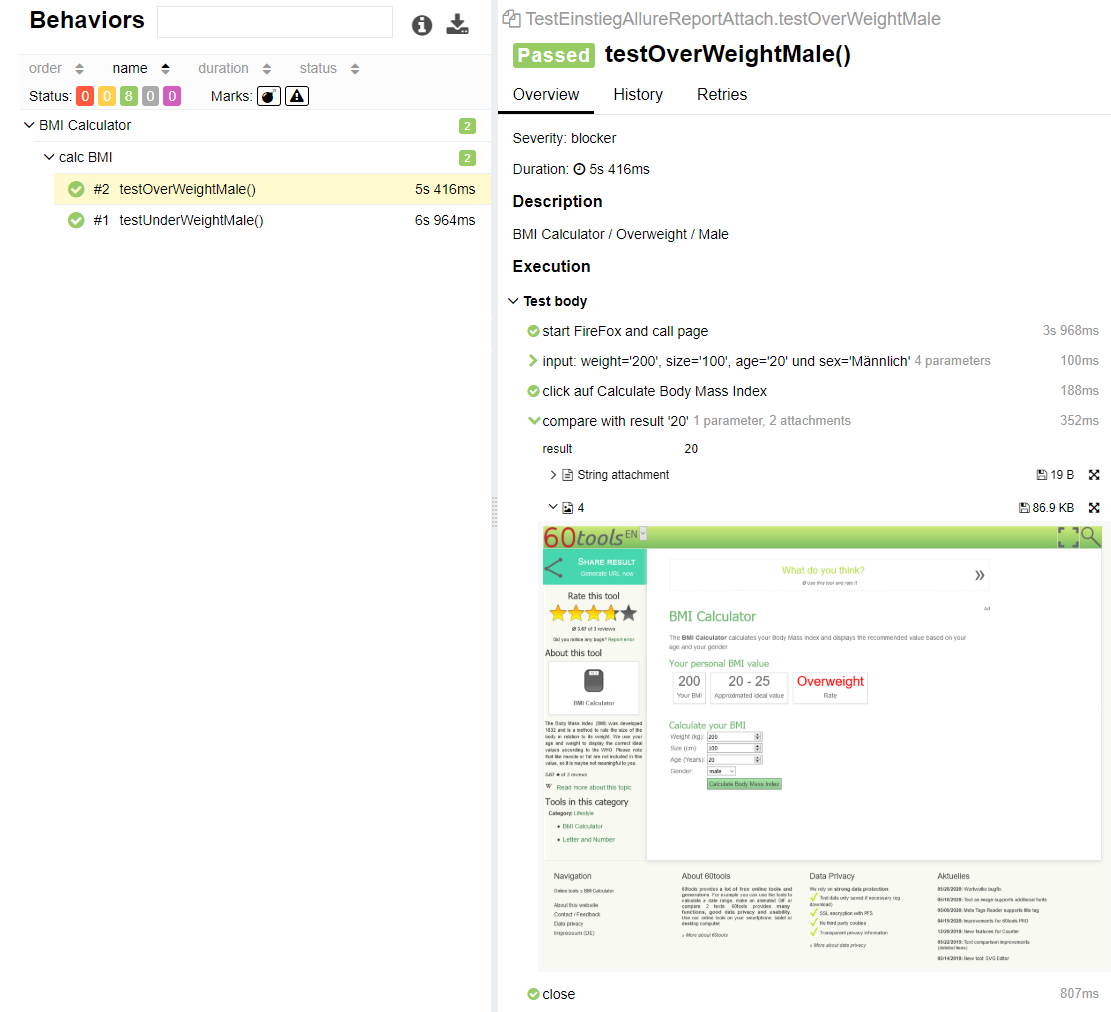
Furthermore, the readability of the test cases can be improved by the annotation @Step and @Attachment. We can divide our test case (@Test) into individual test methods to increase readability and reusability. With the annotation @Step of the Allure framework, these test methods or test steps can be displayed in the test log. Here @Step supports the display of a test step description of the parameters used, the step results, and attachments. This is because test steps can have texts attached in the form of strings and images in the form of byte[]. See the code example …
Annotationen von Allure
import org.apache.commons.io.FileUtils;
import org.junit.jupiter.api.Test;
import org.junit.jupiter.api.AfterEach;
import org.junit.jupiter.api.BeforeEach;
import org.junit.jupiter.api.Assertions;

import org.openqa.selenium.*;
import org.openqa.selenium.firefox.FirefoxDriver;

import io.qameta.allure.Allure;
import io.qameta.allure.Feature;
import io.qameta.allure.Description;
import io.qameta.allure.Severity;
import io.qameta.allure.SeverityLevel;
import io.qameta.allure.Step;
import io.qameta.allure.Attachment;
import io.qameta.allure.Story;
import io.qameta.allure.Epic;

import java.io.File;
import java.io.IOException;
import java.text.SimpleDateFormat;
import java.util.Date;
import java.util.concurrent.TimeUnit;

/**
 * Allure Framework is a flexible lightweight multi-language test report tool
 * that not only shows a very concise representation of what have been tested
 * in a neat web report form, but allows everyone participating in the development
 * process to extract maximum of useful information from everyday execution of tests.
 *
 * https://docs.qameta.io/allure/#_junit_5
 */
@Feature("BMI Calculator")
public class TestAllureReportAttach {

    FirefoxDriver driver;
    String url = "https://60tools.com/en/tool/bmi-calculator";

    @Test
    @Description("BMI Calculator / Underweight / Male")
    @Severity(SeverityLevel.CRITICAL)
    @Story("calc BMI")
    public void testUnderWeightMale() {
        inputTestdata("20", "200", "20", "Männlich");
        clickButtonCalc();
        compareResult("5");
    }

    @Test
    @Description("BMI Calculator / Overweight / Male")
    @Severity(SeverityLevel.BLOCKER)
    @Story("calc BMI")
    public void testOverWeightMale() {
        inputTestdata("200", "100", "20", "Männlich");
        clickButtonCalc();
        compareResult("20");
    }

    @BeforeEach
    @Step("start FireFox and call page")
    public void startFirefoxWithURL() {
        /**
         * What is GeckoDriver?
         GeckoDriver is a connecting link to the Firefox browser for your scripts in Selenium.
         GeckoDriver is a proxy which helps to communicate with the Gecko-based browsers (e.g. Firefox), for which it provides HTTP API.

         Firefox's geckodriver *requires* you to specify its location.
         */
        System.setProperty("webdriver.gecko.driver", ".\\libs\\geckodriver.exe");

        driver=new FirefoxDriver();
        driver.get(url);
        driver.manage().timeouts().pageLoadTimeout(120, TimeUnit.SECONDS);
    }

    @Step("input: weight='{0}', size='{1}', age='{2}' und sex='{3}'")
    private void inputTestdata(String weight, String size, String age, String sex) {

        driver.findElement(By.name("weight")).sendKeys(weight);
        driver.findElement(By.name("size")).sendKeys(size);
        driver.findElement(By.name("age")).sendKeys(age);


        WebElement gender = driver.findElement(By.name("sex"));
        gender.sendKeys(sex);
        gender.sendKeys(Keys.RETURN);
    }

    @Step("click auf Calculate Body Mass Index")
    private void clickButtonCalc() {
        WebElement button = driver.findElement(By.xpath("//*[@id=\"toolForm\"]/table/tbody/tr[5]/td[2]/input[2]"));
        button.click();
    }

    @Step("compare with result '{0}'")
    private void compareResult(String result) {
        String str2 = driver.findElement(By.xpath("//*[@id=\"content\"]/div[2]")).getText();

        System.out.println("str2: " + str2);
        attachment(str2);

        System.out.println("getScreenshot1");
        //make a screenshot
        screenShot(driver, ".\\screenshots\\" ,"test_Oversized");
        System.out.println("getScreenshot3");

        Assertions.assertTrue(str2.contains(result));

    }

    @AfterEach
    @Step("close")
    public void closeBrowser() {
        driver.close();
    }

    @Attachment(value = "String attachment", type = "text/plain")
    public String attachment(String text) {
        return "<p>" + text + "</p>";
    }

    @Attachment(value = "4", type = "image/png")
    private static byte[] screenShot(FirefoxDriver driver, String folder, String filename) {

        SimpleDateFormat dateFormat = new SimpleDateFormat("yyyyMMdd_HHmmss");
        String timestamp  = dateFormat.format(new Date());

        try {
            File scrFile = ((TakesScreenshot)driver).getScreenshotAs(OutputType.FILE);
            // Now you can do whatever you need to do with it, for example copy somewhere
            FileUtils.copyFile(scrFile, new File(folder + filename + "_" + timestamp + ".png"));
            return driver.getScreenshotAs(OutputType.BYTES);
        }
        catch (IOException e) {
            System.out.println(e.getMessage());
        }
        System.out.println("getScreenshot2");
        return new byte[0];

    }

}
… and the result in the test protocol:
Conclusion
With test protocols and reports, automated test runs can be generated very easily and integrated into your own tool chain. Although this is usually associated with a little extra work, trends and problems can be identified faster and better.
Result protocols and reports
The Good
The Bad
… and the Useful
• Visualization of the current status • Trends and problems can be identified
• More effort • New tools and interfaces • Higher complexity
With this blog series I want to show how important functions can be built into selenium by using simple means. In the first part I introduced what Selenium 4 brings and how to use screenshots. In the second part we will create a video of the test execution. I try to evaluate the approaches according to their added value (The Good) and their challenges (The Bad) and to give useful hints (… and the Useful).
Why?
But at the beginning we will briefly ask ourselves the question: Why record a video or screencast of the test performance?
With a video we have a recording of the entire test run. Unlike with a screenshot, we can not only record the test result, but we can also trace the path to it.
Like screenshots, the videos can also be used for debugging and point out problems during the test run. Therefore, as with the screenshot, it makes sense to create videos only when problems occur. Following this approach, the video functionality should be extended by a flexible and global switch that can be set as needed.
But the videos can also be used to document the test results. In some projects a detailed documentation is even mandatory, because here legal or other requirements have to be met.
Recording video made easy
Since I use Java Selenium, my first approach was to record videos with the “in-house” functions of Java or to use a suitable framework. My first choice was the MonteCC framework, because it allowed me to record the screen during the test execution with the help of only two methods. In one method video recording is started before the test and in one method the recording is stopped after the test and the video is stored in the appropriate directory.
To make sure this happens before each test, we use the annotations of JUnit:
@Test
The method with the annotation @Test is a test case and is started during test execution and the result is recorded in the test log.
@BeforeEach
This method is called before each test execution (see @Test).
@AfterEach
This method is called after each test execution (see @Test).
If you need a complete record of all test cases, you can also use the annotations @Before and @After, which are called before all or after all tests of an execution definition (test class).
Major disadvantages of MonteCC are that the last release was more than six years ago and that the videos are in QuickTime format.
JavaCV (https://github.com/bytedeco/javacv) offered itself as an alternative. The library is actively maintained in GitHub and stores videos in MPEG format. Again, there are two methods of video creation that can be called before and after the test. But JavaCV requires additional methods because screenshots are taken at short intervals parallel to the test run and then assembled into a video after the test. A detailed instruction can be found under the following link: https://cooltrickshome.blogspot.com/2016/12/create-your-own-free-screen-recorder.html.
I have made the following changes for use in automated testing:
/**
 *
 * https://github.com/bytedeco/javacv
 * https://cooltrickshome.blogspot.com/2016/12/create-your-own-free-screen-recorder.html
 */
public class RecordSeleniumJavaCV {

    // The WebDriver is a tool for writing automated tests of websites.
    FirefoxDriver driver;

    public static boolean videoComplete=false;
    public static String inputImageDir= "videos" + File.separator + "inputImgFolder"+File.separator;
    public static String inputImgExt="png";
    public static String outputVideoDir= "videos" + File.separator;
    public static String outputVideo;
    public static int counter=0;
    public static int imgProcessed=0;
    public static FFmpegFrameRecorder recorder=null;
    public static int videoWidth=1920;
    public static int videoHeight=1080;
    public static int videoFrameRate=3;
    public static int videoQuality=0; // 0 is the max quality
    public static int videoBitRate=9000;
    public static String videoFormat="mp4";
    public static int videoCodec=avcodec.AV_CODEC_ID_MPEG4;
    public static Thread t1=null;
    public static Thread t2=null;
    public static boolean isRegionSelected=false;
    public static int c1=0;
    public static int c2=0;
    public static int c3=0;
    public static int c4=0;

    /**
     * Explanation:
     * 1) videoComplete variables tells if user has stopped the recording or not.
     * 2) inputImageDir defines the input directory where screenshots will be stored which would be utilized by the video thread
     * 3) inputImgExt denotes the extension of the image taken for screenshot.
     * 4) outputVideo is the name of the recorded video file
     * 5) counter is used for numbering the screenshots when stored in input directory.
     * 6) recorder is used for starting and stopping the video recording
     * 7) videoWidth, videoFrameRate etc define output video param
     * 8) If user wants to record only a selected region then c1,c2,c3,c4 denotes the coordinate
     *
     * @return
     * @throws Exception
     */
    public static FFmpegFrameRecorder getRecorder() throws Exception
    {
        if(recorder!=null)
        {
            return recorder;
        }
        recorder = new FFmpegFrameRecorder(outputVideo,videoWidth,videoHeight);
        try
        {
            recorder.setFrameRate(videoFrameRate);
            recorder.setVideoCodec(videoCodec);
            recorder.setVideoBitrate(videoBitRate);
            recorder.setFormat(videoFormat);
            recorder.setVideoQuality(videoQuality); // maximum quality
            recorder.start();
        }
        catch(Exception e)
        {
            System.out.println("Exception while starting the recorder object "+e.getMessage());
            throw new Exception("Unable to start recorder");
        }
        return recorder;
    }

    /**
     * Explanation:
     * 1) This method is used to get the Recorder object.
     * 2) We create an object of FFmpegFrameRecorder named "Recorder" and then set all its video parameters.
     * 3) Lastly we start the recorder and then return the object.
     *
     * @return
     * @throws Exception
     */
    public static Robot getRobot() throws Exception
    {
        Robot r=null;
        try {
            r = new Robot();
            return r;
        } catch (AWTException e) {
            System.out.println("Issue while initiating Robot object "+e.getMessage());
            throw new Exception("Issue while initiating Robot object");
        }
    }

    /**
     * Explanation:
     * 1) Two threads are started in this module when user starts the recording
     * 2) First thread calls the takeScreenshot module which keeps on taking screenshot of user screen and saves them on local disk.
     * 3) Second thread calls the prepareVideo which monitors the screenshot created in step 2 and add them continuously on the video.
     *
     * @param r
     */
    public static void takeScreenshot(Robot r)
    {
        Dimension size = Toolkit.getDefaultToolkit().getScreenSize();
        Rectangle rec=new Rectangle(size);
        if(isRegionSelected)
        {
            rec=new Rectangle(c1, c2, c3-c1, c4-c2);
        }
        while(!videoComplete)
        {
            counter++;
            BufferedImage img = r.createScreenCapture(rec);
            try {
                ImageIO.write(img, inputImgExt, new File(inputImageDir+counter+"."+inputImgExt));
            } catch (IOException e) {
                System.out.println("Got an issue while writing the screenshot to disk "+e.getMessage());
                counter--;
            }
        }
    }

    /**
     * Explanation:
     * 1) If user has selected a region for recording then we set the rectangle with the coordinate value of c1,c2,c3,c4. Otherwise we set the rectangle to be full screen
     * 2) Now we run a loop until videoComplete is false (remains false until user press stop recording.
     * 3) Now we capture the region and write the same to the input image directory.
     * 4) So when user starts the recording this method keeps on taking screenshot and saves them into disk.
     *
     */
    public static void prepareVideo()
    {
        File scanFolder=new File(inputImageDir);
        while(!videoComplete)
        {
            File[] inputFiles=scanFolder.listFiles();
            try {
                getRobot().delay(500);
            } catch (Exception e) {
            }
            //for(int i=0;i<scanFolder.list().length;i++)
            for(int i=0;i<inputFiles.length;i++)
            {
                //imgProcessed++;
                addImageToVideo(inputFiles[i].getAbsolutePath());
                //String imgToAdd=scanFolder.getAbsolutePath()+File.separator+imgProcessed+"."+inputImgExt;
                //addImageToVideo(imgToAdd);
                //new File(imgToAdd).delete();
                inputFiles[i].delete();
            }
        }
        File[] inputFiles=scanFolder.listFiles();
        for(int i=0;i<inputFiles.length;i++)
        {
            addImageToVideo(inputFiles[i].getAbsolutePath());
            inputFiles[i].delete();
        }
    }

    /**
     * Explanation:
     * 1) cvLoadImage is used to load the image passed as argument
     * 2) We call the convert method to convert the image to frame which could be used by the recorder
     * 3) We pass the frame obtained in step 2 and add the same in the recorder by calling the record method.
     *
     * @return
     */
    public static OpenCVFrameConverter.ToIplImage getFrameConverter()
    {
        OpenCVFrameConverter.ToIplImage grabberConverter = new OpenCVFrameConverter.ToIplImage();
        return grabberConverter;
    }

    /**
     * Explanation:
     * 1) We start a loop which will run until video complete is set true (done only when user press stop recording)
     * 2) We keep on monitoring the input  Image directory
     * 3) We traverse each file found in the input image directory and add those images to video using the addImageToVideo method. After the image has been added we delete the image
     * 4) Using the loop in step1 we keep on repeating step 2 and 3 so that each image gets added to video. We added a delay of 500ms so that this module does not picks a half created image from the takeScreenshot module
     * 5) When user press stop recording the loop gets broken. Now we finally traverse the input image directory and add the remaining images to video.
     *
     * @param imgPath
     */
    public static void addImageToVideo(String imgPath)
    {
        try {
            getRecorder().record(getFrameConverter().convert(cvLoadImage(imgPath)));
        } catch (Exception e) {
            System.out.println("Exception while adding image to video "+e.getMessage());
        }
    }

    /**
     * Explanation:
     * 1) We make a JFrame with the button for staring and stopping the recording. One more button is added for allowing user to record only a selected portion of screen
     * 2) If user clicks to select only certain region then we call a class CropRegion method getImage which helps in retrieving the coordinate of the region selected by user and update the same in variable c1,c2,c3,c4
     * 3) If user clicks on start recording then startRecording method is called
     * 4) If user clicks on stoprecording then stopRecording method is called
     */
    @BeforeEach
    public void beforeTest() {

        System.out.println("this.screenRecorder.start()");

        SimpleDateFormat dateFormat = new SimpleDateFormat("yyyyMMdd_HHmmss");
        String timestamp  = dateFormat.format(new Date());

        outputVideo= outputVideoDir + "recording_" + timestamp + ".mp4";

        try {
            t1=new Thread()
            {
                public void run() {
                    try {
                        takeScreenshot(getRobot());
                    } catch (Exception e) {
                        System.out.println("Cannot make robot object, Exiting program "+e.getMessage());
                        System.exit(0);
                    }
                }
            };
            t2=new Thread()
            {
                public void run() {
                    prepareVideo();
                }
            };
            t1.start();
            t2.start();
            System.out.println("Started recording at "+new Date());


        } catch (Exception e) {
            System.out.println("screenRecorder.start " + e.getMessage());
        }
    }

    @AfterEach
    public void afterTest()  {

        System.out.println("this.screenRecorder.stop()");

        try {
            videoComplete=true;
            System.out.println("Stopping recording at "+new Date());
            t1.join();
            System.out.println("Screenshot thread complete");
            t2.join();
            System.out.println("Video maker thread complete");
            getRecorder().stop();
            System.out.println("Recording has been saved successfully at "+new File(outputVideo).getAbsolutePath());

        } catch (Exception e) {
            System.out.println("screenRecorder.stop " + e.getMessage());
        }
    }

    @Test
    public void testMe() {

        //toDo

    }

}
Is there a catch?
So, we now have several possibilities to record the automatic test run in a video in order to be able to reproduce it in case of problems or to fulfil the documentation obligations.
But recording during the test run is associated with a risk that the tester / test automator should keep in mind: It is an interference with the normal test run, because we might change the timing. Our modified test run with video recording may behave differently than a test run without video recording.
Videos of the test procedure
The Good
The Bad
… and the Useful
• Recording the entire test run • In addition to the test result, the path to it can also be traced
• The test run is influenced • Various old and paid frameworks for video recording • Codec problems (QuicktimeView only)
Software development projects live from the use of modern testing tools, which support the project members in their work. Selenium has been available since 2004 and may seem a bit dusty, but it is not out of fashion. With Selenium 4 it is catching up with the new challenges. With this blog series, I want to show what Selenium 4 brings and how important features like screenshots, videos, reports and approaches of AI can be implemented using simple means. I will try to evaluate the approaches according to their added value (The Good) and their challenges (The Bad) as well as give useful hints (… and the Useful).
Jason Huggins started working on Selenium back in 2004 as an internal project for testing websites. Over time, Selenium became the leading tool in many development projects or served as the basis for other testing tools. Currently, the framework feels a bit old-fashioned, but it stands out from its challengers with its broad support of languages (Ruby, Java, Python, C#, JavaScript) and browsers (Firefox, Internet Explorer, Safari, Opera, Chrome, Edge and others).
What is new in Selenium 4?
Version 4, which is announced for 2020, attempts to bring selenium into the modern age. This includes the following innovations:
WebDriver API becomes a W3C standard
This means there will be only one WebDriver for all browsers.
Selenium4 IDE TNG
„TheNextGeneration“ Selenium IDE is based on Node JS and is available for Firefox and Chrome. Parallel test runs can be started and there is extended test protocol information (test result, runtime etc.).
Improved WebDriver Grid
Setup, administration and docker support have been improved.
Furthermore
There is a better UI and the reporting / logging have been optimized.
Documentation
Version 4 should come with a detailed documentation and new tutorials.
With version 4, Selenium consists of the following parts: The Selenium WebDriver, the Selenium IDE and the Selenium Grid. The Selenium WebDriver is a collection of different programming language integrations to control browsers for test automation. The Selenium IDE is a Chrome or Firefox add-on to start test automation directly from the browser without programming knowledge and allows the recording and the play back of test cases in the browser. The Selenium Grid allows controlled and simultaneous test executions on different machines and supports the administration of different test environments from a central point. Thus, a test case can be tested against different browser or operating system combinations or a list of test cases can be executed scaled and distributed over several machines.
Selenium 4
The Good
The Bad
… and the Useful
WebDriver API >> W3C Standardized Selenium 4 IDE TNG Improved WebDriver Grid Documentation
New challenger like cypress etc. Selenium 4 was announced for 2019
Newer frameworks for test automation already have a function for creating screenshots. But with a few lines of code, you can also add the possibility to store screenshots in selenium tests.
private void screenShot(RemoteWebDriver driver, String folder, String filename) {

    SimpleDateFormat dateFormat = new SimpleDateFormat("yyyyMMdd_HHmmss");
    String timestamp  = dateFormat.format(new Date());

    try {
        File scrFile = ((TakesScreenshot)driver).getScreenshotAs(OutputType.FILE);
        // Now you can do whatever you need to do with it, for example copy somewhere
        FileUtils.copyFile(scrFile, new File(folder + filename + "_" + timestamp + ".png"));
    }
    catch (IOException e) {
        System.out.println(e.getMessage());
    }

}
However, you should always pay attention to the purpose of screenshots when creating and storing the file. Screenshots can be used for debugging purposes and to point out problems. Therefore, it makes sense to create screenshots only when problems occur. According to this approach, the screenshot functionality can be extended by a flexible and global switch that can be set as needed.
On the other hand, screenshots can be used to document the test results and may even be mandatory in some projects, as legal or other requirements must be met in such cases. In this case, the storage of the screenshots must be traceable, and each generated file must be assigned to a test case and the corresponding test run. According to this approach, the file name must have a reference to the test case and a suitable timestamp. Furthermore, the storage directory for this one test run must also be created and named.
Screenshots
The Good
The Bad
… and the Useful
Allows the verification of the test run results
Can only show a snapshot
Can be used for “debugging”
In my next post we will create a video of the test implementation.