Result protocols and reports
With Selenium, as with most test automation tools, result reports can be generated. These machine-readable documents in formats such as XML or JSON are not very user-friendly, but they can be easily integrated into other tools and thus made more readable. With this blog series I want to show how important functions in Selenium can be extended or enhanced with simple means. In the first part I introduced what Selenium 4 brings and how screenshots can be used. In the second part we made a video of the test and the third part is about reports. I try to evaluate the approaches according to their added value (The Good) and their challenges (The Bad) and give useful hints (… and the Useful) if necessary.
Why do we need reports?
To answer the “why” question, I start with the “worst” case: The evaluation and audit-proof storage of all test results is mandatory in some projects, because legal or other requirements must be met. In the case of contract development, this may be a requirement of the customer. In the case of software and hardware development in the medical field, it is a mandatory requirement for approval and licensing by the authorities. But even without these specifications, reports and clear protocols offer added value for the project. They can be used to derive key figures and trends that the team needs for its retrospectives or further development.
Just a protocol…
There are many ways to generate simple machine-readable test protocols. When using automated tests (Selenium, JUnit) in Java projects, you can use Maven to integrate the maven-surefire plugin, which creates an XML file during the build process that records the results of a test run. The XML file contains the name of the test class and all test methods, the total duration of the test execution, the duration of each test case / method and the test results (tests, errors, skipped, failures).

… and what do you do with it.
The machine-readable logs are usually generated automatically in the build tool and included in the result report of the build tool. Thus, Jenkins includes all results of automated testing for projects organized with Maven. In addition, most build tools have plug-ins that include the test logs or even graphically display them.
The projects that need to document all of their test results usually face the problem that the test results for the different types of tests (manual, automated, etc.) are generated in different tools and therefore exist in different formats. Therefore, different test management tools offer the possibility to read in the machine-readable reports. This means that the test results of the automated tests stand next to the manual tests and can be summarized in a test report/test report.
For example, in the Jira test management plug-in Xray, the test results for JUnit and NUnit can be imported manually or automatically via a Rest API: https://confluence.xpand-it.com/display/public/XRAY/Import+Execution+Results.
Is there more to it?
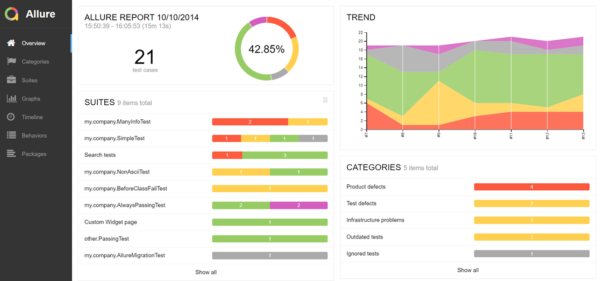
If no suitable test management tool is available or if you need a stand-alone version, I would like to introduce the Allure Test Report tool. The Allure framework is a flexible, lightweight and multilingual test report tool with the possibility to add screenshots, protocols etc. It offers a modular architecture and clear web reports with the possibility to save attachments, steps, parameters and much more. Different test frameworks are supported: JUnit4, JUnit5, Cucumber, JBehave, TestNG, …

To create better evaluation and clarity in the reports, the Allure framework uses its own annotations. This allows the results of test classes and test methods to be linked to features, epics or stories. Annotations such as @Story, @Feature or @Epic can be used to link test classes or test methods with requirements (story, epic, feature). These links can then be evaluated in the report view and statements about test coverage or project progress can be made.
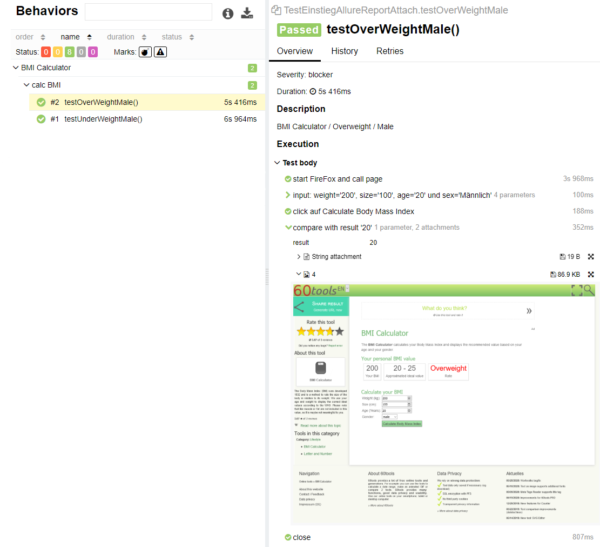
Furthermore, the readability of the test cases can be improved by the annotation @Step and @Attachment. We can divide our test case (@Test) into individual test methods to increase readability and reusability. With the annotation @Step of the Allure framework, these test methods or test steps can be displayed in the test log. Here @Step supports the display of a test step description of the parameters used, the step results, and attachments. This is because test steps can have texts attached in the form of strings and images in the form of byte[]. See the code example …
Annotationen von Allure
import org.apache.commons.io.FileUtils;
import org.junit.jupiter.api.Test;
import org.junit.jupiter.api.AfterEach;
import org.junit.jupiter.api.BeforeEach;
import org.junit.jupiter.api.Assertions;

import org.openqa.selenium.*;
import org.openqa.selenium.firefox.FirefoxDriver;

import io.qameta.allure.Allure;
import io.qameta.allure.Feature;
import io.qameta.allure.Description;
import io.qameta.allure.Severity;
import io.qameta.allure.SeverityLevel;
import io.qameta.allure.Step;
import io.qameta.allure.Attachment;
import io.qameta.allure.Story;
import io.qameta.allure.Epic;

import java.io.File;
import java.io.IOException;
import java.text.SimpleDateFormat;
import java.util.Date;
import java.util.concurrent.TimeUnit;

/**
 * Allure Framework is a flexible lightweight multi-language test report tool
 * that not only shows a very concise representation of what have been tested
 * in a neat web report form, but allows everyone participating in the development
 * process to extract maximum of useful information from everyday execution of tests.
 *
 * https://docs.qameta.io/allure/#_junit_5
 */
@Feature("BMI Calculator")
public class TestAllureReportAttach {

    FirefoxDriver driver;
    String url = "https://60tools.com/en/tool/bmi-calculator";

    @Test
    @Description("BMI Calculator / Underweight / Male")
    @Severity(SeverityLevel.CRITICAL)
    @Story("calc BMI")
    public void testUnderWeightMale() {
        inputTestdata("20", "200", "20", "Männlich");
        clickButtonCalc();
        compareResult("5");
    }

    @Test
    @Description("BMI Calculator / Overweight / Male")
    @Severity(SeverityLevel.BLOCKER)
    @Story("calc BMI")
    public void testOverWeightMale() {
        inputTestdata("200", "100", "20", "Männlich");
        clickButtonCalc();
        compareResult("20");
    }

    @BeforeEach
    @Step("start FireFox and call page")
    public void startFirefoxWithURL() {
        /**
         * What is GeckoDriver?
         GeckoDriver is a connecting link to the Firefox browser for your scripts in Selenium.
         GeckoDriver is a proxy which helps to communicate with the Gecko-based browsers (e.g. Firefox), for which it provides HTTP API.

         Firefox's geckodriver *requires* you to specify its location.
         */
        System.setProperty("webdriver.gecko.driver", ".\\libs\\geckodriver.exe");

        driver=new FirefoxDriver();
        driver.get(url);
        driver.manage().timeouts().pageLoadTimeout(120, TimeUnit.SECONDS);
    }

    @Step("input: weight='{0}', size='{1}', age='{2}' und sex='{3}'")
    private void inputTestdata(String weight, String size, String age, String sex) {

        driver.findElement(By.name("weight")).sendKeys(weight);
        driver.findElement(By.name("size")).sendKeys(size);
        driver.findElement(By.name("age")).sendKeys(age);


        WebElement gender = driver.findElement(By.name("sex"));
        gender.sendKeys(sex);
        gender.sendKeys(Keys.RETURN);
    }

    @Step("click auf Calculate Body Mass Index")
    private void clickButtonCalc() {
        WebElement button = driver.findElement(By.xpath("//*[@id=\"toolForm\"]/table/tbody/tr[5]/td[2]/input[2]"));
        button.click();
    }

    @Step("compare with result '{0}'")
    private void compareResult(String result) {
        String str2 = driver.findElement(By.xpath("//*[@id=\"content\"]/div[2]")).getText();

        System.out.println("str2: " + str2);
        attachment(str2);

        System.out.println("getScreenshot1");
        //make a screenshot
        screenShot(driver, ".\\screenshots\\" ,"test_Oversized");
        System.out.println("getScreenshot3");

        Assertions.assertTrue(str2.contains(result));

    }

    @AfterEach
    @Step("close")
    public void closeBrowser() {
        driver.close();
    }

    @Attachment(value = "String attachment", type = "text/plain")
    public String attachment(String text) {
        return "<p>" + text + "</p>";
    }

    @Attachment(value = "4", type = "image/png")
    private static byte[] screenShot(FirefoxDriver driver, String folder, String filename) {

        SimpleDateFormat dateFormat = new SimpleDateFormat("yyyyMMdd_HHmmss");
        String timestamp  = dateFormat.format(new Date());

        try {
            File scrFile = ((TakesScreenshot)driver).getScreenshotAs(OutputType.FILE);
            // Now you can do whatever you need to do with it, for example copy somewhere
            FileUtils.copyFile(scrFile, new File(folder + filename + "_" + timestamp + ".png"));
            return driver.getScreenshotAs(OutputType.BYTES);
        }
        catch (IOException e) {
            System.out.println(e.getMessage());
        }
        System.out.println("getScreenshot2");
        return new byte[0];

    }

}
… and the result in the test protocol:

Conclusion
With test protocols and reports, automated test runs can be generated very easily and integrated into your own tool chain. Although this is usually associated with a little extra work, trends and problems can be identified faster and better.
Result protocols and reports
| The Good | The Bad | … and the Useful |
| • Visualization of the current status • Trends and problems can be identified | • More effort • New tools and interfaces • Higher complexity | • Allure Test Report → allure.qatools.ru/ • Xpand Xray → getxray.app/ • Plugins in build tools |