FlaUI, project experience

Preface

The automated testing of graphical user interfaces is an important topic. For each GUI technology, there are several libraries that need to be carefully selected in order to achieve a high-quality and accurate result in the shortest possible time. 

When it comes to web technologies, there are many well-known frameworks such as Selenium, Playwright, Cypress and many more. There are also suitable alternatives for WPF or Winforms. Today I would like to introduce you to FlaUI.

FlaUI is a .NET class library for automated testing of Windows apps, especially the UI. It is built on the in-house Microsoft libraries for UI Automation.

Image: Pyramid of test automation

History

Roman Roemer published the first version of FlaUI on Github on December 20, 2016. Version 0.6.1 was the first step towards a class library for testing .NET products. Since then, the library has been developed further with consistency and great enthusiasm in order to expand it with new and better functions. The newest version is 4.0.0 and it includes features such as the automation of WPF and Windows Store app products as well as the FlaUI Inspect tool, which reads and displays the structure of .NET products.

Installation

FlaUI can be downloaded and installed via GitHub or NuGet. For this article and the following example, I will also use other plugins/frameworks and class libraries such as:

  • C# by OmniSharp
  • C# Extensions by Jchannon
  • NuGet Package Manager by Jmrog
  • .NET Core Test Explorer by Jun Han
  • The latest Windows SDK
  • NUnit Framework

Example

For this example, I will use several different methods to maximize a typical Windows app, here the task manager, and restore it to its original state. Also, different elements should be highlighted.

While working on this article, I noticed that Windows exhibits a special behavior: When a program is maximized, not only the name and other properties of the button change, but also the AutomationID. As a result, I had to give the method calls two different transfer strings for the AutomationID, “Maximize” and “Restore”, which both address the same button.

Code (C#)

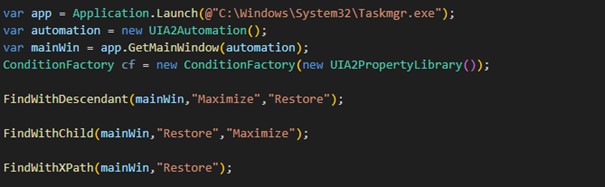
First of all, we start the relevant application and create an instance of the window for further use:

var app = Application.Launch(@"C:\Windows\System32\Taskmgr.exe");
var automation = new UIA2Automation();
var mainWin = app.GetMainWindow(automation);

Furthermore, we also need the ConditionFactory helper class:

ConditionFactory cf = new ConditionFactory(new UIA2PropertyLibrary());

This helper class enables us to search for objects according to certain conditions. For instance, searching for an object with a specific ID.

As mentioned above, we want to maximize the program and restore the initial state in the following methods. We also want to highlight elements:

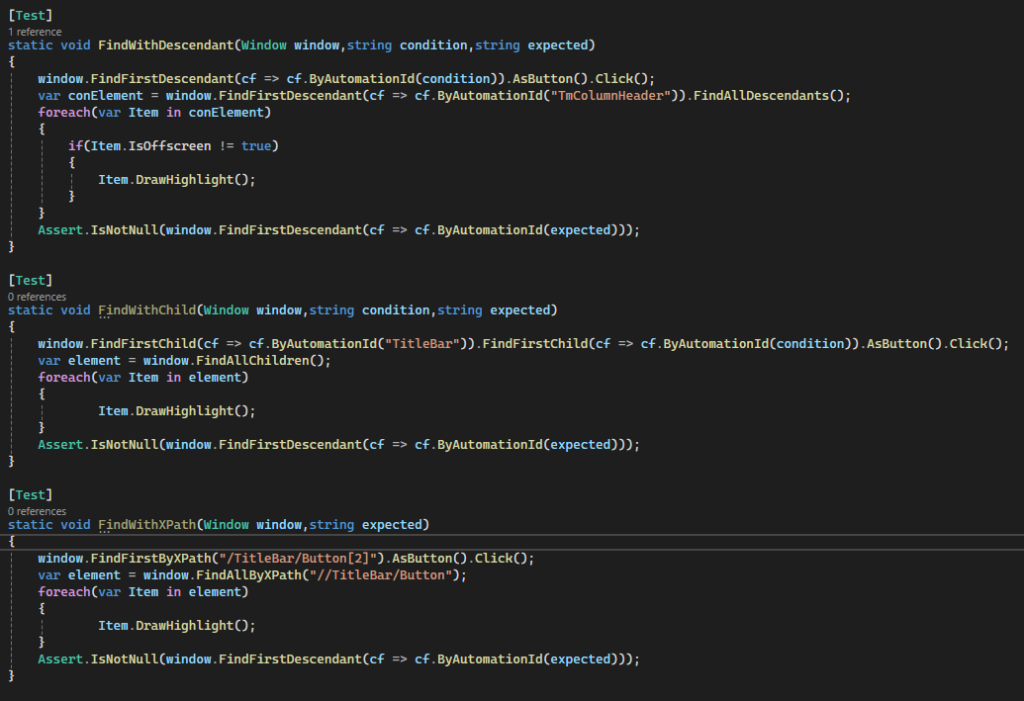
For the first method, we will work with FindFirstDescendant and FindAllDescendant. FindAllDescendant searches for all elements that are below the source element. FindFirstDescendant finds the first element below the source element matching the specified search condition and DrawHighlight creates a red frame around the element.

        static void FindWithDescendant(Window window, string condition, string expected)
        {
            window.FindFirstDescendant(cf => cf.ByAutomationId(condition)).AsButton().Click();
            var element = window.FindFirstDescendant(cf =>
            cf.ByAutomationId("TmColumnHeader")).FindAllDescendants();            
            foreach(var Item in element)
            {
                if(Item.IsOffscreen != true)
                {
                    Item.DrawHighlight();
                }
            }
            Assert.IsNotNull(window.FindFirstDescendant(cf => cf.ByAutomationId(expected)));
        }

For the second method, we use FindFirstChild and FindAllChildren. Both function in almost the same way as Descendant, except that not all elements are found here, but only those that are directly below the starting element.

        static void FindWithChild(Window window, string condition, string expected)
        {
            window.FindFirstChild(cf => cf.ByAutomationId("TitleBar")).FindFirstChild(cf =>
            cf.ByAutomationId(condition)).AsButton().Click();
            var element = window.FindAllChildren();
            foreach(var Item in element)
            {
                    Item.DrawHighlight();
            }
            Assert.IsNotNull(window.FindFirstDescendant(cf => cf.ByAutomationId(expected)));
        }

And for the third method, we use FindFirstByXPath and FindAllByXPath. This is where we have to specify the path, as the name suggests. With First it should be the exact path to the desired element and with FindAll all elements found within the path are searched for. If you want to inspect an unknown program, it helps to use FlaUI Inspect, which can display properties such as the path, but also other information about elements of Windows apps.

        static void FindWithXPath(Window window, string expected)
        {
            window.FindFirstByXPath("/TitleBar/Button[2]").AsButton().Click();
            var element = window.FindAllByXPath("//TitleBar/Button");
            foreach(var Item in element)
            {
                    Item.DrawHighlight();
            }
            Assert.IsNotNull(window.FindFirstDescendant(cf => cf.ByAutomationId(expected)));
        }

Finally, we just need to call the methods and pass them the desired values. The first is the window that we created at the beginning and the second is the AutomationID of the maximize button, which changes as soon as the button is pressed.

       FindWithDescendant(mainWin,"Maximize", "Restore");
       FindWithChild(mainWin,"Restore", "Maximize");
       FindWithXPath(mainWin,"Restore");

This looks as follows in my code:

Flaws

One problem is self-made objects, e.g. we had created buttons in a project with self-made polygons. These could not be found by either FlaUI Inspect or FlaUI itself, which severely limited their use in our automated tests. For such objects, an AutomationPeer (provides a base class that makes the object usable for UI automation) must be created so that they can be found.

Summary and conclusion

FlaUI supports Forms and Win 32 applications with UIA2 and WPF and Windows Store apps with UIA3. It is user-friendly and straightforward to operate, as it requires relatively few basic functions. Furthermore, it can be extended with your own methods and objects at any time.

Similarly, the software developers are satisfied because they do not have to install any extra interfaces and therefore no potential sources of error for test automation. Since FlaUI gives us the possibility to directly access the objects of the program to be tested, we do not need to spend additional time planning and managing major and error-prone adjustments to the existing program structure for testing.

On the other hand, in order to be able to address each object automatically, its AutomationID must be stored at least once in the test code so that it can also be used for the test. Consequently, the approximate structure of the program to be tested must be reproduced, which can be time-consuming, especially with more complex programs. And for the sake of clarity, these should be clustered in several classes with meaningful names.

We will definitely continue to use it and recommend it to our colleagues.

The QA Navigation Board workshop

The QA Navigation Board provides a visual aid to agile development teams which they can use to assess the planning aspects of quality assurance at an early stage. During the project duration, the QA Navigation Board can also be used as a reference for the current procedure and as a basis for potential improvements.  » QA Navigation Board

The QA Navigation Board is developed within the framework of a workshop run by an agile QA coach. The duration of the workshop should not exceed 1.5 hours.

Preparation

All the parties involved in the agile project should be invited:

  • Development team (developers, testers)
  • Scrum master
  • Product owner
  • Other stakeholders and shareholders

The QA Navigation Board is affixed to a bulletin board or wall. In addition, each participant receives a printout of the QA Octant as a worksheet.

Step 1:

Presentation of the QA Navigation Board and the objectives of the workshop by the host (agile QA coach), and introduction of the participants.

Step 2:

Brief presentation of the QA Octant and the quality characteristics. The goal is for all the participants to be able to complete the worksheet and to understand the quality characteristics so that they do not talk at cross purposes later.

Furthermore, the participants agree on the dimensions of the QA Octant: Which label is to be given to the intervals of the diagram (1, 2, 3 or S, M, L, XL, etc.)? Then, the worksheets are handed out and completed within 5 to 10 minutes by each participant, the name of whom is indicated on the worksheet (cf. blog post: How to use the QA Octant).

Step 3:

At the end of this time, the host collects the worksheets and puts them up on a bulletin board or wall.

The host then goes through each of the quality characteristics. For this purpose, he identifies the common denominator (average) of each characteristic and discusses the greatest deviations with the respective persons (cf. planning poker). Once the team reaches a consensus regarding the value of a characteristic, the host documents this value.

Step 4:

Based on the valuation of the quality characteristics, the participants then deduce the necessary types of tests. The higher the value of a quality characteristic, the more likely it requires testing by means of an appropriate test procedure. The team then places the types of tests determined in the test pyramid of the QA Navigation Board.

Step 5:

Once all types of tests have been determined and placed, the necessary test resources and other test artifacts can be placed on the QA Navigation Board. A checklist can help in this respect (cf. blog post: The QA Map or “How to complete the QA Navigation Board”).

Step 6:

When the team has mostly completed the QA Navigation Board, it is put up in an appropriate place in the team room. The host concludes the workshop and points out that the QA Navigation Board can be updated and further developed by the team, and also used in retrospectives.

The QA Map or “How to complete the QA Navigation Board…”

The QA Navigation Board provides a visual aid to the development teams which they can use to assess the planning aspects of quality assurance at an early stage. During the project duration, the QA Navigation Board can also be used as a reference for the current procedure and as a basis for potential improvements. But how should the types of tests and other test artifacts be placed on the QA Navigation Board?

To answer the question, “How and where do we want to test?”, the team would have to comb through the entire development process to find and document test and QA aspects. The development process can be different for every project, which could quickly make this issue highly complex (Fig. 1).

Figure 1: Development and QA process

Again, to facilitate the introduction of this topic to the teams, we have developed the QA Map. The QA Map gives the team a practical tool to plan and document the measures required for optimal testability of the projects. The objective is to determine all QA-relevant issues for the teams and development projects, using a playful approach and at an early stage.

QA map from the QA Navigation Board
Figure 2: The QA Map

After defining all the key test areas by means of the QA Octant and determining the necessary types of tests, all aspects of the test strategy, such as types of tests, resources and tools, can be visualized, discussed, and prioritized.

A good practice resulting from the workshops done in the past is using two tools to control the completion of the QA Map. The first is a competent host who leads the workshop in the right direction, and the second is using a check list. The check list comprises appropriate questions that are intended to provide suggestions in the workshop in order to complete the various parts of the QA Map. These questions are listed below and allocated to the respective field to be completed.

Requirements

  • What are the requirements?
  • Do the requirements support the preparation of the test case?
  • Can requirements and tests be linked?

Test / Code

  • Where do we place the tests?
  • Do we have the necessary skills?

Repository

  • Where do we store the test artifacts?
  • Are there different artifacts?

Test Management

  • How do we plan our tests?
  • How do we document our tests?
  • How do we report? And to whom?

Automation

  • How much test automation is required?
  • Do we need additional tools?
  • Do we need test data?

Build

  • How often do we want to build and test?
  • How do we want to integrate QA?
  • Do we want to test maintainability?

Test Environments

  • Do we have an adequate environment for every test?
  • Will we get in each other’s way?

Figure 3: Example 1 of a completed QA Navigation Board
Figure 4: Example 2 of a completed QA Navigation Board

Once all types of tests have been selected and the team has started to place the other test artifacts (e.g. tools, environments), the host can withdraw. The team should put up the final picture in the team room as an eye-catcher. This way, the QA Navigation Board plan can be used as a reference for the current procedure and as a basis for potential improvements.

How to use the QA Octant?

In my blog post “The QA Navigation Board – What do you mean, we have to test that?”, I introduced the QA Navigation Board. Now, I would like to share our experience using the QA Octant contained in this QA Navigation Board to identify the necessary types of tests.

One of the questions asked at the start of a software project is: Which quality characteristics does the development, and therefore the quality assurance, focus on? To facilitate the introduction of this topic to the teams, we use the QA Octant. The QA Octant contains the quality characteristics for software systems according to ISO 25010. These characteristics also point to the necessary types of tests that result from the set weighting of the different functional and non-functional characteristics.

Depending on how much the implemented requirements affect the quality characteristics, it is necessary to check these characteristics by means of a corresponding type of test. Apps with a high data throughput for example require efficiency tests, whereas web shops should be tested for compatibility in various browsers. Thanks to the simple visualization and weighting of the different quality characteristics, the QA Octant can be used for planning.

QA octant from the QA Navigation Board

The team asks the product owner or the department: “How important is each of the quality characteristics?” The goal of this round of questions is to visualize a ranking in the weighting of the different characteristics. Most of the respondents will not really differentiate between the quality characteristics, or rather they will answer: “Everything is important!”

It is now up to the team and the host of the meeting to clarify the question to the point that such a differentiation is possible. Different questioning techniques can be used for this purpose.

Differentiation is for example possible by delimiting the area of application. If an HTML-based technical application is used in a company network, and the IT compliance regulations specify one browser and one operating system version, the aspect of compatibility and the associated tests can be ranked lower. If, by contrast, a large number of different combinations of platforms are used, extensive testing has to be planned.

For further differentiation, you can for example use a negative questioning technique: “What happens if, for example, usability is reduced?” Using the example of an application for monthly invoicing, we assume that a negative effect on the usability increases the time it takes to issue an invoice from two to four hours. Since the application is only used once every month, this “delay” would be acceptable, and usability can be ranked lower in the QA Octant.

This questioning technique can be expanded by prioritizing by means of risk assessment. “What happens, or which consequences arise if, for example, the security characteristic is lowered?” The answers result from the following aspects:

  • What financial impact would a failure of the application have if the focus on this characteristic was reduced?
  • How many users would be affected by a failure of the application if the focus on this characteristic was reduced?
  • Would a failure of the application cause danger to life and limb if the focus on this characteristic was reduced?
  • Would a failure of the application affect the company’s reputation if the focus on this characteristic was reduced?

If results and findings are available with respect to one or several of the quality characteristics, you can compare them to the open quality characteristics and proceed similarly to the complexity comparison for the planning or estimation.

Asking the right questions produces an overview of the quality characteristics. Thanks to the simple visualization and weighting of the different quality characteristics, the QA Octant can be used for planning the types of tests.

The result is not always the most important part of the QA Octant: “the journey is the destination” as well. Due to the weighting in the team and together with the PO and/or the department, different opinions are more discernible, and all the parties involved develop a better understanding.

QA Navigation Board – What do you mean, we have to test that?

In development projects, most clients primarily focus on thoughts of functionality and added value. Consequently, QA and testability are neglected in the planning stage. The team then encounters obstacles in the testing stage that can be avoided if the QA tasks are planned with some forethought. For the planning of the advanced testing stages, testers already have an adequate procedure: a detailed test concept that documents the test objectives and defines corresponding measures and a schedule.

aspects of the test strategy I topics of a test concept
Figure 1: aspects of the test strategy I topics of a test concept

However, this level of detail is not suitable for agile projects and development teams. Nevertheless, the team should consider most of the aspects that are specified in the test concept before starting a project. This is why we have developed a tool that enables the teams to take all the measures required for optimal testability in software projects into account. This tool covers the questions “What needs to be tested?” and “How and where do we want to test?”

To answer the first question, “What needs to be tested?”, in regard to software products, specifying the quality characteristics for the requirements to be fulfilled is decisive. The different quality characteristics are provided in ISO 25010 “Systems and software Quality Requirements and Evaluation (SQuaRE)” (Fig. 2).

Quality criteria according to ISO 25010
Figure 2: Quality criteria according to ISO 25010

Depending on how much the implemented requirements affect the quality characteristics, it is necessary to check these characteristics by means of a corresponding type of test. Apps with a high data throughput for example require efficiency tests, whereas web shops should be tested for compatibility in various browsers.

To facilitate the introduction of this topic to the teams, we use the QA Octant. The QA Octant contains the quality characteristics for software systems according to ISO 25010. These characteristics also point to the necessary types of tests that result from the set weighting of the different functional and non-functional characteristics (Fig. 3).

QA octant from the QA Navigation Board
Figure 3: The QA octant with weighted quality criteria

Thanks to the simple visualization and weighting of the different quality characteristics, the QA Octant can be used for planning. It allows product owners to keep track of the relevant requirements, and the team can classify the requirements according to the quality characteristics together with the product owner. Due to the weighting in the team, different opinions are more discernible, and the agreed classification can be clearly documented. The result then allows for the necessary types of tests to be deduced.

To answer the second question, “How and where do we want to test?”, the team would have to comb through the entire development process to find and document test and QA aspects. The development process can be different for every project, which could quickly make this issue highly complex (Fig. 4).

Development and QA process
Figure 4: Development and QA process

Again, to facilitate the introduction of this topic to the teams, we have developed the QA Map. The QA Map gives the team a practical tool to plan and document the measures required for optimal testability of the projects. The objective is to determine all QA-relevant issues for the teams and development projects, using a playful approach and at an early stage. All aspects of the test strategy, such as types of tests and tools, can be visualized, discussed and prioritized together in planning rounds. In addition to the planning, the QA Map with its eye-catching representation also serves as a reminder, or a quick introduction to the team’s test strategy.

Put together, the octant and the map form the QA Navigation Board, which can be put up as a picture on the wall (Fig. 5).

The QA navigation board (with octant and map) as a mural
Figure 5: The QA navigation board (with octant and map) as a mural

The QA Navigation Board provides a visual aid to the development teams, by means of which they can assess the planning aspects of quality assurance at an early stage. During the project term, the QA Navigation Board can also be used as a reference for the current procedure and as a basis for potential improvements.

Good luck testing!

Mocks in the test environment (Part 1)

The complexity and interaction of software applications used in companies has increased dramatically in recent years. When releases are rolled out today, some of the new functions are related to the exchange of data with other applications. We also notice this in software testing: The focus of testing has expanded from pure system testing to the area of integration testing. Therefore, mocks are also used.

We work in a test centre and carry out the comprehensive integration test for our customers on their complex application infrastructure. Therefore, we build the test environments to match the productive environment. So why do we need mocks if the integration test environment already has all software components?

This way of thinking is partly correct, but different focuses are set on the different staging levels during testing. Mocks are used less in system testing, since this is where the software functions are tested. Instead, mocks are more often used in integration testing. However, since it is not always possible to test the complete message flow, communication at the interface is tested as an alternative.

If 3 components are tested in the integration test, which are located directly one after the other in the message flow, it cannot be guaranteed one hundred percent that the procedure will run without problems when using all 3 software components. It is possible that the respective errors of the components could falsify the message flow and be corrected afterwards, the error is quasi masked. Therefore, we put mocks at the respective ends of the components to get specific inputs and outputs.

To explain the described problems and peculiarities of a mock, we use a residual service as the application to be tested. The Rest-Service should be able to perform a GET and a POST command. If our component would now ask the mock for personal data with a GET command, we could configure our mock to return standardized answers or perform simple calculations on POST commands.

Using Microsoft Visual Studio, you could quickly create a WebAPI project in C# that has the basic function of a rest service. The methods of the controller only have to be adapted and you have a working Rest-API available.

File > New > Project > Visual C# > Web > Web Application

If you look at the WebAPI controllers, you can see that certain URLs call functions within the API. In this example we use a small WebAPI that is used as a hero database.

[Route("api/hero/get")]
[HttpGet]
public Iherolist Get()
{
    Console.WriteLine("Return of all heroes of the database"); 
    return heroRepository.GetAllHeroes();
    
}

[Route("api/hero/add")]
[HttpPost]
public string AddHeroDetails([FromBody]Hero hero)
{
    //AddHeroToDatabase(hero);
    return "The hero with the name: " + hero.Name + hero.Klasse + " has been added";
}

The route describes the URL path to call the HttpGet(GET command) or HttpPost(POST command) function.

Example: http:localhost/api/hero/add

Once you get the Rest API up and running, you can use an API tool (Postman) or a browser to send different Rest commands to the URL. When a POST command is sent to the Rest API, the service accepts it and recognizes from the URL that the function AddHeldenDetails() should be called. The function takes the sent data and adds it to its database. In response it returns the return value of the function. In this case the confirmation about adding the desired hero.

POST command:

POST /api/hero/add HTTP/1.1
Host: localhost:53521
Content-Type: application/x-www-form-urlencoded
Cache-Control: no-cache
Postman-Token: b169b96f-682d-165d-640f-dbcafe52789e
{ „name“:“Maria“,“class“: „lord“,“age“:68,“level“:57 }

Answer:

The heroine with the name: Maria was added

We have now added the heroine Maria to the database with our POST command. Now you can retrieve the stored heroes with the GET command. Here is an example of the format of the GET command, which is sent to the Rest-API with the corresponding response of the API:

Query:

GET /api/hero/get HTTP/1.1
Host: localhost:53521
Content-Type: application/json
Cache-Control: no-cache
Postman-Token: b3f19b01-11cf-85f1-100f-2cf175a990d9

Answer:

{"theList":
[
    {"name":"Lukas","class":"healer","age":"25","level":"12"};
    {"name":"Martin","class":"warrior","age":"30","level":"13"};
    {"name":"Gustav","class":"thief","age":"18","level":"19"};
    {"name":"Maria","class":"lord","age":"68","level":"57"};
]
}

In the answer, you can see that the heroine Maria has been added to the list and can now be called up at any time.

Now we know how the Rest-Services work, which input leads to which output. With this information we can start building a mock. I will deal with this topic in the next part.

That was “Mocks in the Test Environment Part 1” … Part 2 follows 🙂

Tearing Down Walls – How Digitalization Changes Departmental Testing

Digitalization and Industry 4.0 entail new requirements for processes and software systems in all company divisions and business areas. Companies that outsource the development of their software or purchase it from third parties face an additional challenge. Considering the interconnected work in the companies’ business operation, the different systems of various manufacturers are required to exchange ever more data. Despite the tests by the internal and external development teams who validate the software in various development-related levels of testing before handing it over to the client, and despite the subsequent approval by way of departmental testing, errors occur when the individual components interact. A test center with a focus on comprehensive integration tests could possibly solve this problem, but it has to meet specific requirements to be successful.

Critical errors that become evident only in live operation mean negative publicity both for the product and the companies involved. To prevent this, testing is a fundamental, integral part of modern software development. Only a sufficient number of tests and prompt feedback of the results allow for the quality and maturity of the product to be appropriately documented and confirmed. In the course of large software development projects, the number of new and/or upgraded functions is often in the hundreds. Development teams use component, integration and system tests to test the software before it is handed over to the client. The department approves the delivered software by way of the acceptance test (see Figure 1: Test pyramid).

test pyramid
Figure 1: test pyramid

Companies have several information systems for different tasks such as logistics, accounting, sales, etc., all of which were built using a wide variety of technologies. These information systems are already exchanging data today. The requirements of the digitalization and Industry 4.0 amplify these effects: New requirements such as increased networking throughout the entire value chain lead to a higher number or extension of the existing interfaces between the information systems. Thus, the overall system becomes more and more complex, as does the life cycle of the software: Dependencies have to be taken into account from the identification of the requirements through to the testing.

Challenges in testing due to digitalization and industry 4.0
Figure 2: Challenges in testing due to digitalization and industry 4.0

The effort required for the integrative tests increases enormously, in particular for companies that have their software developed by various service providers. In most constellations, the software systems are developed by several third-party software manufacturers and/or possibly an in-house IT organization. The providers themselves perform more or less in-depth component, integration and system tests, and verify the quality for the individual information system they create. The departments are now responsible for testing the interconnected information systems as they interact (see Figure 2: Challenges in testing due to digitalization and Industry 4.0).

The worst problems, or errors with a high risk, occur in the interaction of the information systems. However, most companies fail to perform the necessary comprehensive, integrative tests, or the testing done is insufficient, resulting in an insufficient quality statement and errors in live operation. This has various reasons. A comprehensive test at the development level is impossible due to the organizational and geographical separation of the service providers involved, and performing the necessary tests for each release is impossible for the expert users or testers from the department because that is too costly in terms of time and resources. Furthermore, the employees tasked with these tests lack the experience and the know-how necessary for optimal test planning and covering all the requirements for integration tests. The physical distance between the respective testers in the various departments further impede consultations and knowledge-building.

For the company to be successful, it is therefore becoming ever more important to outsource the necessary tests to dedicated testers, significantly increasing both the degree of coverage achieved in testing and the frequency of testing (regression). A possible solution is a test center that oversees the comprehensive integration test that takes place after the tests of the service providers and before the acceptance test of the department (see Figure 3: Comprehensive integration test by a test center). The test center verifies that the information systems interact correctly, and the department ultimately focuses on the approval of the requirements it specified.

Comprehensive integration test by a test center
Figure 3: Comprehensive integration test by a test center

A test team or test center of dedicated and trained testers has several advantages:

  • The quality of the information systems is the dedicated test team’s primary objective.
  • The test results are collected and communicated to the parties involved in an objective manner.
  • There is a test manager who focuses on quality issues and who is responsible for the management of the test group.
  • The test manager coordinates with the technical and development departments, determines the requirements to be tested, coordinates the test team, integrates the testers from the departments, communicates with the project management, and documents the results in test reports.

However, there are also disadvantages to an in-house test team or test center: Longer release cycles or delays in the provision of the software to be tested can cause the workload to fluctuate. The in-house test team or test center continuously generates costs, but does not always have enough work. On the other hand, in the case of peaks in the testing work, the team may not, or only with great difficulty, be able to cover them.

Companies that already use service providers for the development of their software can also call on an external provider offering integration testing as a service for the test center. Using a test center does not merely mean outsourcing the testing. A test center based on a test service agreement is a solution where the responsibilities, duties and settlement terms are customized for the individual client.

The third-party test team or test center is as independent as possible from the software development, highly specialized, and due to the nature of the service, adaptable to the client’s testing requirements. This resolves the above-mentioned disadvantages of an in-house test team or test center, and allows the company to focus on its processes.

In order for a test center to be able to optimally respond to the client’s wishes, certain prerequisites need to be fulfilled. The test center must not be a detached organizational unit, but has to establish open channels of communication and information with all the parties involved. Proximity to the client is of particular importance. Based on our experience, the test team should preferably be located on the client’s premises or at a distance of no more than 5 to 10 minutes on foot. This ensures knowledge transfer and target-oriented coordination with the departments.

The service managers and test managers are responsible for coordinating with the client and/or the department. The service manager agrees the planning of the test services with the client. This includes defining the content of the test services and the responsibilities of the test center. As every client has different requirements and processes, the assumption of the testing requires individual coordination with each client, and an individual transition. If the transition, and thus the assumption of the testing, has been successful, the test manager agrees the testing period, the operative test content and the test cases with the department and/or the client’s test coordination for each test release. But the communication is not limited to these two roles. The test experts in the test center and the department need to be in immediate, close contact in order to create, adapt and review the test cases in the best possible way, and to coordinate when deviations are discovered.

The result of the tests largely depends on the know-how of the testers, which has to comprise at least three aspects: Firstly, the technical know-how regarding the applications to be tested, and secondly, comprehensive knowledge of the testing methods. This ensures that optimal coverage of the requirements is achieved, both in technical terms and with respect to the definition of test cases. Thirdly, the testers also need to know the way the developers work. This enables them to better identify and analyze errors and communicate them to the software developers in the best possible way.

Coordination tasks of the service and test manager
Figure 4: Coordination tasks of the service and test manager

On the other side, the test center has to exchange information with the third-party providers and the development. The objective of such coordination is, for example, comparing the content of the tests already done to the downstream integration tests in order to identify any gaps in the testing or redundancies, if any. Furthermore, the delivery of new software releases to the test systems is planned, and the analysis and follow-up of deviations are discussed with the client.

In addition to the planning and execution of the test activities of the comprehensive integration test, the test center can also take over the technical support of the testing in the company. This includes, for example, the development and maintenance of the test infrastructure and test environments, and the development of comprehensive test data management. It is important that all the software systems to be tested are installed in the integration test environments, ensuring that the entire business process can be comprehensively tested.

An additional aspect of the test center is the continuous optimization of the test processes. This not only includes the optimization of the operations that have already been established, but also the introduction and operation of test automation, the dissolution of current interdependencies within and between the test stages, and the review of the level of development of the software developers at an early stage by way of so-called pre-integration tests.

For this purpose, additional test environments besides the test environments for the comprehensive integration tests are created. The service providers provide pre-release versions of the software in the pre-integration environments, giving the test center’s pre-integration team the opportunity to perform tests with interaction with the other applications at an early stage. Thus, the pre-integration tests help to identify possible deviations between the different information systems of the various providers more quickly.

For companies that have their software developed by various providers and still have complex, interconnected system environments, an external test center offers a quick and in-depth quality statement regarding all the software systems. The objective of the external test center is the establishment of an integrative test process that includes not only the interconnection of the test systems, but an interconnected test organization and interconnected test processes as well. This way, the test center responds to the companies’ requirements regarding a more integrative test focus and flexibility through scalability, communication, and concentrated testing expertise.