Pimp my testAUTOmation (Part 3)

Result protocols and reports

With Selenium, as with most test automation tools, result reports can be generated. These machine-readable documents in formats such as XML or JSON are not very user-friendly, but they can be easily integrated into other tools and thus made more readable. With this blog series I want to show how important functions in Selenium can be extended or enhanced with simple means. In the first part I introduced what Selenium 4 brings and how screenshots can be used. In the second part we made a video of the test and the third part is about reports. I try to evaluate the approaches according to their added value (The Good) and their challenges (The Bad) and give useful hints (… and the Useful) if necessary.

Why do we need reports?

To answer the “why” question, I start with the “worst” case: The evaluation and audit-proof storage of all test results is mandatory in some projects, because legal or other requirements must be met. In the case of contract development, this may be a requirement of the customer. In the case of software and hardware development in the medical field, it is a mandatory requirement for approval and licensing by the authorities. But even without these specifications, reports and clear protocols offer added value for the project. They can be used to derive key figures and trends that the team needs for its retrospectives or further development.

Just a protocol…

There are many ways to generate simple machine-readable test protocols. When using automated tests (Selenium, JUnit) in Java projects, you can use Maven to integrate the maven-surefire plugin, which creates an XML file during the build process that records the results of a test run. The XML file contains the name of the test class and all test methods, the total duration of the test execution, the duration of each test case / method and the test results (tests, errors, skipped, failures).

… and what do you do with it.

The machine-readable logs are usually generated automatically in the build tool and included in the result report of the build tool. Thus, Jenkins includes all results of automated testing for projects organized with Maven. In addition, most build tools have plug-ins that include the test logs or even graphically display them.

The projects that need to document all of their test results usually face the problem that the test results for the different types of tests (manual, automated, etc.) are generated in different tools and therefore exist in different formats. Therefore, different test management tools offer the possibility to read in the machine-readable reports. This means that the test results of the automated tests stand next to the manual tests and can be summarized in a test report/test report.

For example, in the Jira test management plug-in Xray, the test results for JUnit and NUnit can be imported manually or automatically via a Rest API: https://confluence.xpand-it.com/display/public/XRAY/Import+Execution+Results.

Is there more to it?

If no suitable test management tool is available or if you need a stand-alone version, I would like to introduce the Allure Test Report tool. The Allure framework is a flexible, lightweight and multilingual test report tool with the possibility to add screenshots, protocols etc. It offers a modular architecture and clear web reports with the possibility to save attachments, steps, parameters and much more. Different test frameworks are supported: JUnit4, JUnit5, Cucumber, JBehave, TestNG, …

Screenshot Allure Report

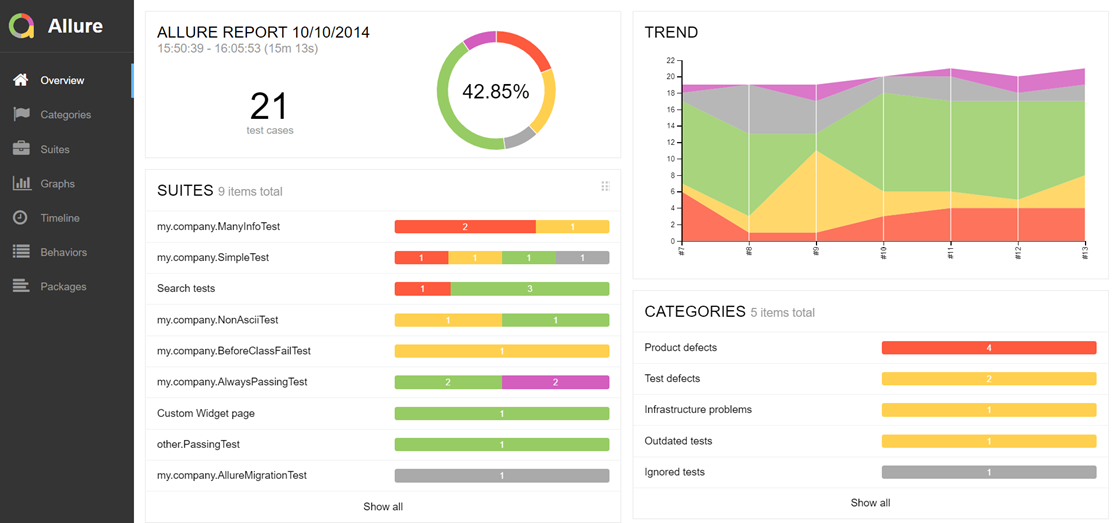
To create better evaluation and clarity in the reports, the Allure framework uses its own annotations. This allows the results of test classes and test methods to be linked to features, epics or stories. Annotations such as @Story, @Feature or @Epic can be used to link test classes or test methods with requirements (story, epic, feature). These links can then be evaluated in the report view and statements about test coverage or project progress can be made.

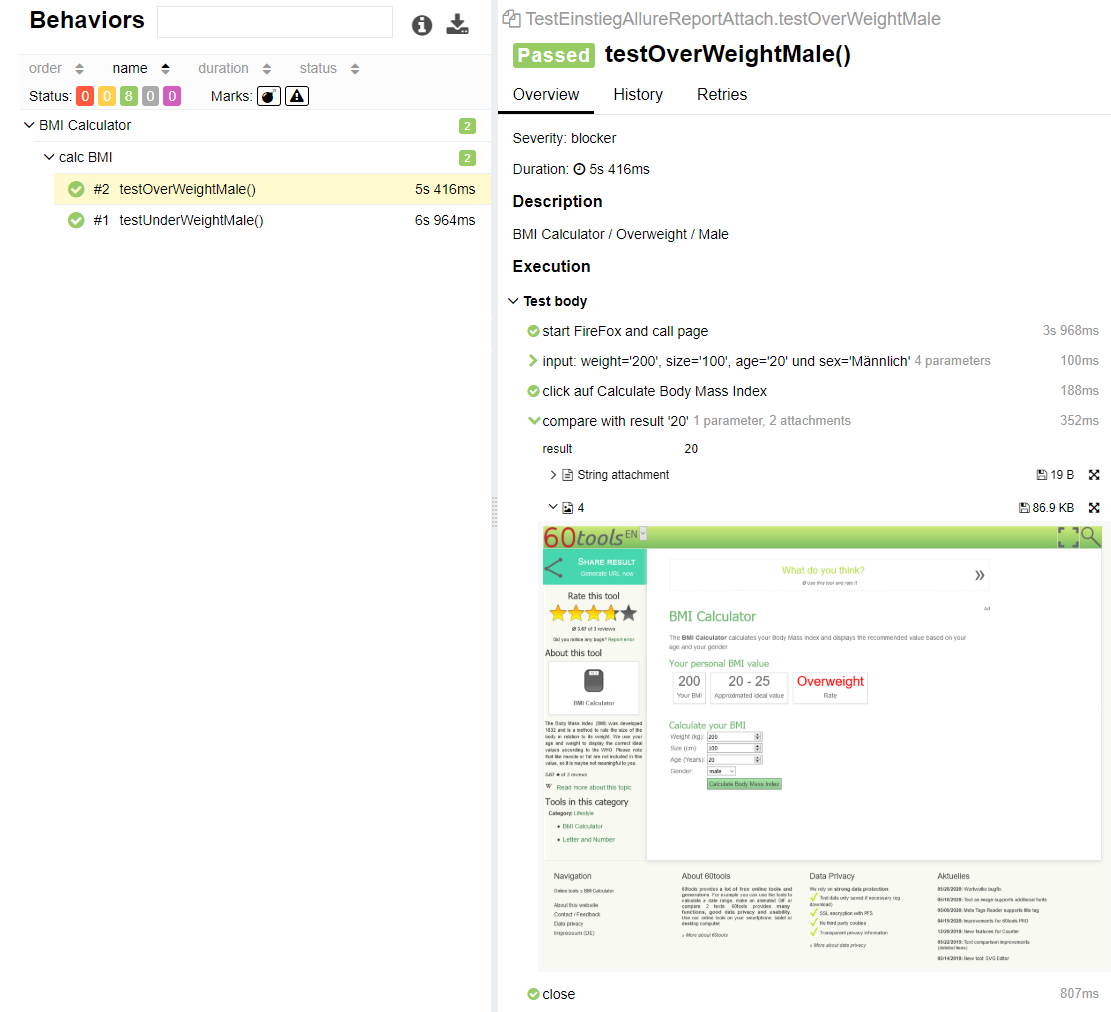
Furthermore, the readability of the test cases can be improved by the annotation @Step and @Attachment. We can divide our test case (@Test) into individual test methods to increase readability and reusability. With the annotation @Step of the Allure framework, these test methods or test steps can be displayed in the test log. Here @Step supports the display of a test step description of the parameters used, the step results, and attachments. This is because test steps can have texts attached in the form of strings and images in the form of byte[]. See the code example …

Annotationen von Allure

import org.apache.commons.io.FileUtils;
import org.junit.jupiter.api.Test;
import org.junit.jupiter.api.AfterEach;
import org.junit.jupiter.api.BeforeEach;
import org.junit.jupiter.api.Assertions;
 
import org.openqa.selenium.*;
import org.openqa.selenium.firefox.FirefoxDriver;
 
import io.qameta.allure.Allure;
import io.qameta.allure.Feature;
import io.qameta.allure.Description;
import io.qameta.allure.Severity;
import io.qameta.allure.SeverityLevel;
import io.qameta.allure.Step;
import io.qameta.allure.Attachment;
import io.qameta.allure.Story;
import io.qameta.allure.Epic;
 
import java.io.File;
import java.io.IOException;
import java.text.SimpleDateFormat;
import java.util.Date;
import java.util.concurrent.TimeUnit;
 
/**
 * Allure Framework is a flexible lightweight multi-language test report tool
 * that not only shows a very concise representation of what have been tested
 * in a neat web report form, but allows everyone participating in the development
 * process to extract maximum of useful information from everyday execution of tests.
 *
 * https://docs.qameta.io/allure/#_junit_5
 */
@Feature("BMI Calculator")
public class TestAllureReportAttach {
 
    FirefoxDriver driver;
    String url = "https://60tools.com/en/tool/bmi-calculator";
 
    @Test
    @Description("BMI Calculator / Underweight / Male")
    @Severity(SeverityLevel.CRITICAL)
    @Story("calc BMI")
    public void testUnderWeightMale() {
        inputTestdata("20", "200", "20", "Männlich");
        clickButtonCalc();
        compareResult("5");
    }
 
    @Test
    @Description("BMI Calculator / Overweight / Male")
    @Severity(SeverityLevel.BLOCKER)
    @Story("calc BMI")
    public void testOverWeightMale() {
        inputTestdata("200", "100", "20", "Männlich");
        clickButtonCalc();
        compareResult("20");
    }
 
    @BeforeEach
    @Step("start FireFox and call page")
    public void startFirefoxWithURL() {
        /**
         * What is GeckoDriver?
         GeckoDriver is a connecting link to the Firefox browser for your scripts in Selenium.
         GeckoDriver is a proxy which helps to communicate with the Gecko-based browsers (e.g. Firefox), for which it provides HTTP API.
 
         Firefox's geckodriver *requires* you to specify its location.
         */
        System.setProperty("webdriver.gecko.driver", ".\\libs\\geckodriver.exe");
         
        driver=new FirefoxDriver();
        driver.get(url);
        driver.manage().timeouts().pageLoadTimeout(120, TimeUnit.SECONDS);
    }
 
    @Step("input: weight='{0}', size='{1}', age='{2}' und sex='{3}'")
    private void inputTestdata(String weight, String size, String age, String sex) {
         
        driver.findElement(By.name("weight")).sendKeys(weight);
        driver.findElement(By.name("size")).sendKeys(size);
        driver.findElement(By.name("age")).sendKeys(age);
 
         
        WebElement gender = driver.findElement(By.name("sex"));
        gender.sendKeys(sex);
        gender.sendKeys(Keys.RETURN);
    }
 
    @Step("click auf Calculate Body Mass Index")
    private void clickButtonCalc() {       
        WebElement button = driver.findElement(By.xpath("//*[@id=\"toolForm\"]/table/tbody/tr[5]/td[2]/input[2]"));
        button.click();
    }
 
    @Step("compare with result '{0}'")
    private void compareResult(String result) {
        String str2 = driver.findElement(By.xpath("//*[@id=\"content\"]/div[2]")).getText();
 
        System.out.println("str2: " + str2);
        attachment(str2);
 
        System.out.println("getScreenshot1");
        //make a screenshot
        screenShot(driver, ".\\screenshots\\" ,"test_Oversized");
        System.out.println("getScreenshot3");
 
        Assertions.assertTrue(str2.contains(result));
 
    }
 
    @AfterEach
    @Step("close")
    public void closeBrowser() {
        driver.close();
    }
 
    @Attachment(value = "String attachment", type = "text/plain")
    public String attachment(String text) {
        return "<p>" + text + "</p>";
    }
 
    @Attachment(value = "4", type = "image/png")
    private static byte[] screenShot(FirefoxDriver driver, String folder, String filename) {
 
        SimpleDateFormat dateFormat = new SimpleDateFormat("yyyyMMdd_HHmmss");
        String timestamp  = dateFormat.format(new Date());
 
        try {
            File scrFile = ((TakesScreenshot)driver).getScreenshotAs(OutputType.FILE);
            // Now you can do whatever you need to do with it, for example copy somewhere
            FileUtils.copyFile(scrFile, new File(folder + filename + "_" + timestamp + ".png"));
            return driver.getScreenshotAs(OutputType.BYTES);
        }
        catch (IOException e) {
            System.out.println(e.getMessage());
        }
        System.out.println("getScreenshot2");
        return new byte[0];
 
    }
 
}

… and the result in the test protocol:

screenshot results from test protocol in Allure

Conclusion

With test protocols and reports, automated test runs can be generated very easily and integrated into your own tool chain. Although this is usually associated with a little extra work, trends and problems can be identified faster and better.

Result protocols and reports

The GoodThe Bad… and the Useful
• Visualization of the current status
• Trends and problems can be identified

• More effort
• New tools and interfaces
• Higher complexity

• Allure Test Report → allure.qatools.ru/
• Xpand Xray → getxray.app/
• Plugins in build tools

Pimp my testAUTOmation (Part 2)

Record videos of the test procedure

With this blog series I want to show how important functions can be built into selenium by using simple means. In the first part I introduced what Selenium 4 brings and how to use screenshots. In the second part we will create a video of the test execution. I try to evaluate the approaches according to their added value (The Good) and their challenges (The Bad) and to give useful hints (… and the Useful).

Why?

But at the beginning we will briefly ask ourselves the question: Why record a video or screencast of the test performance?

With a video we have a recording of the entire test run. Unlike with a screenshot, we can not only record the test result, but we can also trace the path to it.

Like screenshots, the videos can also be used for debugging and point out problems during the test run. Therefore, as with the screenshot, it makes sense to create videos only when problems occur. Following this approach, the video functionality should be extended by a flexible and global switch that can be set as needed.

But the videos can also be used to document the test results. In some projects a detailed documentation is even mandatory, because here legal or other requirements have to be met.

Recording video made easy

Since I use Java Selenium, my first approach was to record videos with the “in-house” functions of Java or to use a suitable framework. My first choice was the MonteCC framework, because it allowed me to record the screen during the test execution with the help of only two methods. In one method video recording is started before the test and in one method the recording is stopped after the test and the video is stored in the appropriate directory.

private ScreenRecorder screenRecorder;
 
@BeforeEach
public void beforeTest() {
 
    GraphicsConfiguration gc = GraphicsEnvironment
            .getLocalGraphicsEnvironment()
            .getDefaultScreenDevice()
            .getDefaultConfiguration();
 
    try {
        this.screenRecorder = new ScreenRecorder(gc,
                new Format(MediaTypeKey, MediaType.FILE, MimeTypeKey, MIME_AVI),
                new Format(MediaTypeKey, MediaType.VIDEO, EncodingKey, ENCODING_AVI_TECHSMITH_SCREEN_CAPTURE,
                        CompressorNameKey, ENCODING_AVI_TECHSMITH_SCREEN_CAPTURE,
                        DepthKey, 24, FrameRateKey, Rational.valueOf(15),
                        QualityKey, 1.0f,
                        KeyFrameIntervalKey, 15 * 60),
                new Format(MediaTypeKey, MediaType.VIDEO, EncodingKey,"black",
                        FrameRateKey, Rational.valueOf(30)),
                null);
        this.screenRecorder.start();
 
    } catch (Exception e) {
        System.out.println("screenRecorder.start " + e.getMessage());
    }
}
 
@AfterEach
public void afterTest()  {
 
    try {
        this.screenRecorder.stop();
        List createdMovieFiles = screenRecorder.getCreatedMovieFiles();
        for (Object movie: createdMovieFiles) {
            File m = (File)movie;
            System.out.println("New movie created: " + m.getAbsolutePath());
        }
 
    } catch (IOException ioe) {
        System.out.println("screenRecorder.stop " + ioe.getMessage());
    }
}

To make sure this happens before each test, we use the annotations of JUnit:

@Test

The method with the annotation @Test is a test case and is started during test execution and the result is recorded in the test log.

@BeforeEach

This method is called before each test execution (see @Test).

@AfterEach

This method is called after each test execution (see @Test).

If you need a complete record of all test cases, you can also use the annotations @Before and @After, which are called before all or after all tests of an execution definition (test class).

Major disadvantages of MonteCC are that the last release was more than six years ago and that the videos are in QuickTime format.

JavaCV (https://github.com/bytedeco/javacv) offered itself as an alternative. The library is actively maintained in GitHub and stores videos in MPEG format. Again, there are two methods of video creation that can be called before and after the test. But JavaCV requires additional methods because screenshots are taken at short intervals parallel to the test run and then assembled into a video after the test. A detailed instruction can be found under the following link: https://cooltrickshome.blogspot.com/2016/12/create-your-own-free-screen-recorder.html.

I have made the following changes for use in automated testing:

/**
 *
 * https://github.com/bytedeco/javacv
 * https://cooltrickshome.blogspot.com/2016/12/create-your-own-free-screen-recorder.html
 */
public class RecordSeleniumJavaCV {
 
    // The WebDriver is a tool for writing automated tests of websites.
    FirefoxDriver driver;
 
    public static boolean videoComplete=false;
    public static String inputImageDir= "videos" + File.separator + "inputImgFolder"+File.separator;
    public static String inputImgExt="png";
    public static String outputVideoDir= "videos" + File.separator;
    public static String outputVideo;
    public static int counter=0;
    public static int imgProcessed=0;
    public static FFmpegFrameRecorder recorder=null;
    public static int videoWidth=1920;
    public static int videoHeight=1080;
    public static int videoFrameRate=3;
    public static int videoQuality=0; // 0 is the max quality
    public static int videoBitRate=9000;
    public static String videoFormat="mp4";
    public static int videoCodec=avcodec.AV_CODEC_ID_MPEG4;
    public static Thread t1=null;
    public static Thread t2=null;
    public static boolean isRegionSelected=false;
    public static int c1=0;
    public static int c2=0;
    public static int c3=0;
    public static int c4=0;
 
    /**
     * Explanation:
     * 1) videoComplete variables tells if user has stopped the recording or not.
     * 2) inputImageDir defines the input directory where screenshots will be stored which would be utilized by the video thread
     * 3) inputImgExt denotes the extension of the image taken for screenshot.
     * 4) outputVideo is the name of the recorded video file
     * 5) counter is used for numbering the screenshots when stored in input directory.
     * 6) recorder is used for starting and stopping the video recording
     * 7) videoWidth, videoFrameRate etc define output video param
     * 8) If user wants to record only a selected region then c1,c2,c3,c4 denotes the coordinate
     *
     * @return
     * @throws Exception
     */
    public static FFmpegFrameRecorder getRecorder() throws Exception
    {
        if(recorder!=null)
        {
            return recorder;
        }
        recorder = new FFmpegFrameRecorder(outputVideo,videoWidth,videoHeight);
        try
        {
            recorder.setFrameRate(videoFrameRate);
            recorder.setVideoCodec(videoCodec);
            recorder.setVideoBitrate(videoBitRate);
            recorder.setFormat(videoFormat);
            recorder.setVideoQuality(videoQuality); // maximum quality
            recorder.start();
        }
        catch(Exception e)
        {
            System.out.println("Exception while starting the recorder object "+e.getMessage());
            throw new Exception("Unable to start recorder");
        }
        return recorder;
    }
 
    /**
     * Explanation:
     * 1) This method is used to get the Recorder object.
     * 2) We create an object of FFmpegFrameRecorder named "Recorder" and then set all its video parameters.
     * 3) Lastly we start the recorder and then return the object.
     *
     * @return
     * @throws Exception
     */
    public static Robot getRobot() throws Exception
    {
        Robot r=null;
        try {
            r = new Robot();
            return r;
        } catch (AWTException e) {
            System.out.println("Issue while initiating Robot object "+e.getMessage());
            throw new Exception("Issue while initiating Robot object");
        }
    }
 
    /**
     * Explanation:
     * 1) Two threads are started in this module when user starts the recording
     * 2) First thread calls the takeScreenshot module which keeps on taking screenshot of user screen and saves them on local disk.
     * 3) Second thread calls the prepareVideo which monitors the screenshot created in step 2 and add them continuously on the video.
     *
     * @param r
     */
    public static void takeScreenshot(Robot r)
    {
        Dimension size = Toolkit.getDefaultToolkit().getScreenSize();
        Rectangle rec=new Rectangle(size);
        if(isRegionSelected)
        {
            rec=new Rectangle(c1, c2, c3-c1, c4-c2);
        }
        while(!videoComplete)
        {
            counter++;
            BufferedImage img = r.createScreenCapture(rec);
            try {
                ImageIO.write(img, inputImgExt, new File(inputImageDir+counter+"."+inputImgExt));
            } catch (IOException e) {
                System.out.println("Got an issue while writing the screenshot to disk "+e.getMessage());
                counter--;
            }
        }
    }
 
    /**
     * Explanation:
     * 1) If user has selected a region for recording then we set the rectangle with the coordinate value of c1,c2,c3,c4. Otherwise we set the rectangle to be full screen
     * 2) Now we run a loop until videoComplete is false (remains false until user press stop recording.
     * 3) Now we capture the region and write the same to the input image directory.
     * 4) So when user starts the recording this method keeps on taking screenshot and saves them into disk.
     *
     */
    public static void prepareVideo()
    {
        File scanFolder=new File(inputImageDir);
        while(!videoComplete)
        {
            File[] inputFiles=scanFolder.listFiles();
            try {
                getRobot().delay(500);
            } catch (Exception e) {
            }
            //for(int i=0;i<scanFolder.list().length;i++)
            for(int i=0;i<inputFiles.length;i++)
            {
                //imgProcessed++;
                addImageToVideo(inputFiles[i].getAbsolutePath());
                //String imgToAdd=scanFolder.getAbsolutePath()+File.separator+imgProcessed+"."+inputImgExt;
                //addImageToVideo(imgToAdd);
                //new File(imgToAdd).delete();
                inputFiles[i].delete();
            }
        }
        File[] inputFiles=scanFolder.listFiles();
        for(int i=0;i<inputFiles.length;i++)
        {
            addImageToVideo(inputFiles[i].getAbsolutePath());
            inputFiles[i].delete();
        }
    }
 
    /**
     * Explanation:
     * 1) cvLoadImage is used to load the image passed as argument
     * 2) We call the convert method to convert the image to frame which could be used by the recorder
     * 3) We pass the frame obtained in step 2 and add the same in the recorder by calling the record method.
     *
     * @return
     */
    public static OpenCVFrameConverter.ToIplImage getFrameConverter()
    {
        OpenCVFrameConverter.ToIplImage grabberConverter = new OpenCVFrameConverter.ToIplImage();
        return grabberConverter;
    }
 
    /**
     * Explanation:
     * 1) We start a loop which will run until video complete is set true (done only when user press stop recording)
     * 2) We keep on monitoring the input  Image directory
     * 3) We traverse each file found in the input image directory and add those images to video using the addImageToVideo method. After the image has been added we delete the image
     * 4) Using the loop in step1 we keep on repeating step 2 and 3 so that each image gets added to video. We added a delay of 500ms so that this module does not picks a half created image from the takeScreenshot module
     * 5) When user press stop recording the loop gets broken. Now we finally traverse the input image directory and add the remaining images to video.
     *
     * @param imgPath
     */
    public static void addImageToVideo(String imgPath)
    {
        try {
            getRecorder().record(getFrameConverter().convert(cvLoadImage(imgPath)));
        } catch (Exception e) {
            System.out.println("Exception while adding image to video "+e.getMessage());
        }
    }
 
    /**
     * Explanation:
     * 1) We make a JFrame with the button for staring and stopping the recording. One more button is added for allowing user to record only a selected portion of screen
     * 2) If user clicks to select only certain region then we call a class CropRegion method getImage which helps in retrieving the coordinate of the region selected by user and update the same in variable c1,c2,c3,c4
     * 3) If user clicks on start recording then startRecording method is called
     * 4) If user clicks on stoprecording then stopRecording method is called
     */
    @BeforeEach
    public void beforeTest() {
 
        System.out.println("this.screenRecorder.start()");
 
        SimpleDateFormat dateFormat = new SimpleDateFormat("yyyyMMdd_HHmmss");
        String timestamp  = dateFormat.format(new Date());
 
        outputVideo= outputVideoDir + "recording_" + timestamp + ".mp4";
 
        try {
            t1=new Thread()
            {
                public void run() {
                    try {
                        takeScreenshot(getRobot());
                    } catch (Exception e) {
                        System.out.println("Cannot make robot object, Exiting program "+e.getMessage());
                        System.exit(0);
                    }
                }
            };
            t2=new Thread()
            {
                public void run() {
                    prepareVideo();
                }
            };
            t1.start();
            t2.start();
            System.out.println("Started recording at "+new Date());
 
 
        } catch (Exception e) {
            System.out.println("screenRecorder.start " + e.getMessage());
        }
    }
 
    @AfterEach
    public void afterTest()  {
 
        System.out.println("this.screenRecorder.stop()");
 
        try {
            videoComplete=true;
            System.out.println("Stopping recording at "+new Date());
            t1.join();
            System.out.println("Screenshot thread complete");
            t2.join();
            System.out.println("Video maker thread complete");
            getRecorder().stop();
            System.out.println("Recording has been saved successfully at "+new File(outputVideo).getAbsolutePath());
 
        } catch (Exception e) {
            System.out.println("screenRecorder.stop " + e.getMessage());
        }
    }
 
    @Test
    public void testMe() {
         
        //toDo
 
    }
 
}

Is there a catch?

So, we now have several possibilities to record the automatic test run in a video in order to be able to reproduce it in case of problems or to fulfil the documentation obligations.

But recording during the test run is associated with a risk that the tester / test automator should keep in mind: It is an interference with the normal test run, because we might change the timing. Our modified test run with video recording may behave differently than a test run without video recording.

Videos of the test procedure

The GoodThe Bad… and the Useful
• Recording the entire test run
• In addition to the test result, the path to it can also be traced


• The test run is influenced
• Various old and paid frameworks for video recording
• Codec problems (QuicktimeView only)
• JavaCV →
github.com/bytedeco/javacv


Pimp my testAUTOmation (Part 1)

Selenium 4 & Screenshots

Software development projects live from the use of modern testing tools, which support the project members in their work. Selenium has been available since 2004 and may seem a bit dusty, but it is not out of fashion. With Selenium 4 it is catching up with the new challenges. With this blog series, I want to show what Selenium 4 brings and how important features like screenshots, videos, reports and approaches of AI can be implemented using simple means. I will try to evaluate the approaches according to their added value (The Good) and their challenges (The Bad) as well as give useful hints (… and the Useful).

Jason Huggins started working on Selenium back in 2004 as an internal project for testing websites. Over time, Selenium became the leading tool in many development projects or served as the basis for other testing tools. Currently, the framework feels a bit old-fashioned, but it stands out from its challengers with its broad support of languages (Ruby, Java, Python, C#, JavaScript) and browsers (Firefox, Internet Explorer, Safari, Opera, Chrome, Edge and others).

What is new in Selenium 4?

Version 4, which is announced for 2020, attempts to bring selenium into the modern age. This includes the following innovations:

WebDriver API becomes a W3C standardThis means there will be only one WebDriver for all browsers.
Selenium4 IDE TNG„TheNextGeneration“ Selenium IDE is based on Node JS and is available for Firefox and Chrome. Parallel test runs can be started and there is extended test protocol information (test result, runtime etc.).
Improved WebDriver GridSetup, administration and docker support have been improved.
FurthermoreThere is a better UI and the reporting / logging have been optimized.
DocumentationVersion 4 should come with a detailed documentation and new tutorials.

With version 4, Selenium consists of the following parts: The Selenium WebDriver, the Selenium IDE and the Selenium Grid. The Selenium WebDriver is a collection of different programming language integrations to control browsers for test automation. The Selenium IDE is a Chrome or Firefox add-on to start test automation directly from the browser without programming knowledge and allows the recording and the play back of test cases in the browser. The Selenium Grid allows controlled and simultaneous test executions on different machines and supports the administration of different test environments from a central point. Thus, a test case can be tested against different browser or operating system combinations or a list of test cases can be executed scaled and distributed over several machines.

Selenium 4

The GoodThe Bad… and the Useful
WebDriver API >> W3C
Standardized
Selenium 4 IDE TNG
Improved WebDriver Grid
Documentation
New challenger like cypress etc.
Selenium 4 was announced for 2019

Latest Selenium 4 Alpha version 4.0.0-alpha-5


Screenshots can help with testing!

Newer frameworks for test automation already have a function for creating screenshots. But with a few lines of code, you can also add the possibility to store screenshots in selenium tests.

private void screenShot(RemoteWebDriver driver, String folder, String filename) {
 
    SimpleDateFormat dateFormat = new SimpleDateFormat("yyyyMMdd_HHmmss");
    String timestamp  = dateFormat.format(new Date());
 
    try {
        File scrFile = ((TakesScreenshot)driver).getScreenshotAs(OutputType.FILE);
        // Now you can do whatever you need to do with it, for example copy somewhere
        FileUtils.copyFile(scrFile, new File(folder + filename + "_" + timestamp + ".png"));
    }
    catch (IOException e) {
        System.out.println(e.getMessage());
    }
     
}

However, you should always pay attention to the purpose of screenshots when creating and storing the file. Screenshots can be used for debugging purposes and to point out problems. Therefore, it makes sense to create screenshots only when problems occur. According to this approach, the screenshot functionality can be extended by a flexible and global switch that can be set as needed.

On the other hand, screenshots can be used to document the test results and may even be mandatory in some projects, as legal or other requirements must be met in such cases. In this case, the storage of the screenshots must be traceable, and each generated file must be assigned to a test case and the corresponding test run. According to this approach, the file name must have a reference to the test case and a suitable timestamp. Furthermore, the storage directory for this one test run must also be created and named.

Screenshots

The GoodThe Bad… and the Useful
Allows the verification of the test run resultsCan only show a snapshotCan be used for “debugging”

In my next post we will create a video of the test implementation.