FlaUI, project experience

Preface

The automated testing of graphical user interfaces is an important topic. For each GUI technology, there are several libraries that need to be carefully selected in order to achieve a high-quality and accurate result in the shortest possible time. 

When it comes to web technologies, there are many well-known frameworks such as Selenium, Playwright, Cypress and many more. There are also suitable alternatives for WPF or Winforms. Today I would like to introduce you to FlaUI.

FlaUI is a .NET class library for automated testing of Windows apps, especially the UI. It is built on the in-house Microsoft libraries for UI Automation.
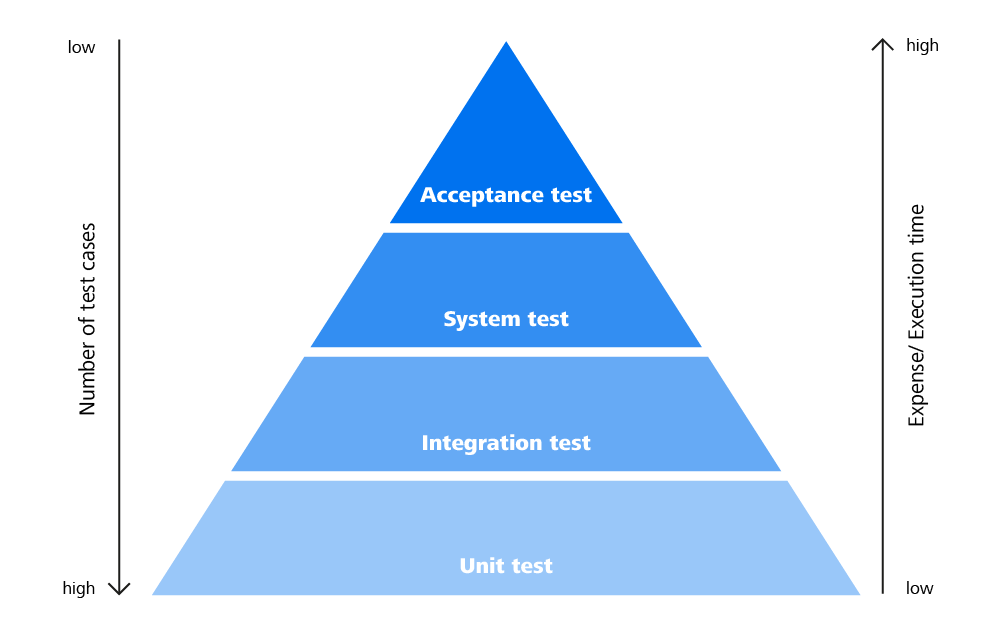
Image: Pyramid of test automation

History

Roman Roemer published the first version of FlaUI on Github on December 20, 2016. Version 0.6.1 was the first step towards a class library for testing .NET products. Since then, the library has been developed further with consistency and great enthusiasm in order to expand it with new and better functions. The newest version is 4.0.0 and it includes features such as the automation of WPF and Windows Store app products as well as the FlaUI Inspect tool, which reads and displays the structure of .NET products.

Installation

FlaUI can be downloaded and installed via GitHub or NuGet. For this article and the following example, I will also use other plugins/frameworks and class libraries such as:

  • C# by OmniSharp
  • C# Extensions by Jchannon
  • NuGet Package Manager by Jmrog
  • .NET Core Test Explorer by Jun Han
  • The latest Windows SDK
  • NUnit Framework

Example

For this example, I will use several different methods to maximize a typical Windows app, here the task manager, and restore it to its original state. Also, different elements should be highlighted.

While working on this article, I noticed that Windows exhibits a special behavior: When a program is maximized, not only the name and other properties of the button change, but also the AutomationID. As a result, I had to give the method calls two different transfer strings for the AutomationID, “Maximize” and “Restore”, which both address the same button.

Code (C#)

First of all, we start the relevant application and create an instance of the window for further use:

var app = Application.Launch(@"C:\Windows\System32\Taskmgr.exe");
var automation = new UIA2Automation();
var mainWin = app.GetMainWindow(automation);

Furthermore, we also need the ConditionFactory helper class:

ConditionFactory cf = new ConditionFactory(new UIA2PropertyLibrary());

This helper class enables us to search for objects according to certain conditions. For instance, searching for an object with a specific ID.

As mentioned above, we want to maximize the program and restore the initial state in the following methods. We also want to highlight elements:

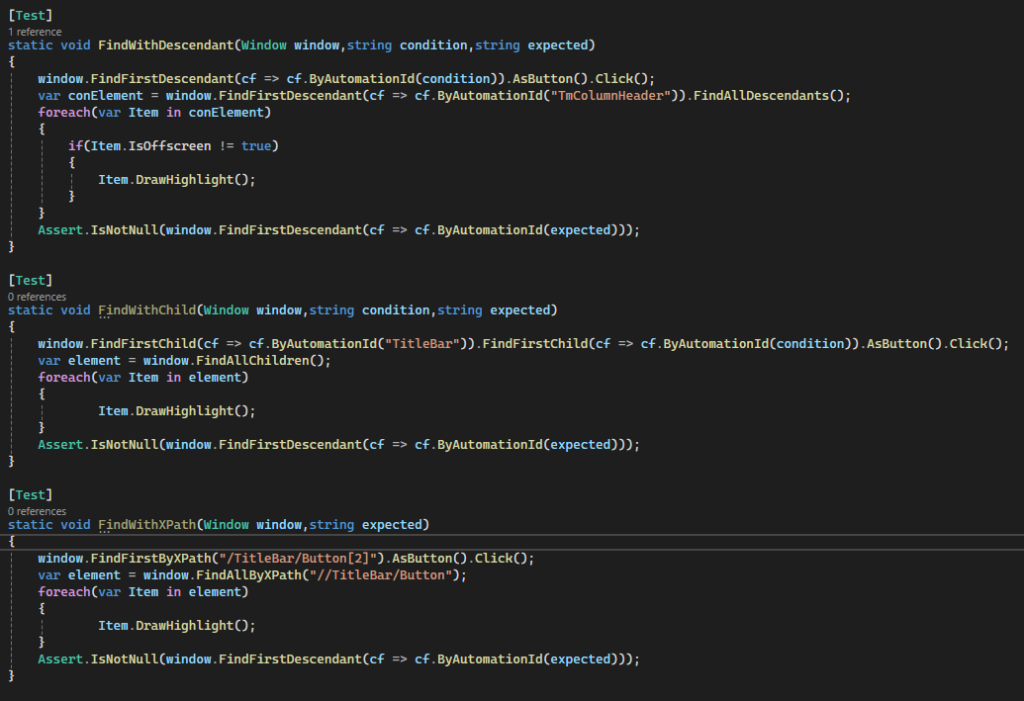
For the first method, we will work with FindFirstDescendant and FindAllDescendant. FindAllDescendant searches for all elements that are below the source element. FindFirstDescendant finds the first element below the source element matching the specified search condition and DrawHighlight creates a red frame around the element.

        static void FindWithDescendant(Window window, string condition, string expected)
        {
            window.FindFirstDescendant(cf => cf.ByAutomationId(condition)).AsButton().Click();
            var element = window.FindFirstDescendant(cf =>
            cf.ByAutomationId("TmColumnHeader")).FindAllDescendants();            
            foreach(var Item in element)
            {
                if(Item.IsOffscreen != true)
                {
                    Item.DrawHighlight();
                }
            }
            Assert.IsNotNull(window.FindFirstDescendant(cf => cf.ByAutomationId(expected)));
        }

For the second method, we use FindFirstChild and FindAllChildren. Both function in almost the same way as Descendant, except that not all elements are found here, but only those that are directly below the starting element.

        static void FindWithChild(Window window, string condition, string expected)
        {
            window.FindFirstChild(cf => cf.ByAutomationId("TitleBar")).FindFirstChild(cf =>
            cf.ByAutomationId(condition)).AsButton().Click();
            var element = window.FindAllChildren();
            foreach(var Item in element)
            {
                    Item.DrawHighlight();
            }
            Assert.IsNotNull(window.FindFirstDescendant(cf => cf.ByAutomationId(expected)));
        }

And for the third method, we use FindFirstByXPath and FindAllByXPath. This is where we have to specify the path, as the name suggests. With First it should be the exact path to the desired element and with FindAll all elements found within the path are searched for. If you want to inspect an unknown program, it helps to use FlaUI Inspect, which can display properties such as the path, but also other information about elements of Windows apps.

        static void FindWithXPath(Window window, string expected)
        {
            window.FindFirstByXPath("/TitleBar/Button[2]").AsButton().Click();
            var element = window.FindAllByXPath("//TitleBar/Button");
            foreach(var Item in element)
            {
                    Item.DrawHighlight();
            }
            Assert.IsNotNull(window.FindFirstDescendant(cf => cf.ByAutomationId(expected)));
        }

Finally, we just need to call the methods and pass them the desired values. The first is the window that we created at the beginning and the second is the AutomationID of the maximize button, which changes as soon as the button is pressed.

       FindWithDescendant(mainWin,"Maximize", "Restore");
       FindWithChild(mainWin,"Restore", "Maximize");
       FindWithXPath(mainWin,"Restore");

This looks as follows in my code:

Flaws

One problem is self-made objects, e.g. we had created buttons in a project with self-made polygons. These could not be found by either FlaUI Inspect or FlaUI itself, which severely limited their use in our automated tests. For such objects, an AutomationPeer (provides a base class that makes the object usable for UI automation) must be created so that they can be found.

Summary and conclusion

FlaUI supports Forms and Win 32 applications with UIA2 and WPF and Windows Store apps with UIA3. It is user-friendly and straightforward to operate, as it requires relatively few basic functions. Furthermore, it can be extended with your own methods and objects at any time.

Similarly, the software developers are satisfied because they do not have to install any extra interfaces and therefore no potential sources of error for test automation. Since FlaUI gives us the possibility to directly access the objects of the program to be tested, we do not need to spend additional time planning and managing major and error-prone adjustments to the existing program structure for testing.

On the other hand, in order to be able to address each object automatically, its AutomationID must be stored at least once in the test code so that it can also be used for the test. Consequently, the approximate structure of the program to be tested must be reproduced, which can be time-consuming, especially with more complex programs. And for the sake of clarity, these should be clustered in several classes with meaningful names.

We will definitely continue to use it and recommend it to our colleagues.

Web UIs with Blazor and possible use cases in industry

Blazor is a Microsoft framework for building interactive web frontends using C# instead of JavaScript. It was published in 2019 as part of .NET Core 3.0. Since then, it has been under constant development. For example, there will be further improvements when .NET 8 is released [1]. The ecosystem of helpful components and libraries has also matured in parallel with Blazor’s features. The framework has now proven its worth and left the initial hype behind. For this reason, the ways in which Blazor could be used in an industrial context should be reviewed and explained in more detail.

C# instead of JavaScript – UI design

@page "/counter"

<PageTitle>Counter</PageTitle>

<h1>Counter</h1>

<p role="status">Current count: @currentCount</p>

<button class="btn btn-primary" @onclick="IncrementCount">Click me</button>

@code {
    private int currentCount = 0;

    private void IncrementCount()
    {
        currentCount++;
    }
}

Figure 1: Example of code using Razor syntax for Blazor website


Blazor uses what is known as Razor syntax. This consists of HTML, special Razor markup and C#. As a C# developer, you can quickly find your way around it with basic HTML knowledge. With Blazor, JavaScript normally only plays a background role and is not directly used in most cases. Exceptions to this rule include, for example, enabling special interactions with the browser and accessing JavaScript libraries. However, there is a growing number of wrappers available, especially for popular JavaScript libraries, which are provided by the community.

Blazor hosting models

There are three hosting models for Blazor apps, which determine how a Blazor app works, what features are available and what restrictions apply.

Blazor Server – server-side rendering

In this case, the website is generated dynamically in an ASP.NET Core app on the server and the HTML is sent to the browser. Rendering on the server provides the entire functionality of the backend. An active SignalR connection is required for each interaction between the browser and server. The latency of this network connection has a direct impact on the UI response time. In addition, the performance of the Blazor application is limited by the performance of the server, which makes having many simultaneous client connections costly, for example.

This hosting model is suitable if…

  • applications serve a manageable number of users;
  • server performance, network latency and offline scenarios do not play a role;
  • there are special requirements that can only be implemented in the backend. Example: Authentication of users based on Windows login
Figure 2: Architecture of a Blazor Server app

Blazor WebAssembly – client-side rendering

The application can be downloaded from any web server to the browser together with the .NET runtime. This runtime is executed in the browser’s WebAssembly environment, rendering the website locally. After downloading the entire app from the server, a Blazor WebAssembly app runs completely in the browser. However, the app’s initial loading time is a few seconds as – depending on the app – a lot of data must be transferred (10 MB is required for Microsoft’s template app alone). Blazor WebAssembly works in the same way as common single-page application (SPA) frameworks, such as React or Angular.

Since the app runs completely in the browser, there is no server-side dependency. However, the app is restricted to the functionalities of the browser and the WebAssembly runtime, which limits interactions with local resources on the client (file system, etc.) and several .NET APIs, for example.

This hosting model is suitable if…

  • no firewalls are preventing the app from being downloaded to the browser (DLLs!)1;
  • download size and start time are irrelevant or accepted by the user;
  • a rich, interactive single-page application is required;
  • all browser functionalities can be leveraged.
Figure 3: Architecture of a Blazor WebAssembly app

Blazor Hybrid

The Blazor app runs locally on the desktop (in .NET MAUI, WPF or Windows Forms) and is rendered to an embedded WebView control. The term “Hybrid” refers to the combination of web technology (Blazor) and desktop or mobile frameworks. Since the app runs locally, it also has full access to the client’s functionalities.

This hosting model is suitable if…

  • Blazor components are to be reused on the desktop;
  • desktop applications are to be gradually transitioned to web technology.
Figure 4: Architecture of a Blazor Hybrid app

.NET 8, which will be released in the autumn of 2023, will introduce another hosting model that strikes a balance between Blazor Server and Blazor WebAssembly. The aim is to combine the performance benefits of rendering static content on the web server with the interactivity of single-page applications while reducing the app’s loading time [2].

How can Blazor be used in industry?

When evaluating practical use cases, we must consider the advantages of Blazor compared to other web UI frameworks, such as Angular or React.

  • Blazor belongs to the ASP.NET Core universe and can therefore integrate and reuse existing .NET libraries.
  • Since Blazor was developed for C# developers, it is designed for teams that specialised in .NET backend development.
  • Blazor is well suited to projects with focus on the backend, implementing complex business logic and an extensive database. Example: Forms-over-data (FOD) applications with extensive forms but otherwise low UI functionality

Use case 1: Background application with local management interface

A .NET application that runs on a computer as a service is to be assigned a simple, locally available UI that can be used to configure and administer the software.

Figure 5: Outline of the application in use case 1

In this case, Blazor with the Blazor Server hosting model is recommended as components of the .NET background application can be easily accessed in the Blazor application. Abstraction layers such as a REST API are not necessary. Network issues caused by firewalls, high latency or lack of availability are excluded. There’s no huge leap required to switch to Blazor, meaning that backend developers with limited knowledge of web technologies can also implement the simple web UI.

Use case 2: Information system

A system provides information for plant/system maintenance. The UI needs to be available at several fixed stations and remotely on laptops or tablets in order to be able to access the data on site at the machine as well.

Figure 6: Outline of the application in use case 2

Blazor WebAssembly is recommended in this case. To enable mobile access to a system, an offline scenario where the data can be read and processed locally – even without a connection – must be supported. The data is synchronised with the backend at a later date. A progressive web app (PWA) that can be installed locally can also be built using Blazor WebAssembly. The app start-up time is increased, but this is accepted in most cases in the industrial environment.

In this scenario, it is essential to check the network connection between the web server and the end devices at the start. Are there any firewalls that prevent the application from downloading?

Use case 3: Control computer

Control software requires a UI to operate a machine or process. The backend of the control software is extensive, while the scope of the UI is much smaller depending on the application.

In this scenario, there is no clear recommendation. Factors to consider in the decision-making process include:

  • access to local resources;
  • local or distributed access to the UI;
  • scope of the UI.

If it is imperative for the UI to access the control software’s local resources, the only real option is Blazor Server. Using this hosting model, these resources can be integrated quickly and easily.

If the UI does not require direct access to local resources, the type of UI access can be a deciding factor. If the UI is primarily accessed locally from the control computer, Blazor Server usually meets the requirements. If access to the UI is distributed, for example across several operator stations of a control room, then Blazor WebAssembly is the best option. In this case, network latency and the control computer’s capacity do not affect the UI response time.

If Blazor WebAssembly is chosen, the network must be checked like in use case 2.

The more extensive the functions of the UI in a distributed scenario, the more important it is to consider established frameworks, such as Angular, React, etc., in addition to Blazor WebAssembly. For extensive UIs, a separate team member dedicated solely to this task will be promptly needed. In such cases, the choice of technology also depends on the skills of the available employees.

Summary

In most cases, Blazor fulfils its main product promise and no JavaScript expertise is required. This means that the UI can also be created by teams with .NET skills that have limited web development experience.

How Blazor is hosted – the chosen hosting model – depends on the use case. Three industrial use cases were presented as examples.


1 Microsoft has acknowledged users’ problems and is planning on using a different format to DLL for assembly files in .NET 8. Details and status: https://github.com/dotnet/runtime/issues/80807

Sources

[1] Microsoft, „.NET Blog,“ 13 Juni 2023. [Online]. Available: https://devblogs.microsoft.com/dotnet/asp-net-core-updates-in-dotnet-8-preview-5/. [Zugriff am 21 Juni 2023].

[2] Microsoft, „GitHub,“ 14 Februar 2023. [Online]. Available: https://github.com/dotnet/aspnetcore/issues/46636. [Zugriff am 21 Juni 2023].

YARP – A fast and reliable reverse proxy

Possibilities of the .NET-based open source solution from Microsoft

Routing, load balancing, authentication, authorisation and reliability are important issues in many web projects. Microsoft has a large number of teams that write a reverse proxy for their services themselves or look for solutions to map the tasks mentioned above. This was a good occasion to bring together the different requirements to work on a common solution. YARP was launched – the Microsoft open source project for a reverse proxy in .NET.

Microsoft released the first preview more than a year ago. Ever since, many improvements have been made and YARP has been released in version 1.0 together with the new .NET 6 on 9 November 2021.

In this article we aim to take a closer look at YARP and provide an overview of the configuration options provided to us by Microsoft. Accordingly, we will start by looking at what a reverse proxy actually is and how YARP is positioned. Then we will look at the diverse configuration options and conclude with an outlook.

YARP is written in C# and is built on .NET. It utilises the infrastructure of ASP.NET and .NET. Thus, .NET Core 3.1 and .NET 5 as well as the .NET 6 mentioned above are supported. However, when .NET Core 3.1 is used, some functions are not available, as YARP makes use of some new features and optimisations in the newer .NET versions.

keyboard with open source button

What is a reverse proxy?

A reverse proxy is a type of proxy server that is typically located behind the firewall in a private network and forwards client requests to back-end services. In doing so, the reverse proxy provides an additional abstraction and control layer to ensure the smooth flow of network traffic between clients and servers.

What is YARP?

A classic reverse proxy usually operates on the transport layer (4th layer – TCP/IP) of the ISO/OSI model and routes the requests further and further. In contrast, YARP resides on the 7th layer – here the http layer – and it cuts the incoming connections and creates new ones to the target server. The incoming and outgoing connections are thus independent. This enables remapping of the URL space, i.e. there is a difference between the URLs that are visible from outside and those in the back-end.

The back-end server can be relieved of load by shifting tasks to the reverse proxy.

Why YARP?

The utilisation options of YARP and the many other (classic) reverse proxies vary. A developer in the ASP.NET environment can easily set up, configure and extend the functionality of the reverse proxy in his or her usual programming language. Likewise, the reverse proxy with all its configurations can be versioned with version control, just like any other project. It also has cross-platform capability, i.e. it runs on both Windows and Linux, making it well suited for containerisation.

Functions of YARP

One of the most important requirements is the extensibility and customisability of YARP. For configuration, any source that maps the IConfiguration interface can be connected. Classically, this would be JSON configuration files. The configuration is automatically updated without a restart when changes are made. However, it is also possible to control the configuration dynamically via an API or even on demand per request.

Anatomy of a request

To better understand the functions, it is useful to first get an overview of the pipeline architecture of YARP. Initially, an incoming request lands in the standard ASP .NET middleware (e.g. TLS Termination, Static Files, Routing, Authentication and Authorisation). This is followed by various phases of YARP.

  1. Run through all target servers incl. health check
  2. Session affinity
  3. Load balancing
  4. Passive health checks
  5. Transformation of the request
  6. Forwarding of the request to the target server through a new connection

Routes and clusters

The reverse proxy can be configured for both routes and clusters. The route configuration is an ordered list of route hits with their associated configurations. A route is typically defined by three components: the route ID, cluster ID and a match criterion. Therefore, when an incoming connection arrives, it is compared with the match criterion. In the process, the list of route entries is processed one after the other. If the match criterion is met, the cluster with the specified ID is used for forwarding. However, CORS, transformer, authentication and authorisation can also be configured for a route.

Figure 1 shows an example configuration for routes and clusters.

Unlike the “Routes section, the Clusters section contains an unordered collection of named clusters. A cluster primarily contains a collection of named targets and their addresses, each of which is considered capable of handling requests for a particular route. The proxy processes the request according to the route and cluster configuration to select a target.

{
    "ReverseProxy": {
        "Routes": {
            "minimumroute": {
                "ClusterId": "minimumcluster",
                "Match": {
                    "Path": "{**catch-all}"
                }
            },
            "route2": {
                "ClusterId": "cluster2",
                "Match": {
                    "Path": "/something/{*any}"
                }
            }
        },
        "Clusters": {
            "minimumcluster": {
                "Destinations": {
                    "example.com": {
                        "Address": "http://www.example.com/"
                    }
                }
            },
            "cluster2": {
                "Destinations": {
                    "first_destination": {
                        "Address": "https://contoso.com"
                    },
                    "another_destination": {
                        "Address": "https://bing.com"
                    }
                },
                "LoadBalancingPolicy": "PowerOfTwoChoices"
            }
        }
    }
}

Figure 1: Example configuration with the basic functions (routes, clusters and load balancing)

TLS termination

As mentioned earlier, incoming connections are cut and new ones to the target server are established. Since TLS connections are expensive, this can improve speed for small requests. This can be useful especially if the proxy forwards to servers that are all on the internal network and a secure connection is no longer necessary. The following possibilities are conceivable here:

  • Routing of an incoming HTTPS to HTTP connection
  • Routing of an incoming HTTPS/1 to HTTP/2 connection
  • Routing of an incoming HTTP to HTTPS connection

Session affinity

Session affinity is a mechanism for binding (affinity) a contiguous request sequence to the target that handled the first request when the load is distributed over multiple targets.

It is useful in scenarios where most requests in a sequence deal with the same data and the cost of accessing data is different for different targets handling requests.

The most common example is transient caching (e.g. in-memory). Here, during the first request, data is retrieved from a slower persistent memory into a fast local cache. Subsequent requests can then be processed with the data from the cache, thus increasing throughput.

Load balancing

If multiple healthy targets are available for a route, one of the following load balancing algorithms can be configured:

  • Random
  • Round robin
  • Least requests
  • Power of two choices
  • First

It is also possible to use a self-developed algorithm at this point.

Health checks

The reverse proxy can analyse the health of each node and stop client traffic to unhealthy nodes until they recover. YARP implements this approach in the form of active and passive checks.

Passive

YARP can passively check for successes and failures in forwarding client requests. Responses to proxy requests are intercepted by dedicated passive health checking middleware, which forwards them to a policy configured on the cluster. The policy analyses the responses to determine whether or not the targets that generated them are healthy. It then computes new passive health states, assigns them to the respective targets and rebuilds the cluster’s collection of healthy targets.

Active

YARP can also actively monitor the health of the target servers. This is done by regularly sending requests to predefined state endpoints. This analysis is defined by an active health check policy set for a cluster. At the end, the policy is used to mark each target as healthy or unhealthy.

Unhealthy clusters are automatically blocked through the active and passive checks, and maintenance can be performed without adversely affecting the application.

Transformers

Transformers allow the proxy to modify parts of the request or response. This may be necessary, for example, to meet defined requirements of the target server. The original request object is not changed, only the proxy request. No analysis of the request body is done and no modification of the request and response body takes place. However, this can be achieved via additional middleware – if necessary. It is at this point, for example, where the API gateway Ocelot, which is also based on .NET, could show its strengths. It can perform conversions such as XML to JSON or merge several responses and is primarily aimed at .NET applications with a microservice or service-oriented architecture.

There are some transformers that are enabled by default. These include the protocol (X-Forwarded-Proto), the requested server (X-Forwarded-Host) and the origin IP (X-Forwarded-For).

Accordingly, the origin of the request is still known after the reverse proxy is routed in the back-end via the added header information – this is not the case with classic reverse proxies.

Authentication and authorisation

Authentication and authorisation are possible before forwarding. This allows consistent policies to be mapped across multiple services, eliminating the need to maintain the policies separately. In addition, it leads to a load reduction for the target systems. The authorisation policies are an ASP.NET Core concept. One policy is set per route and the rest is handled by the existing ASP.NET Core authentication and authorisation components.

The following procedures are supported by YARP:

  • Cookie, Bearer, API Keys
  • OAuth2, OpenIdConnect, WsFederation
  • Client certificates

Windows, Negotiate, NTLM and Kerberos authentication, on the other hand, are not supported, as these are usually bound to a specific connection.

Cross-Origin Resource Sharing – CORS

YARP can handle cross-origin requests before they are routed to the target server. This reduces the load on the target servers and ensures consistent policies.

Direct forwarding with IHttpForwarder

If the application does not require the full range of functions, just the IHttpForwarder can be used instead of the full feature set. It serves as a proxy adapter between incoming and outgoing connections.

In this case, the proxy takes over the creation of an HttpRequestMessage from an HttpContext, the sending and forwarding of the response.

The IHttpForwarder supports dynamic target selection, where one defines the target for each request.

Adjustments can be made to the request and response, where the body is excluded. And last but not least, the streaming protocols gRPC and WebSockets as well as error handling are supported.

This minimalistic version does not support routing, load balancing, session affinity and retries – but it does provide some performance benefits.

Outlook

For future releases, the team behind YARP is working on support for HTTP/3, Service Fabric, integration in Kubernetes and further performance improvements.

In addition, Microsoft is trying to develop LLHTTP (Low Level HTTP), an alternative to the current HttpClient, in order to have more control over how requests are made and processed. It is intended to be used especially in scenarios where performance is more important than ease of use. In YARP, it is to be used to gain more control over outgoing connections and for more efficient processing of headers.

Summary

The present article explained the basics of YARP and its extensive features. Using the knowledge gained and the multitude of good code examples in the YARP repository on GitHub, you can now assess whether the functionalities are sufficient for a given use case and create your own reverse proxy.

Since the toolkit is based on the ASP.NET Core stack, it can be run on any environment you have been using for your .NET Core projects.

With YARP, Microsoft delivers a fast and reliable next-generation reverse proxy that will be applied in many projects – not only those of Microsoft.

MAUI – More than an island

In May 2020, Microsoft released a new, unified UI platform for all systems under the resounding name MAUI or in full “. NET Multi-Platform App UI”, which is expected to be launched in November 2021. But what exactly is behind this name? This question is to be answered in this article. The platform will be presented, the technical background explained and, above all, the potential of the technology will be highlighted.

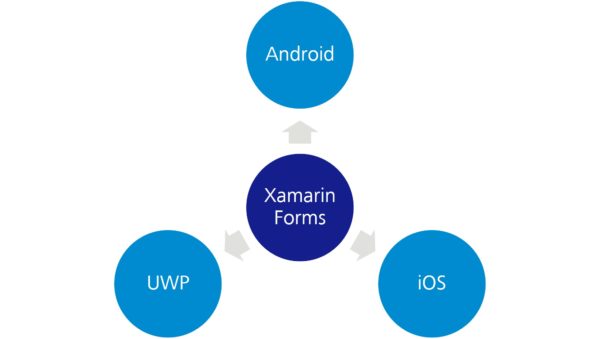
To understand MAUI as a platform, you need to know Xamarin. Xamarine (and in particular Xamarine.Forms is a platform for developing native apps for iOS, Android, and UWP with C#, XAML, and .NET. You can create an app from a code base for all supported operating systems. Thus, the development effort for different operating systems is significantly lower compared to the native coding of the applications. Currently, the various SPA frameworks for the browser are actually the only technology that offers comparable portability at a similar overall effort.

graphic explaining MAUI
Figure 1: Xamarin.Forms allows you to create native apps for all supported operating systems from a single code base. MAUI is the direct successor of Xamarin.Forms.

But what is this mysterious MAUI and what does it have to do with Xamarin? The answer to this question is quite simple: MAUI is the new Xamarin or, more precisely, its direct successor, which is shipped with .NET 6 for the first time.

Just like Xamarin.Forms, MAUI can create apps for all supported operating systems from a single project and with the same code base. Installation packages are generated from the code, which can then be installed on the different platforms. Officially, Microsoft supports Android from version 10, iOS, macOS and of course Windows, both natively and as UWP app. In addition, there will be a community implementation for Linux operating systems and an implementation for their Tizen platform provided by Samsung. The project and build system will be standardized for all platforms and the creation of the apps will be possible via both Visual Studio and the .NET CLI

Another feature will be the sharing of resources such as images or translations. These should be automatically converted by MAUI into the corresponding native formats and integrated into the created packages. You will also be able to access the APIs of the respective operating system at any time. For this purpose, there should be a special folder in the project, under which the native code hooks are stored and which are then automatically integrated into the package when compiling.

All functionalities available in the .NET standard, such as Dependency Injection, should also be able to be used for a MAUI app. By using C# and XAML it will also be possible to use corresponding design patterns such as the widely used MVVM pattern. Also new is the support for the Model View Update Pattern, a pattern borrowed from Elm, which is intended to be able to display a unidirectional data flow analogous to Redux. Also, Microsoft’s web-based client technology Blazor is to be supported.

Unfortunately, MAUI will not be officially available until the launch of .NET 6 in November 2021. In addition, parts of the framework have been moved to .NET 7 and thus to 2022. The official support for Blazor and the MVU pattern should be mentioned here. Since MAUI is the official successor of Xamarin, it will be supported with the release of .NET 6 for another year and then discontinued.

Microsoft’s strategy for the future of UI development with the .Net Framework seems clear: MAUI is the new “First Class Citizen” when it comes to creating native user interfaces.

At first it all sounds like Microsoft wants to integrate native cross-platform support into the .NET framework. However, this plan will only work if MAUI is accepted by the developers. Due to the very late release and a lot of excellent open-source alternatives such as Uno might not be able to establish MAUI in the end. At the moment, therefore, one can only wait and see what the future holds.

However, MAUI would actually have the potential to become the only UI technology in the .NET framework and eventually even replace WPF. It offers a variety of functionalities to increase productivity in development – “Write once, run everywhere” is the motto of the hour. This could significantly reduce costs and development time for apps on all supported platforms. Just imagine the joy of the customer if you could create not only a Windows application, but also the corresponding mobile apps for only a small amount of development effort. Of course, this is an idealized idea, the devil is in the detail as you know. Migration of existing WPF applications is difficult, for example, because the long-awaited XAML standard, which was supposed to define a standardization of elements and tags for all XAML dialects, has apparently been dropped and MAUI and WPF will not be able to be exchanged seamlessly due to different elements.

But if the technology actually delivers on its promises, developers deploy it widely, and MAUI becomes as high-class as Microsoft promises, a cross-platform revolution under .NET could be in the offing.

Building .NET Core Applications

Preamble

.NET Core is still a new technology and people might ask themselves questions like “how applicable is it in a real- life scenario?”, “how convenient is it to set up?”, “what do I need to configure, to get a build-pipeline up and ready?”, “do I need any tools aside from the official .NET Core SDK?” … therefore I want to share my gained experience while setting up and configuring a “Microsoft-friendly” build- controller and agent scenario. It is based on the regular Microsoft technologies including Team Foundation Server 2017 and Microsoft Windows VSTS build agent, both hosted on Microsoft Windows Server 2016.

Prerequisites

Build controller
• TFS 2017
Build agent
• VSTS-Agent win-7-x64-2.112.0
• .NET Core SDK 1.0.3 for Windows

Although it is not the cheapest way to implement a .NET Core build pipeline, it is also not the most expensive one, since we are not installing any Visual Studio stuff inside the build agent. And yes you arguably could host a vsts build agent inside a linux for example but that setup will be mentioned in a seperate blogpost. Alright lets not go any further into licence and pricing discussions and jump right to the technology part.

Set-Up

First of all you need to establish a controller-agent connection so all the neat build data is captured and processed correctly. There are 4 different ways how you can do it which are explained here:
See http://go.microsoft.com/fwlink/?LinkID=825113 for more detailed information.

After you are done with that, connect to Build-Agent-Host via remote desktop and download/install the .NET Core SDK.
See https://go.microsoft.com/fwlink/?linkid=847097 for more detailed Information.

Make sure that the dotnet.exe path is added to the PATH environment variable and you can call it from the cmd/powershell.
At this point you are pretty much done with your build agent configuration and you can jump right into your TFS source controlled .NET Core project and add a default .NET Core build definition.

Build configuration

If you are using the ASP.NET Core (Preview) build template to add a build definition, then you should follow these steps below.

After you added the build definition modify the single tasks according to your project root structure as it is shown below. Keep in mind that all the commands are seperate tools which are composed inside the .NET Core CLI Toolchain.

The restore command is mapped to the integrated NuGet, we use the verbosity flag to display the „used nuget feeds“ information.

The build command is mapped to integrated msbuild. The $(BuildConfiguration) variable gets replaced before the actual target gets executed on the build agent. It should either be replaced by „Debug“ or „Release“.

The test command is mapped to vstest.console or to xunit.console depending on your configuration.

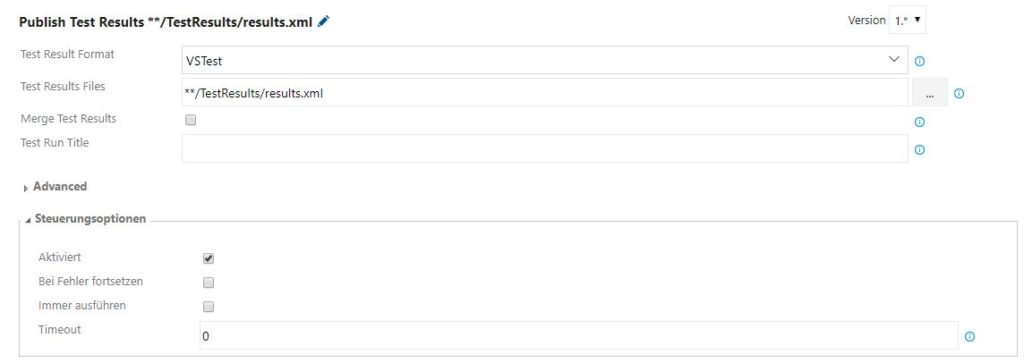
Notice that the test command requires an extra logger parameter in case you want to capture and print test for publishing reasons. Now you need to add the „Publish Test Results“ step and configure the path wildcards/naming in a way that it grabs the results.xml file produced by your vstest.console logger.

After you queued up and finished your build you should get a report which should look similar to the one below.

Conclusion

So at the current .NET Core SDK and TFS state, there are still minor configurations required to get your pipeline going. Regardless, the installation effort is very minimal and intuitiv in my opinion and the alternative to host a .NET application on a Linux OS instead of Windows should make a ton of people happy! So give it a try ????.

Building .NET Core Applications and enjoy it!