A large part of the apps we use regularly provide individual data and services for different users and therefore need to be able to clearly identify their users.
The classic approach here would be to build a login form and manage it with its own user database, but this can have some disadvantages. This article presents the alternative approach with the protocols “OAuth” and “OpenID Connect”, which were developed for the purpose of secure authentication and authorisation.

Disadvantages of the classic login forms
The classic variant of user authentication described at the beginning has some disadvantages:
Security
Building security-critical functions yourself is always associated with a certain risk. With passwords, for example, it is not enough to simply store hash values. Because the passwords must be secure even if the worst-case scenario occurs and the database falls into the hands of hackers. Special procedures are available for this, but they must also be implemented correctly. In case of doubt, it is therefore generally better to rely on established and expert-reviewed free products than to copy them yourself.
Effort
A simple login mask is not enough. Other processes such as registration, changing a password, forgetting a password, etc. must also be considered and implemented. And, of course, there are also best practices here, for example with regard to usability, which should be taken into account. The effort required to implement all these aspects in a high quality should not be underestimated.
Two-factor authentication
To further increase security, users should be given the option to use a second factor for login. This can be, for example, a one-time code sent by SMS or generated by an Authenticator App. But hardware tokens are also popular. This increases security enormously, as it is no longer sufficient to guess the password. Instead, attackers must additionally be in possession of the smartphone or hardware token. However, implementing these additional security features oneself is not only error-prone, but, see previous point, also labour-intensive.
Central account management
Especially in a corporate context, it is often an important requirement that account information can be used from a central administration (e.g. LDAP, Active Directory). If employees have a company account anyway, why should they create an additional account with (hopefully) an individual password for each company-internal application? The possibility for Single-Sign-On additionally increases user comfort. And even outside the corporate context, many people do not want to create a separate account and remember the access data for every app and every website, but prefer to use a central identity provider.
“OAuth” and “OpenID Connect” as a solution approach
With the “OAuth” and “OpenIDConnect” protocols, two protocols are available that were developed precisely for this purpose.
In practice, however, the actual implementation of these standards usually presents a certain hurdle, especially when one comes into contact with these procedures for the first time. On the one hand, this is due to the fact that the processes are somewhat more complex than a simple adjustment with a stored password hash. Another reason might be that the standards provide for several variants (so-called flows) that are used in different situations. As a newcomer, one is quickly confronted with the question of which variant is best for one’s own application and how it should then be implemented in concrete terms. The answer to this question depends in particular on the type of application, i.e. whether it is a native mobile app, a classic server-side rendered web application or a Single-Page App, for example.
In this article, we do not want to go into too much depth about the two protocols (if you want to learn more about OAuth and OpenID Connect, we recommend this very good lecture on Youtube: https://www.youtube.com/watch?v=996OiexHze0).
Instead, we want to pick out a concrete use case that occurs relatively often in our projects: we build a Single-Page-App (SPA) that is delivered statically. This means that there is no frontend logic on the server, only JavaScript and HTML files are provided. Instead, the server simply provides an API for use by the SPA (and other clients) to fetch data and perform operations. This API could be implemented using REST or GraphQL.
As usual with OAuth, a separate authentication service is used here, so we do not want to implement the user management ourselves. This could be a cloud provider or self-hosted software, for example the free open-source authentication server “Keycloak”. The only important thing is that the authentication service “speaks” OAuth2/OpenID Connect.
The exciting thing about this constellation is that, unlike with a server-side processed web frontend, authentication initially takes place outside the sphere of influence of the server (i.e. purely client-side in the SPA or in the user’s browser). However, the SPA must then send requests against the server API, whereby the server must first mistrust the credibility of the requests and check the authentication again independently.
Working with OAuth: Implicit Flow and Authorisation Code Flow
The OAuth specification specifies several flows, but for our purpose we will only take a closer look at two: The so-called “Implicit Flow” and the “Authorisation Code Flow”. Ultimately, both variants involve the Auth Provider issuing a so-called “Access Token” to the application, which the application then sends to the API server with all requests. The API server, in turn, can use the Access Token to determine the authenticity of the request. The only difference between the flows is how exactly the Access Token is issued.
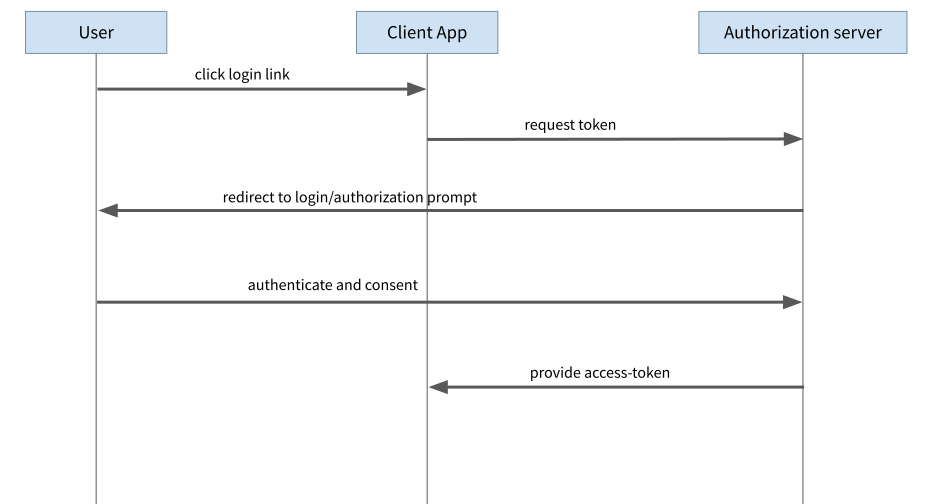
For years, the ImplicitFlow was the recommendation for use in JavaScript applications in the browser. First, the application forwards the user to a login page of the Auth Provider. Once the user has logged in, the Auth Provider redirects the browser back to the original page and passes the Access Token to the application as part of the response. However, this is exactly where the problems lie with this variant. It is possible for an attacker to obtain the Access Token in various ways, for example by manipulating the redirects so that the Access Token is no longer sent to the actual app but to the attacker.

From the beginning, the Implicit Flow was an emergency solution for JavaScript applications in the browser. At the time of standardisation, there was no possibility for browser scripts to execute requests on servers other than their own (so-called Same-Origin Policy). This meant that the execution of the actually better Authorisation Code Flow was not possible. In the meantime, a system has been introduced with the so-called CORS mechanism (for Cross-Origin Resource Sharing), which closes precisely this gap and allows requests to be made to other servers, as long as they allow access.
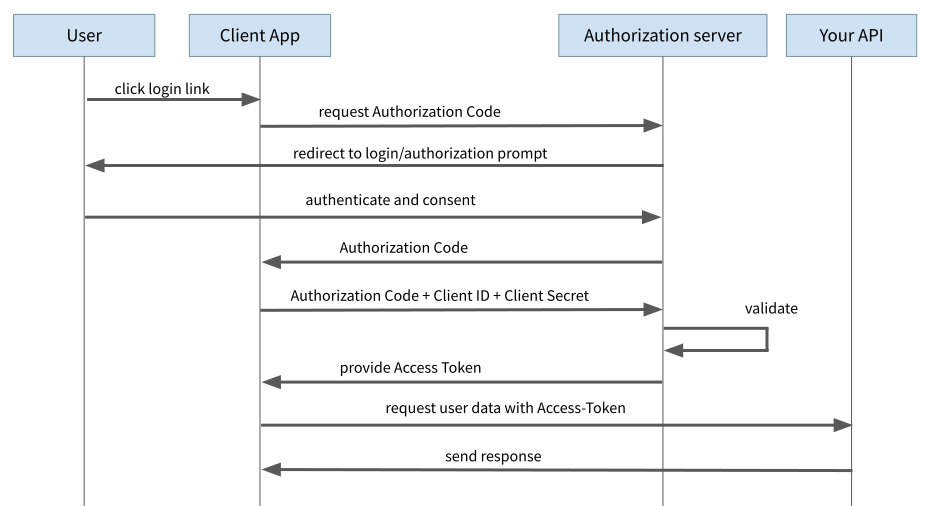
With the AuthorisationCodeFlow, there is also a redirect to the login page of the Auth Provider. Instead of an Access Token, however, the Auth Provider only sends a so-called “Authorisation Code” to the client. In a separate request, this Authorisation Code must be sent to the Auth Provider together with the “Client ID” and the “Client Secret” and exchanged for the Access Token. The Client ID identifies the client (in our case the Single-Page App) and enables the Auth Server to apply different rules for different clients. The Client ID is in principle publicly known and appears in some apps/services as part of the URL.
The Client Secret, on the other hand, is a secret code that only this one client is allowed to use to identify itself to the Auth Server (we will come back to this in a moment). The crucial point here is that this second request is not implemented as a GET request but as a POST request. This means that the transmitted information is not part of the URL and is protected from the eyes of hackers by means of HTTPS (which of course must be used).

The Problem with the Browser-based Single-Page-App
Actually, this flow is primarily intended for server-side rendered web applications, so that the exchange of the authorisation code for the access token takes place on the server. In that case, the client secret in particular can remain on the server side and does not have to be transmitted to the browser.
With single-page apps, however, the entire process has to take place in the browser and therefore the app also needs the client secret. The difficulty is therefore to keep the client secret “secret”. In practice, this turns out to be practically impossible, because ultimately the client secret must be bundled as part of the application code and delivered to the browser.
Bundling in modern SPA frameworks produces unreadable JavaScript code, but it remains JavaScript and an attacker could look at this code, extract the client secret and thus compromise the application. The solution to this is “PKCE”.
Authorization Code Flow with PKCE
PKCE stands for “Proof Key for Code Exchange” and is an extension of the authorisation code flow. Here, no static client secret is used and instead, in principle, a new secret is generated dynamically for each authentication process.
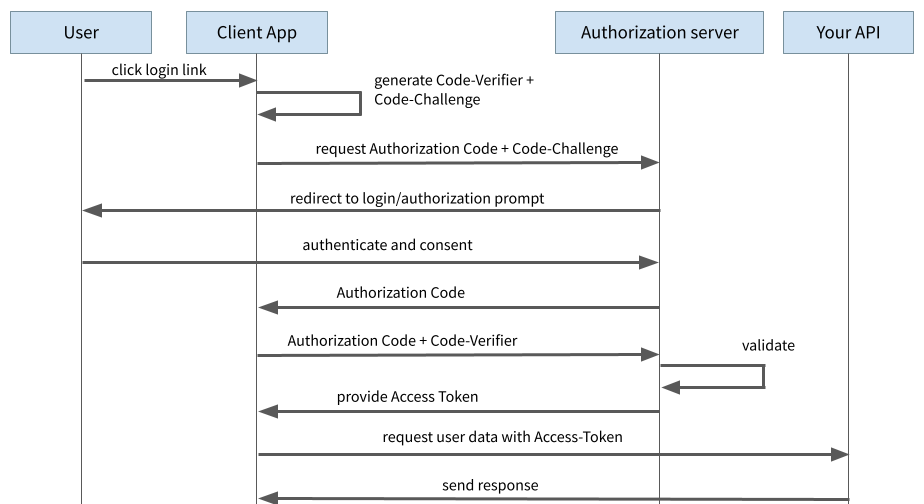
For this purpose, a so-called “code verifier” is generated at the very beginning. This is a string of random numbers. The code verifier is used to calculate the “code challenge” by hashing the code verifier with the SHA256 hash method.
During the initial login process to request the authorisation code, the application sends the code challenge to the auth provider. The auth provider remembers the code challenge and responds with the authorisation code as before.

With the subsequent request for the exchange of the Authorisation Code against the Access Token, the client now sends the Code Verifier along. The Auth Provider can now check whether the Code Verifier and the Code Challenge match by hashing with SHA256.
With this procedure, an attacker can no longer extract the Client Secret, since no such Client Secret exists anymore. The most an attacker could do from the outside would be to pick up the Code Challenge, as this is transmitted to the Auth Provider via a browser redirect during the initial request. However, the attacker has no knowledge of the Code Verifier and cannot derive it from the Code Challenge. Without the Code Verifier, the Auth Provider does not issue an Access Token, which successfully blocks an attacker.
Originally, the PKCE procedure was developed primarily for native mobile apps, but it can also be used to securely implement Single-Page Apps that are publicly visible in the source code. And not only that: the procedure is now even recommended for other types of applications, such as server-side applications, for which the normal Authorisation Code Flow with Client Secret was previously intended.
PKCE in detail
Since Authorisation Code Flow with PKCE is the method of choice for Single-Page Apps, let’s take a closer look at the individual steps.
- Code Verifier and Code Challenge
First, the Code Verifier and Code Challenge are calculated:
const code_verifier = "fkljl34l5jksdlf" // generate random string
const code_challenge = sha256(code_verifier)
In this and the following examples, I use truncated random values to better represent the individual steps and parameters. In a real application, of course, real random values must be generated here.
However, random values in a security context are a topic of their own and therefore we do not want to go into detail here about how exactly the Code Verifier is generated. As a keyword, however, the relatively new Web Crypto API should be mentioned, which among other things provides functions for generating secure random numbers. The Web Crypto API also provides the right tools for hashing using SHA256.
- Request Token
Now a redirect or GET request is executed to obtain the Authorisation Code:
GET <auth-server>/openid-connect/auth?
& response_type=code
& client_id=oauth-demo
& scope=openid
& state=hkjshkdwe
& redirect_uri=https://<app-url>/callback
& code_challenge=shkjhek34hk2lhkds
& code_challenge_method=S256
The Code Challenge and the method used to calculate the Code Challenge (in our case SHA256) are included in the request.
In addition, a so-called “state” parameter is given, which also consists of a random value. We will discuss this in more detail in a moment.
- Login and Redirect
The browser is redirected to the login page at the Auth Provider, where the user can log in and authorise the app. The Auth Provider then redirects back to the app using the “request_uri” parameter passed in the first request. As a rule, one or more valid redirect URIs are configured in the Auth Provider to prevent an attacker from manipulating the request and trying to impose a forged redirect URI.
The redirect URI must of course be configured in the router of the Single-Page App and accept the parameters that the Auth Provider wants to communicate to the client. The request for this looks something like this:
https://<app-url>/callback?
& code=jehrejkjhsad223ndskj2
& state=hkjshkdwe
The Authorisation Code is a token that we want to exchange for the actual Access Token in the next step (again, I would like to point out that I am using made-up and abbreviated random values here for the sake of simplicity. A real Authorisation Code looks different).
In addition, the state parameter appears again. We generated this as a random value in the previous step and sent it to the Auth Provider. The Auth Provider sends the state back unchanged. In this way, our Client App can find out whether the Response Request actually follows its own Token Request or not. Should an attacker have initiated a Token Request, the corresponding state parameter would be unknown to the app and the request would be directly exposed as insecure. This procedure protects especially against so-called CSRF attacks (Cross Site Request Forgery, further explanation here: https://security.stackexchange.com/questions/20187/oauth2-cross-site-request-forgery-and-stateparameter).
- Exchange Code for Access Token
Now we can exchange our Authorisation Code for the actual Access Token. To do this, we start a POST request:
POST <auth-server>/openid-connect/auth/token?
& grant_type=authorization_code
& code=jehrejkjhsad223ndskj2
& client_id=oauth-demo
& redirect_uri=https://<app-url>/callback
& code_verifier=fkljl34l5jksdlf
We pass the Authorisation Code and the Code Verifier as parameters. As a response, we finally receive the Access Token, which we can then use for requests against the API server. The answer looks something like this:
HTTP/1.1 200 OK
Content-Type: application/json
{
"access_token": "<jwt token>",
"token_type": "bearer",
"expires_in": 3600,
"refresh_token": "<jwt token>",
"scope": "tasks"
}
We receive the Access Token and some further information about the token.
What exactly does an Access Token look like? The “JSON Web Token” standard, or JWT for short, has established itself as the format. This not only enables the standardised exchange of authentication/authorisation data, but also the verification of the tokens. Both symmetrical and asymmetrical verification is available for confirmation. This allows our API server to check the validity of the Access Tokens without having to contact the Auth Provider for each request.
Increase user-friendliness with the Refresh Token
Another aspect of OAuth are so-called “Refresh Tokens”. In the previous example, we received such a token together with the Access Token. The idea is to keep the validity of Access Tokens as short as possible (in the range of a few minutes to a few hours). When the Access Token expires, it must be renewed. This has the advantage that any compromised access tokens can only cause limited damage. In addition, with OAuth, users have the possibility to cancel their authorisation, i.e. for example to revoke the authorisation of an app to access their own data at the Auth Provider. Since the API server does not communicate with the Auth Provider to verify Access Tokens, the API server is not aware of this revocation of rights.
However, as soon as the old Access Token has expired and a new one has to be obtained, the new authorisations take effect. However, for reasons of convenience, you do not want to ask your users to log in again every few minutes. For this reason, the Auth Provider transmits a longer valid Refresh Token. This is stored in the Client App and used when the Access Token expires to get a new Access Token from the Auth Provider. In this case, the Auth Provider does not request a new login from the user. However, if the user has previously revoked the authorisation for the app, the Auth Provider will no longer issue new Access Tokens. It is important to note that the Refresh Token is even more valuable than the Access Token and must therefore be protected from access by unauthorised third parties at all costs!
Conclusion
OAuth is an exciting protocol that can securely solve most questions around authentication and authorisation. However, the topic is not exactly beginner-friendly and at the beginning the many terms and processes can quickly overwhelm you.
Once you have finally got to grips with the subject, the question of implementation arises. Especially for Single-Page Applications, there are still many instructions on the web that refer to the Implicit Flow, which is no longer recommended. With PKCE, however, an extension is available that also enables the better Authorisation Code Flow for JavaScript applications.
Numerous libraries exist to simplify the implementation. On the one hand, cloud providers who use OAuth often offer their own help libraries. However, it is also recommended to take a look at the library “OIDC-Client” (https://github.com/IdentityModel/oidc-client-js), which offers a provider-independent solution. In addition to pure OAuth, this library also supports the extension “OpenID Connect”, which supplements OAuth with functions for user profiles and authentication. The library does abstract the individual steps of the OAuth flows, so that one no longer has to “struggle” with the individual requests and their parameters. However, a certain basic understanding of the processes is still useful and helps in the sensible use of the library.