In the second part, we saw how a mock framework (in this case Moq) can be used to modify an application in such a way that certain interfaces are mocked for testing and thus cannot deliver errors.
In this part we will create a self-programmed mock application and will access it with our hero database. For this we use “Docker for Windows”, which can be used since Windows 10. Before Windows 10 you had to use Hyper-V, for example to simulate a Linux machine on which you could run containers via docker. With the latest operating system from Microsoft, this procedure is also possible on Windows. You can download and install the latest version at Docs.docker.com. The downloaded installer prepares the system for Docker.
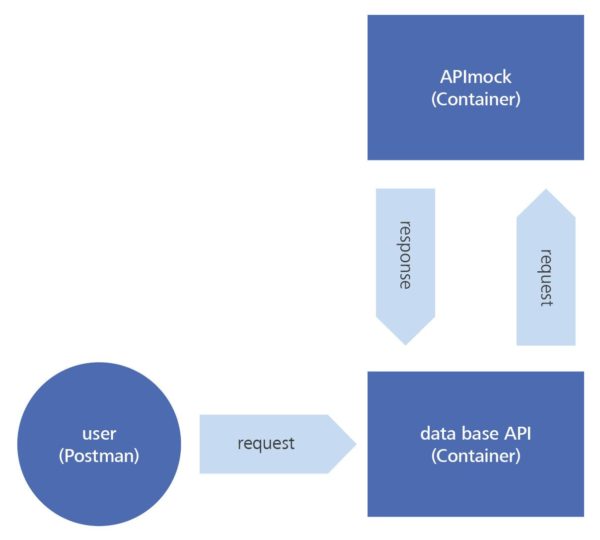
With Docker we start our hero database – as well as the APImock application that we will be building shortly. With the Postman we will then make a POST request that runs in the APImock via the hero database.
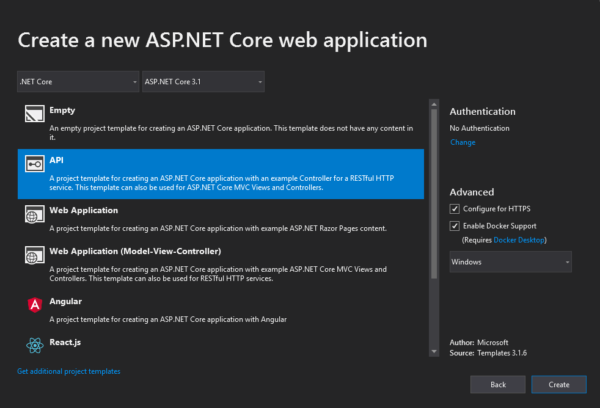
Visual Studio has an extension that enables support of Docker. When creating a new project we can check the box in the template window to combine the project with Docker for Windows. We also use the Web API template to avoid having to create a completely new project.
When the project is loaded, an image is directly created in Docker. Each time the project is built, the image is updated in Docker.
We can now run the Docker commands at the same time in Windows PowerShell to get our current images.
PS C:\Users\neco.giedrojc> docker images
REPOSITORY                    TAG            IMAGE ID            CREATED             SIZE
apimock                    	dev             c64f4ccd31cd        2 days ago          1.13GB
herodatabase                   dev             5feaebecd325        2 days ago          13.3GB
The images can be uploaded to a repository similar to GitHub for version control and access from multiple workstations. To do this, modify the image tag to match the repository name and upload it using the push command.
PS C:\Users\neco.giedrojc> docker  tag   5feaebecd325  tester_user/herodatabase
PS C:\Users\neco.giedrojc> docker  push  tester_user/herodatabase
The push refers to repository [docker.io/tester_user/herodatabase]
6d8d18d60d45: Pushed
89d570a16fde: Pushed
c18c4a07904a: Pushed
latest: digest: sha256:d37cf6481f52a72e1b760f98824ceefc758a7ab2924759d6881db9ef444f9db2 size: 1565
PS C:\Users\neco.giedrojc>
Since the Web API template was used, the four standard REST commands (GET, POST, DELETE, PUT) are already pre-generated in the controller class. We delete all functions except POST, because this is supposed to be a “trivial function” for the mock.
[Route("api/items")]
[HttpPost]
public String PostMock([FromBody]String itemHero)
{
    String algo = "sword";
    /**
    * here should be a function which calls an algorithm.
    * but this is just a mock so one hardcoded line is enough
    */

    return algo;
}
So now we have an application that has only one function and does not do anything else. The basic idea for this interface is that the database API sends the hero name to this application to get the item configuration for that hero. This means that the PostMock() function is executed on a POST request and the supplied hero name would use the algorithm for the request. However, here instead of an algorithm a fixed string is used, which always returns the same answer to each request. This ensures that no errors will come from the new application. This also ensures that this interface works as desired.
[Route("api/hero/Mockitems")]
[HttpPost]
public async System.Threading.Tasks.Task<String> MockCallAsync([FromBody]String heroname)
{
    using (var client = new Webclient())
    {
        var values = new NameValueCollection();
        values["name"]= heroname;

        var response = client.UploadeValues("http://localhost:7266/api/items", values)

        var responseString = Encoding.Default.GetString(response);

        return reponseString;
    }
}
In the hero database API a POST function has been implemented which forwards the request for the hero name to the APImock. For this purpose the WebClient class is used, which is filled with a string (hero name). This is then forwarded via the function of the class UploadValues().
Both applications are now ready and can be started in Visual Studio via the docker button. As soon as both applications are started, you can view the currently running containers via the PowerShell. With the docker command “docker ps” we also get to know the port the containers are running on.
PS C:\WINDOWS\system32> docker ps
CONTAINER ID        IMAGE                                 CREATED                STATUS                     PORT
2aa75e039429        herodatabase:dev        7 minutes ago       Up 6 minutes        0.0.0.0:23337
f3ae2ca8c6d0         apimock:dev                         10 minutes ago      Up 10 minutes      0.0.0.0:7266
If we now make a request with the postman to the route “api/Heroes/MockItems” of the Heroes Database API, it is forwarded to the APImock and we see the answer for the hero “Maria”.
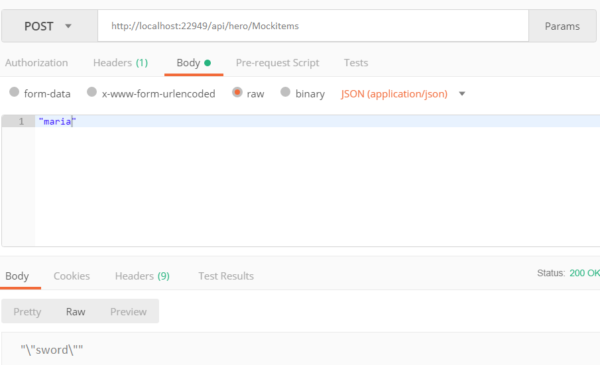
The unmocked application would in this case list the appropriate equipment for the hero “Maria”. However, since this is a mock, the return string “sword” matches the fixed variable we set.
So now you can test all functions that use the interface to the APImock without expecting errors from the APImock.
Now we have seen three different ways of using mocks:
- The framework Moq, which is used to create Mock objects within the application
- API tools (Postman), which are a kind of mock for the frontend
- A self-written application that serves as a mock
I hope I could give you a little insight into the world of mocks.