In the first part the basics of the mock and the example project were presented. In the second part we build a mock that interactively tests our Rest-Service application.
Now the question comes up: “Why should I use a mock in this example?” After all, it’s a simple, straightforward application. However, we must remember that we want to test the standard functionality of the API. When we execute a GET or POST command, the rest of the service takes the complete path to the database to access the data already stored. This is where the mock comes into play. The access to the database is simulated by the mock. This ensures that if an error is found, it has nothing to do with the access to the database, but with the area in which we performed the test. This would be an example of the application area. Another would be the access from outside to the API. Normally such an API would have a frontend for entering the information. However, since we know the paths into which the data is fed, we can use an API tool that simulates the frontend and sends specific data to the API.
In this part I will talk about the mock framework “Moq” and the API test tool “Postman”.
Moq is a small and simple mock framework for .Net or C#. There are several frameworks (NSubstitute, Rhino Mocks, etc …) but they are usually quite complicated to use. Moq stands out in the sense that it uses a simple syntax and is perfectly adequate for most applications. The Moq framework package can be easily downloaded from Visual Studio with the nuget tool and directly included in the source code.
using System.Net.Http;
using Moq;
using NUnit.Framework;
Here the simple structure of a unit test. We create a new hero list, which gets its data from the database. With this information we can create the service which is consumed by the API. We call up the fourth hero we have stored. In this case it would be “Maria”.
[Test]
  public void TestMethodwithoutMoq()
{
    //Arrange (Create)
   Herolist h_list = new Herolist();
   var heroAPI = new HeroService(h_list);
   string shouldBe = „Maria“;
   //Act (Test)
   var result = heroAPI.GetHeroName(4);
   //Assert (Verify)
   Assert.That(result,Is.EqualTo(shouldBe),“Is Not as Aspected“);
   }

[Route(„api/hero/{number}“)]
[HttpGet]
public string GetHeroName(int number)
{
   Hero hero = heroAPI.GetHero(number)
   Return hero.name;
}
Now we take the already existing structure and replace the hero list with a mock. This way we no longer use the data stored in the database and have separated the application from the database for the time being. This setup guarantees that no errors from the database connection will interfere with the test.
[Test]
public void TestMethodwithMoq()
{
    Hero mockHero = new Hero()
{
    name = „Detlef“,
    class = „Wizard“,
    age = 40,
    level = 14
};
//Arrange (Create)
var moqHerolist = new Mock();
moqHerolist.Setup(x => x.GetHero(It.IsAny()))
    .Returns(() => mockHero);

var heroapi_mock = new HeldenAPI(moqHerolist.Object);
var shouldBe = „Detlef“;
//Act (Test)
var result = heroapi_mock.GetHeroName(It.IsAny());
//Assert (Verify)
Assert.That(result, Is.EqualTo(shouldBe), „Is Not as Aspectet“);
}
If the Moq framework is integrated, you can use the class “Mock”. When using the class, you specify which class should be simulated. The next step is to configure the mock with the setup() function. We specify that no matter which hero is asked for (It.IsAny), the mockHero (Detlef) will always be output. If we would not configure the mock, it would take a default value as integer when calling the GetHeroName() function. This is usually “0”. But since no data is fetched from the database, it would return an error.
The Moq framework can be used to test the functionality the API calls within your application. However, when calling the API directly, it reaches its limits. This is where the API tool “Postman” comes into play.
“Postman” can be installed as a separate application or used as a chrome plugin. It is equipped with most REST commands (GET, POST, PUT, etc…) and has an easy to use interface. It is possible to write test cases that run during the REST commands and work with the sent or received data. So, we build a mock with it, which simulates the frontend.
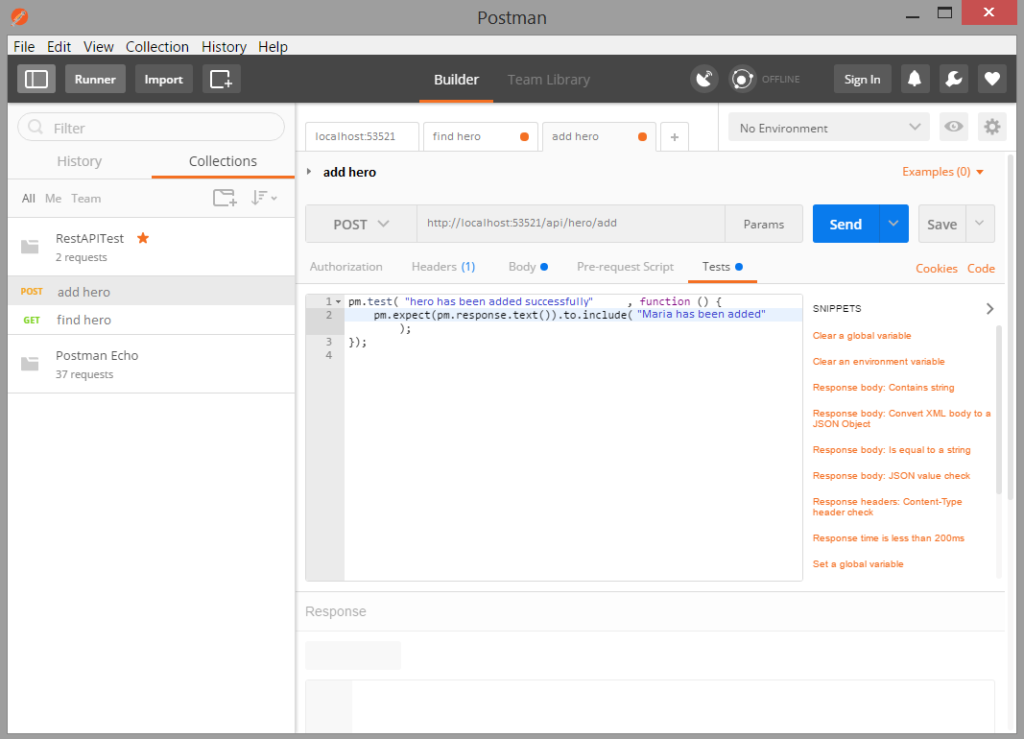
You can create “Collections” to store the REST commands we used in the last part. With the POST command we stored the heroine Maria via the API. Now we added a test case which checks the response text we got back from the API. In a positive case we get back that the desired hero has been added. In a negative case we would get another message and the Test-case would return Failed.
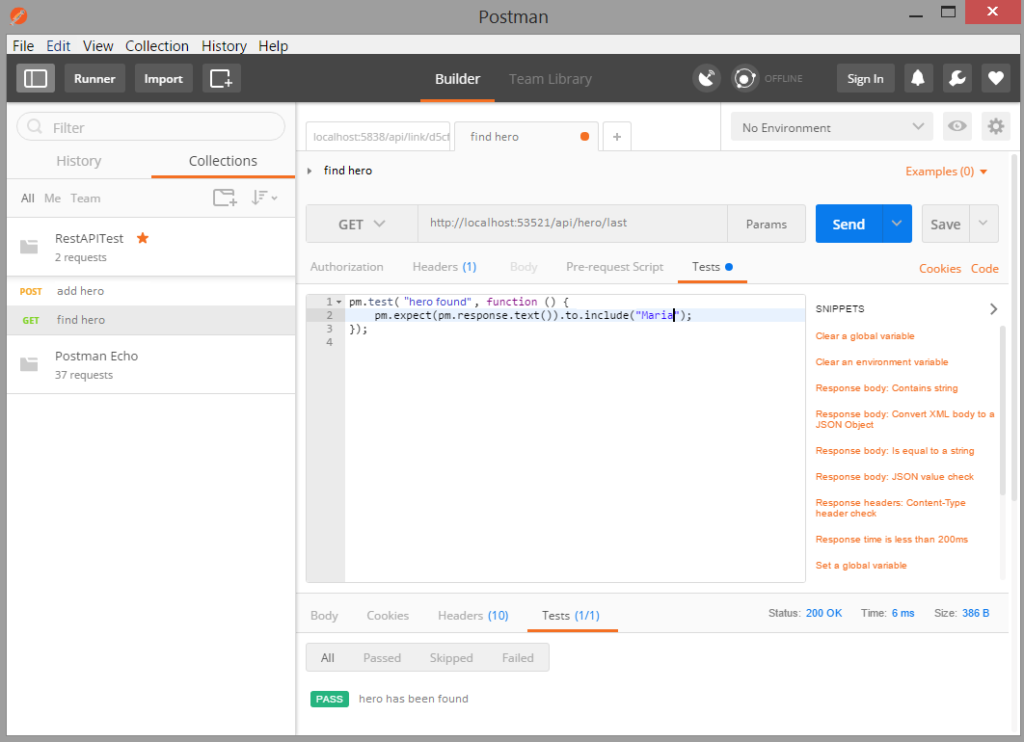
We also add the query for the last added hero to our “Collection”. You can add many more queries with your own test cases to the “Collection”, but for our example these two are sufficient. Now it is possible to start the complete “Collection”. The “Postman” will then call all REST commands one after the other and go through their stored Test Cases. So, we get such a result in the end:
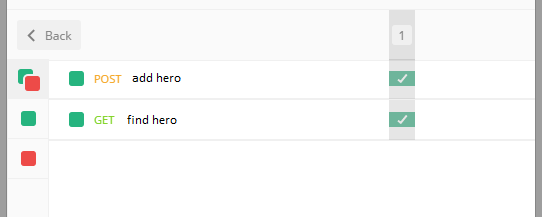
We can see now that the access from outside, to the API works.
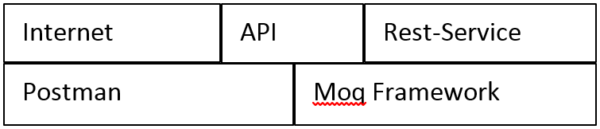
With these examples we see that with the Moq framework the application behind the API can be easily tested. The “Postman” on the other hand makes it easier to test the API from the Internet.
In the next part we will continue to deal with this topic. We will build a small test environment in Docker where the Rest service will be built with the database, and a self-written mock application will continuously try to access the Rest API. This variant could also be used as a load test later on.
This was Mocks in the test environment. An here you’ll find part 3.