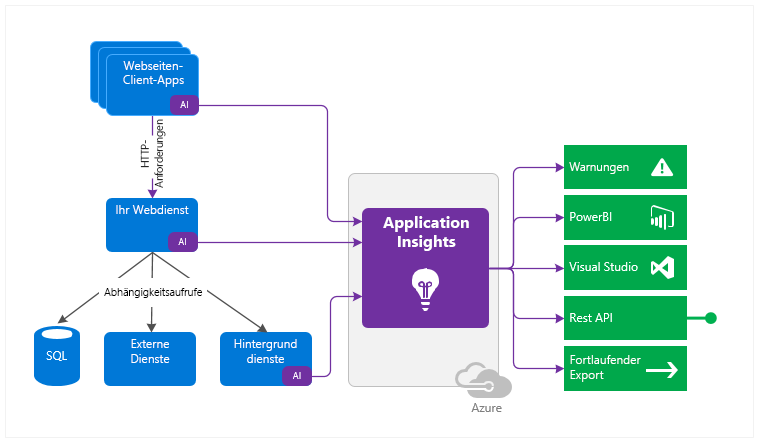
With Application Insights, Microsoft provides an application monitoring service for development and DevOps. It can log virtually everything, from response times and rates to errors and exceptions, page impressions, users and user sessions, the back end, and desktop applications.
Monitoring is not restricted to websites, either. Application Insights can also be used with web services and in the back end. It can even monitor desktop applications. The data can then be analyzed and interpreted in various ways (see Figure 1).
Logging
As a starting point, you need an Azure subscription with an Application Insights instance. Once the latter has been set up, you will find the so-called Instrumentation Key in the overview, which functions as a connection string.
As soon as the instance has been provided, you can immediately start the implementation. In terms of programming, you are in no way limited to Azure resources or .Net. Microsoft supports a wide variety of languages and platforms.
We will use a small .Net Core console application as an example. All you have to do is integrate the NuGet package Microsoft.Applicationlnsights, and you can get started.
First, you create a Telemetry Client. Simply insert the corresponding Instrumentation Key from your own Application Insights instance, and just like that, the application is ready for the first log entries.
- Trace generates a simple trace log entry with a corresponding message and appropriate severity level.
- Events are appropriate for structured logs that can contain both text and numerical values.
Metrics, on the other hand, are numerical values only, and therefore used mainly to log periodic events.
- Trace generates a simple trace log entry with a corresponding message and appropriate severity level.
- Events are appropriate for structured logs that can contain both text and numerical values.
- Metrics, on the other hand, are numerical values only, and therefore used mainly to log periodic events.
static void Main(string[] args)
{
Console.WriteLine("Schau mir in die Augen");

       var config = TelemetryConfiguration.CreateDefault();
       config.InstrumentationKey = "INSTRUMENTATIONKEY";
       var tc = new TelemetryClient(config);

       // Track traces
       tc.TrackTrace("BlogTrace", SeverityLevel.Information);

       // Track custom events
       var et = new EventTelemetry();
       et.Name = "BlogEvent";
       et.Properties.Add("Source", "console");
       et.Properties.Add("Context", "Schau mir in die Augen");
       tc.TrackEvent(et);

       // Track custom metric
       var mt = new MetricTelemetry();
       mt.Name = "BlogMetric";
       mt.Sum = new Random().Next(1,100);
       tc.TrackMetric(mt);

       tc.Flush();
}
As a side note, keep in mind that log entries appear in Application Insights with a delay of up to five minutes.
Interaction with NLog
Application Insights can also be integrated into an existing NLog configuration in a few simple steps.
You have to install the NuGet package Microsoft.Applicationlnsights.NLogTarget, and then add the following entries to the NLog configuration:
- Add Extensions with reference to the Application Insights Assembly
- New target of the Application Insights Target type (again specifying your own instrumentation key)
- New rule targeting the Application Insights Target
<nlog xmlns="http://www.nlog-project.org/schemas/NLog.xsd"
      xmlns:xsi="http://www.w3.org/2001/XMLSchema-instance"
      throwConfigExceptions="true">

  <extensions>
    <add assembly="Microsoft.ApplicationInsights.NLogTarget" />
  </extensions>

  <targets>
    <target name="logfile" xsi:type="File" fileName="log.txt" />
    <target name="logconsole" xsi:type="Console" />
    <target xsi:type="ApplicationInsightsTarget" name="aiTarget">
      <instrumentationKey>INSTRUMENTATIONKEY</instrumentationKey>
      <contextproperty name="threadid" layout="${threadid}" />
    </target>
  </targets>

  <rules>
    <logger name="*" minlevel="Info" writeTo="logconsole" />
    <logger name="*" minlevel="Debug" writeTo="logfile" />
    <logger name="*" minlevel="Trace" writeTo="aiTarget" />
  </rules>
</nlog>
Analysis
The data are then analyzed by means of the Application Insights portal. All the logs can subsequently be found in the respective table under Logs (see Figure 2).
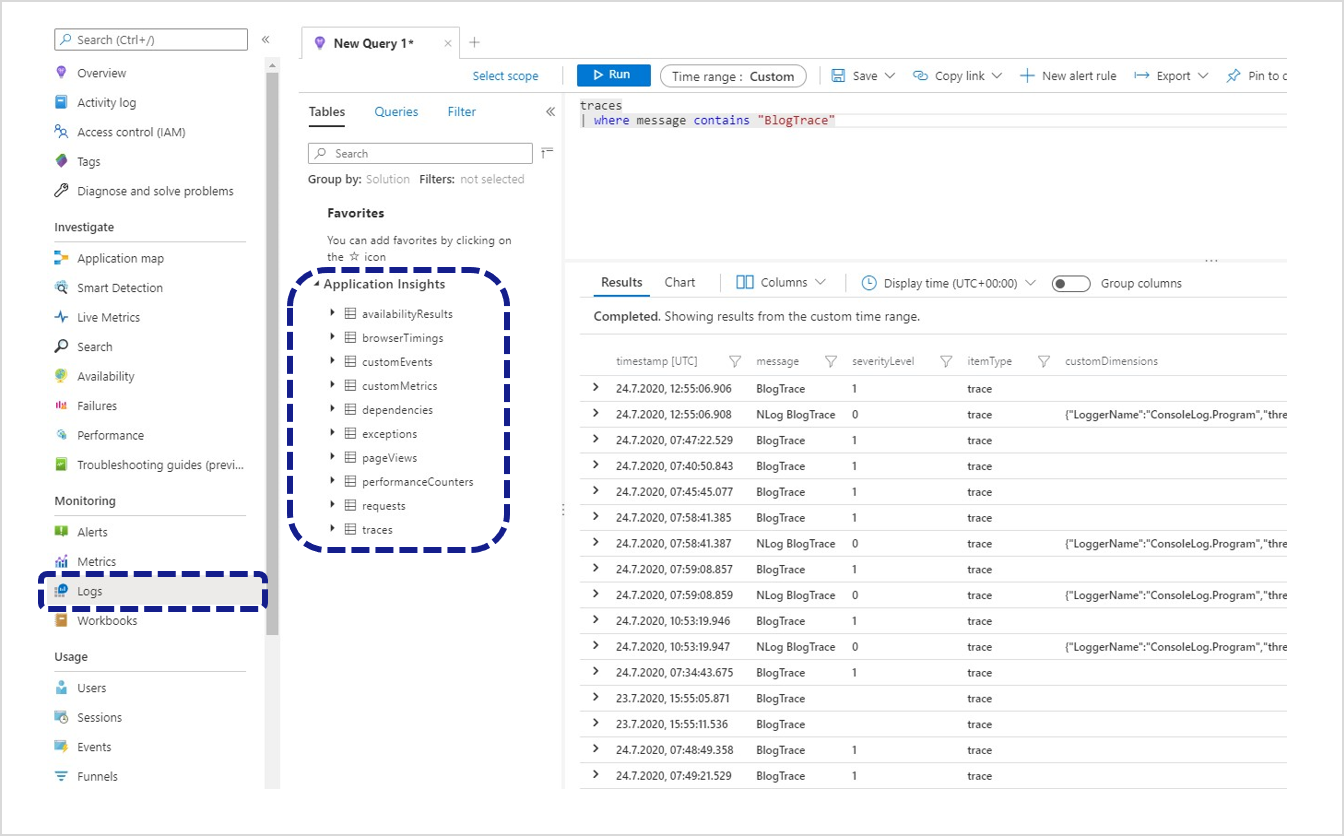
The trace logs created in the console application can be found in the traces table. Queries are phrased using the Kusto Query Language (KQL). The traces from the example above can be requested using the following query:
traces
| where message contains "BlogTrace"
The logged metrics can also be represented as a line chart using the following query (see Figure 3):
customMetrics
| where timestamp >= ago(12h)
| where name contains "Blog"
| render timechart 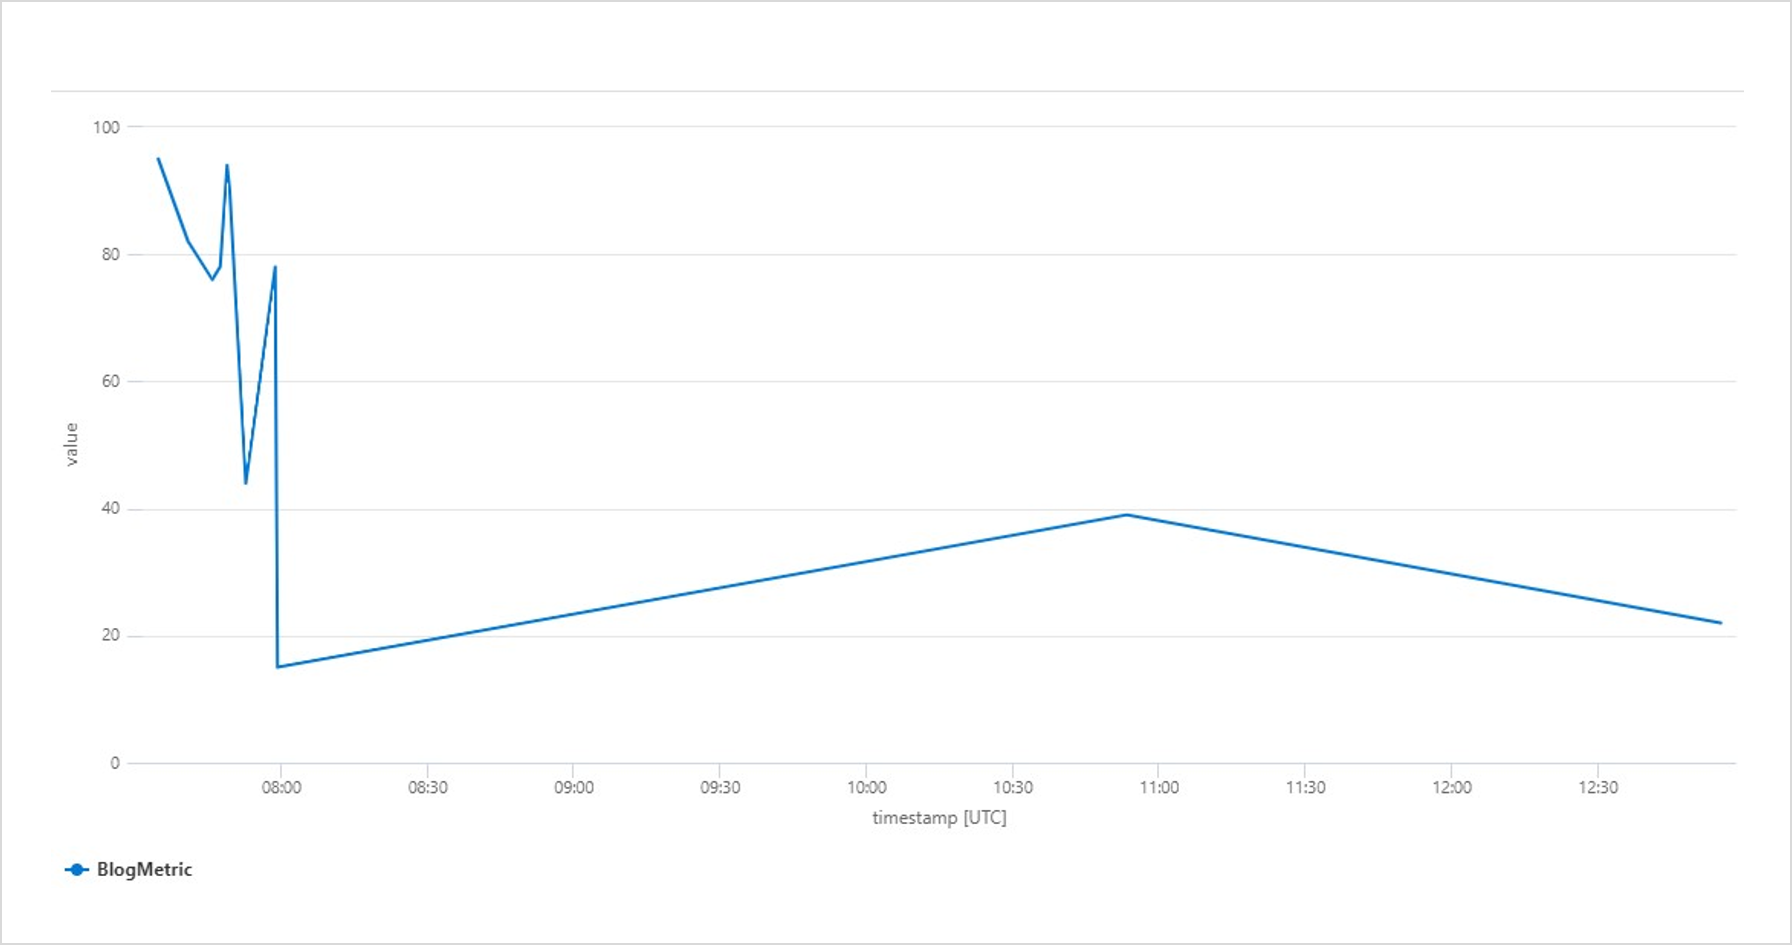
Dashboards & alert rules
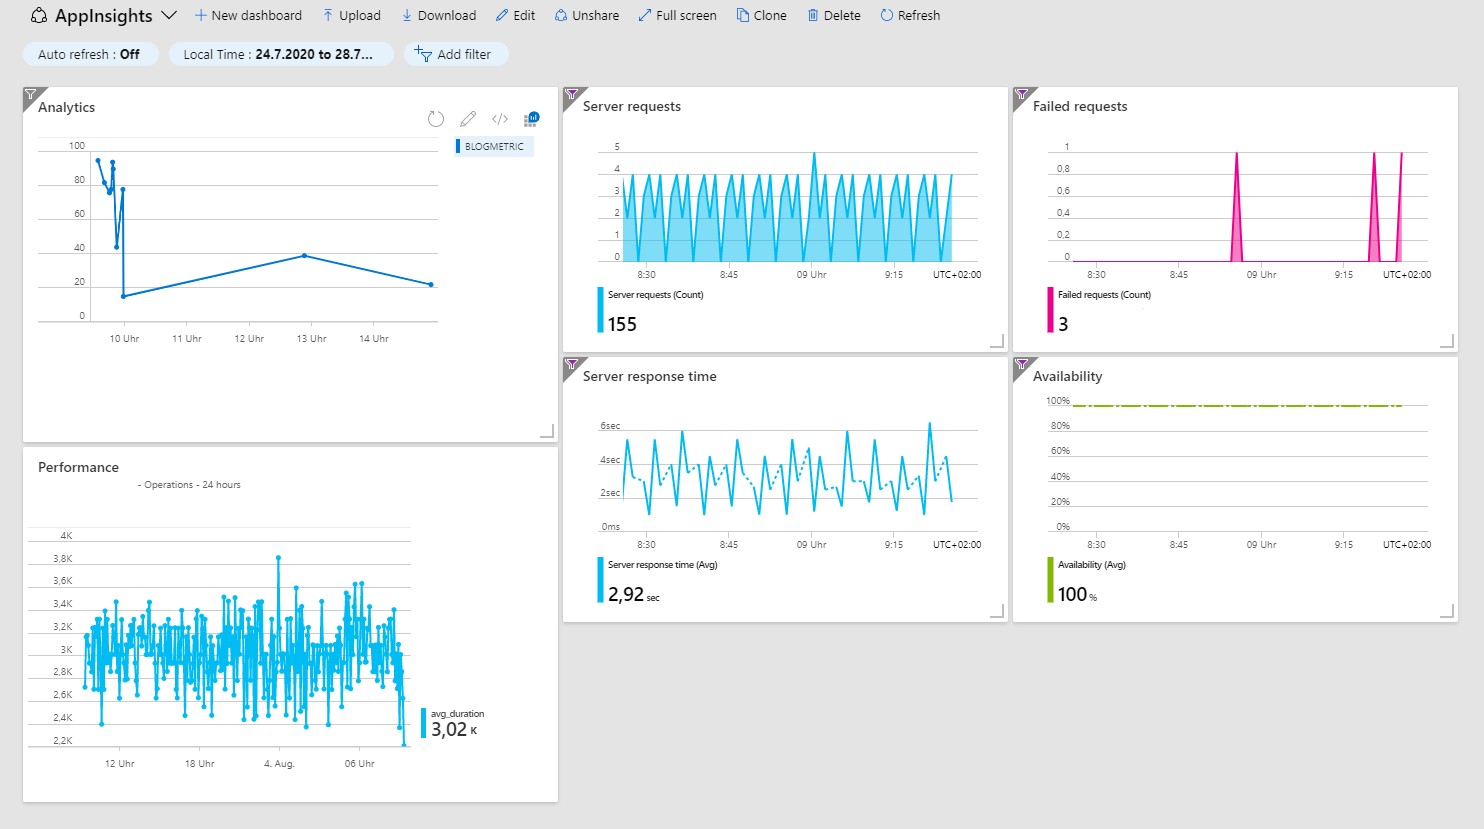
To identify irregularities at an early stage, you can create customized dashboards and alert rules. In the case of the metrics used above, you can pin the chart to an enabled dashboard. This can be continued with additional queries as desired until all the required information is compiled in an overview.
The following dashboard shows the metric of the console application. It also contains examples of information regarding server requests, incorrect queries, response times, and performance and availability (see Figure 4).
If an anomaly occurs at a time when you do not have an eye on the dashboard, it is also possible to be alerted immediately by email or text message by means of alert rules.
Individual alert rules can be created and managed in the Warnings menu in the Application Insights portal. An alert rule consists of a signal logic (condition) and an action group.
For the condition, you select a signal, e.g. a metric, and define a threshold: “traces greater than 80”. If you get more than 80 trace entries during a defined period of time, the alert is triggered.
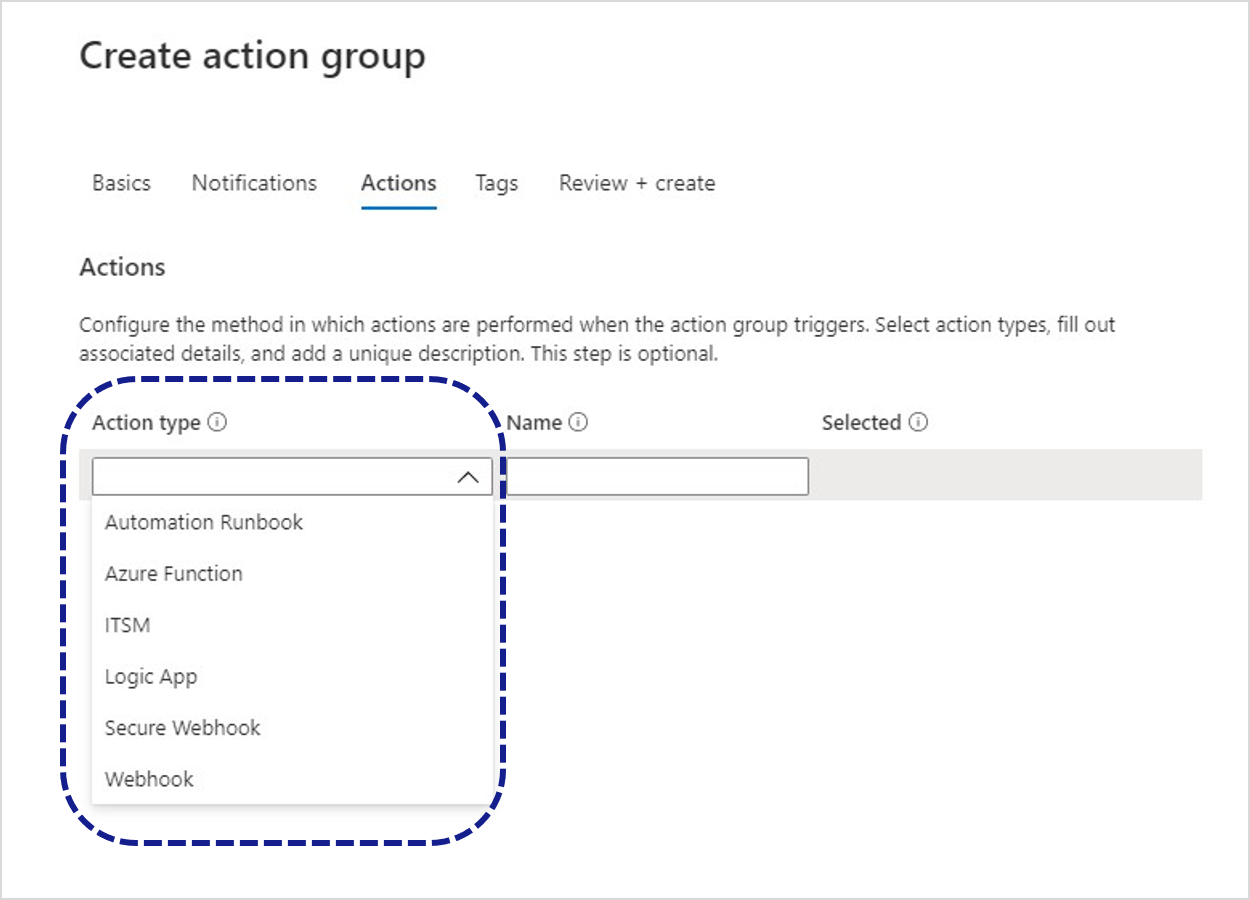
The action group defines precisely what is to be done in the case of an alert. Here, you can have simple notices sent to specified persons by email or text message, or program more complex actions by means of runbooks, Azure Functions, logic apps or webhooks (see Figure 5).
REST API
If it is necessary for the data to be processed outside of Application Insights as well, they can be requested by means of a REST API.
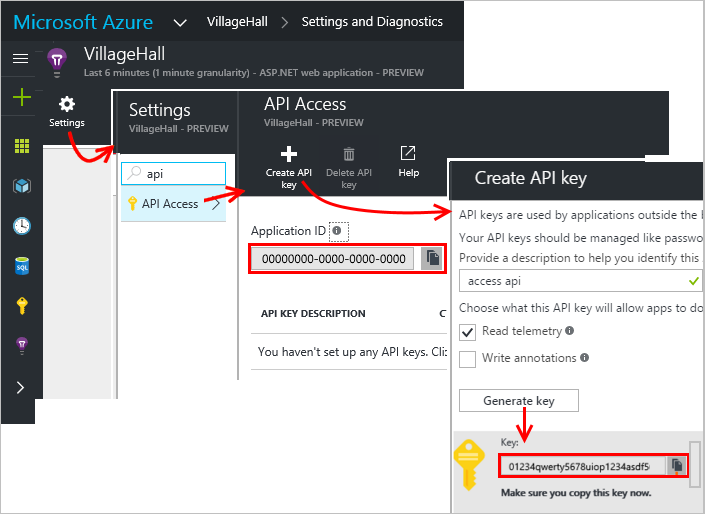
The URL for API requests consists of a basic part and the required operation. Operations are metrics, events or query. In addition, an API key has to be submitted as “X-API-Key” HTTP header:
https://api.applicationinsights.io/v1/apps/{app-id}/{operation}/[path]?[parameters]
The app ID can be found in the settings under API Access.
Continuing with the metrics described above, this is the API request with a query operation for the total number of entries during the last 24 hours:
https://api.applicationinsights.io/v1/apps/{}app-id}/query?query=customMetrics | where timestamp >= ago(24h) | where name contains “Blog” | summarize count()
ago(24h) | where name contains “Blog” | summarize count()
The result is returned in JSON format:
{
    "tables": [
        {
            "name": "PrimaryResult",
            "columns": [
                {
                    "name": "count_",
                    "type": "long"
                }
            ],
            "rows": [
                [
                    13
                ]
            ]
        }
    ]
}
Conclusion
As this example shows, centralized logging can easily be set up and managed by means of Application Insights. In addition to the quick and simple integration, the automated infrastructure is an advantage. No need to deal with the hosting, and if the load increases, Application Insights scales automatically.